Background
In our last post we described How to Run the Basic SPA Sample. Next we will take a closer look at HTTP messages used by our UI and API, to understand OAuth request and response payloads.
OAuth Workflows
Using an OAuth secured app generates a workflow of HTTP messages, starting from when the SPA is initially accessed, proceeding through to logins, then API calls, then dealing with token expiry and logouts.
This page will provide screenshots to visualise the partial workflow covered by the initial code sample when using AWS Cognito as the authorization server, and we will point out the most important behaviour.
Developer URLs
This blog recommends an OAuth development setup where three logical domains similar to the following are used on a development computer. This best enables thinking about the responsibility of each component.
| Component | Base URL |
|---|---|
| SPA | http://web.mycompany.com |
| API | http://api.mycompany.com |
| Authorization Server | http://login.mycompany.com |
When using an HTTP value for the SPA’s redirect URI, Cognito has a restriction on the using a localhost based value for the redirect URI. The code example manages this by redirecting back to the correct domain name when it receives a login response.
Viewing OAuth Messages
Most of the time I trace HTTP/S messages using a proxy tool rather than browser tools. This allows me to view traffic from both the SPA and API together. See the below post if you are new to this type of tool:
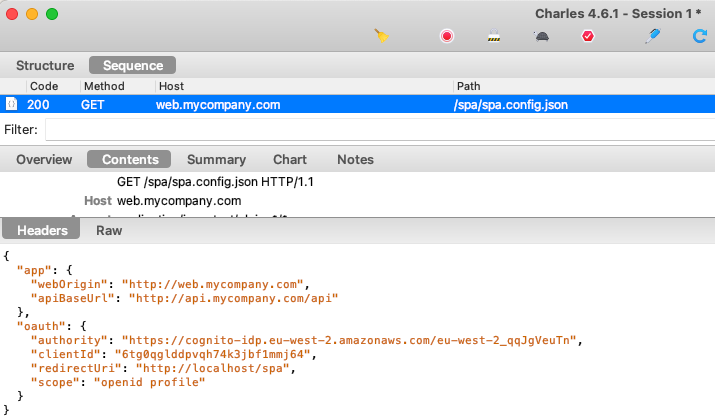
Step 1. SPA Downloads its Configuration
The sample first downloads configuration settings from the server, since I don’t want to hard code these details in Javascript code.
Step 2. A Login Redirect is Triggered
As part of loading views, the SPA looks for an existing access token. It does not have one yet, so the SPA asks the oidc-client-ts library to begin an authorization request.
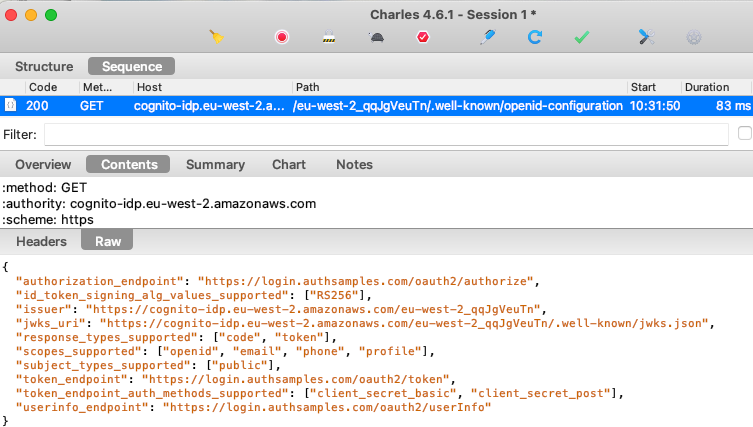
Step 3. SPA Gets OpenID Connect Metadata
The first thing the security library does is make a cross origin HTTP request to get OpenID Connect metadata at the below URL. In some systems you will need to enable CORS permissions for. this to work:
The metadata response includes details about the authorization server capabilities and its OpenID Connect endpoints:
Step 4. SPA Redirects to Authorization Endpoint
The oidc-client-ts library then creates an authorization redirect URL using OpenID Connect keywords. The SPA sets its location to this URL, to cause a front channel browser redirect to Cognito’s Authorization Endpoint:
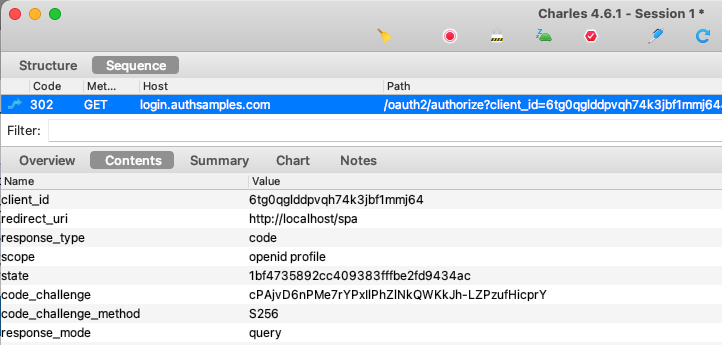
Authorization servers will check parameters and only allow requests from valid applications, whose Client ID and Redirect URI are registered as an OAuth client.
The Authorization Code Flow (PKCE) is recognised by the presence of the response_type=code and code_challenge parameters. Note also that we use the following scope parameters:
| Scope | Meaning |
|---|---|
| openid | OpenID Connect is being used as the sign in protocol |
| profile | Needed later to get the User’s Name from the User Info Endpoint |
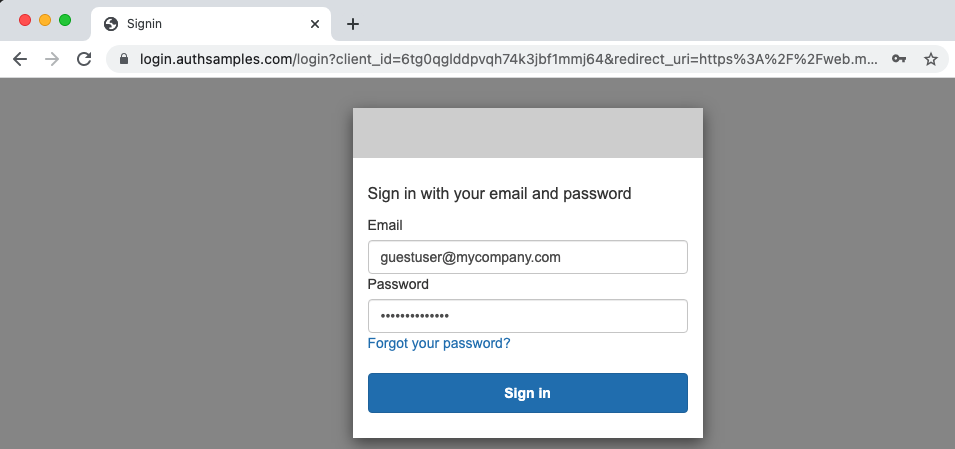
Step 5. User Authenticates
Next the login screen is presented and in a real app the user would type valid Cognito password credentials as proof of identity. In this blog however we are just using well known test users to allow anyone to sign in:
Step 6. An Authenticated User Session is Started
Once a login completes successfully, a session or ‘SSO’ cookie is set by the authorization server. In subsequent requests the authorization server knows the user is already signed in when it receives this cookie, and can avoid login prompts.
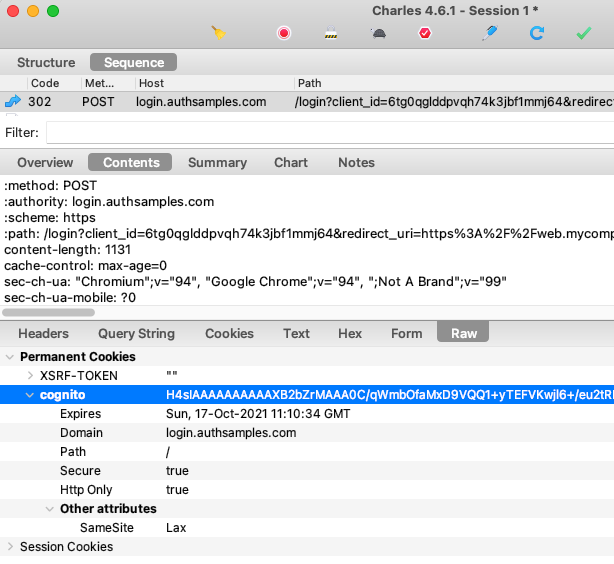
The most standard option for identity systems is to use SameSite=none, to inform browsers that this is a third party cookie. Cognito instead uses SameSite=lax which will cause some token renewal problems in later posts.
Step 7. An Authorization Response is Returned
Cognito then triggers a redirect back to the SPA with the successful authorization result, which is an Authorization Code. The SPA’s main page must then execute again and handle this login response:
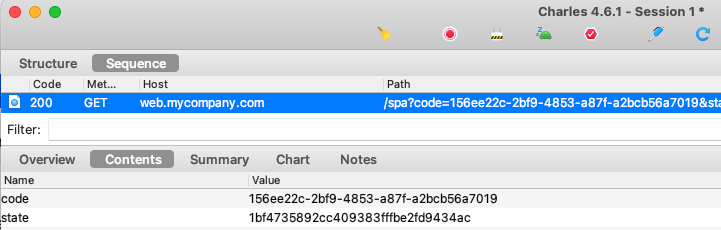
The security library takes care of OAuth security checks such as verifying that the response state parameter matches the request state parameter, so we do not have to write this type of code ourselves.
Step 8. SPA Swaps Code for Tokens
The SPA then makes a direct HTTPS back channel request to the Authorization Server’s Token Endpoint. This is an Authorization Code Grant message to swap the code for tokens:

In OAuth there are multiple grant messages and this is just one of them. The result of all grant messages is to receive tokens, and we have configured Cognito to return access tokens with a short 15 minute expiry.
An OAuth flow for SPAs should avoid returning refresh tokens to the browser, since it is a long lived credential and the browser has nowhere secure to store it. Yet AWS Cognito does not allow the refresh token to be disabled. The Final SPA will show a better way to deal with refresh tokens.
Step 9. Proof Key for Code Exchange is Used
PKCE is an extension to the original authorization code flow, and involves the following additional steps:
- UI generates a runtime secret (code_verifier) when beginning a login redirect
- UI sends a hash of the secret (code_challenge) in the authorization request
- UI posts the code verifier when exchanging the code for tokens
- Authorization server verifies that hash of the verifier matches the challenge received earlier, before issuing tokens
This protects against some types of attack, such as a malicious party sending an intercepted authorization code to the authorization server.
Step 10. Login Errors are Handled
Login requests can sometimes result in errors being returned, so let’s see an example of this. We will configure an invalid scope in our SPA, and ensure that the error is handled in a controlled manner:
{
    "app": {
        "webOrigin":        "http://web.mycompany.com",
        "apiBaseUrl":       "http://api.mycompany.com/api"
    },
    "oauth": {
        "authority":        "https://cognito-idp.eu-west-2.amazonaws.com/eu-west-2_qqJgVeuTn",
        "clientId":         "6tg0qglddpvqh74k3jbf1mmj64",
        "redirectUri":      "http://localhost/spa",
        "scope":            "openid profile xxx"
    }
}
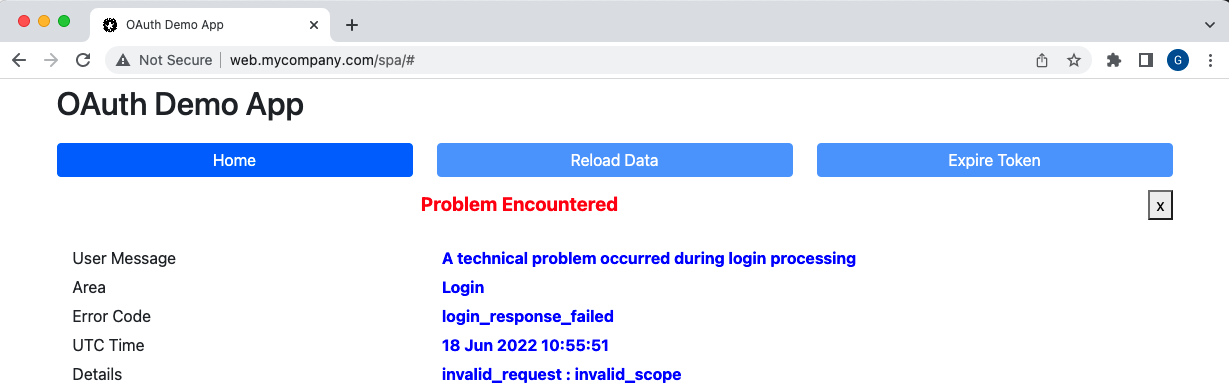
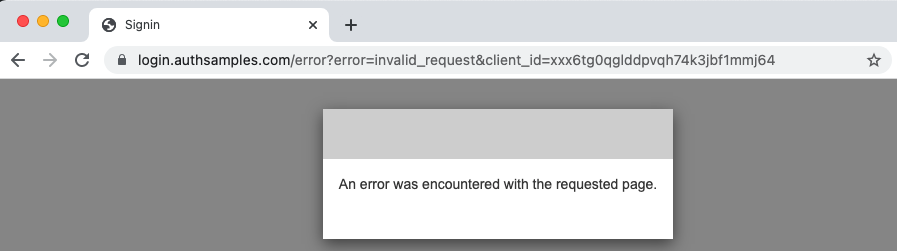
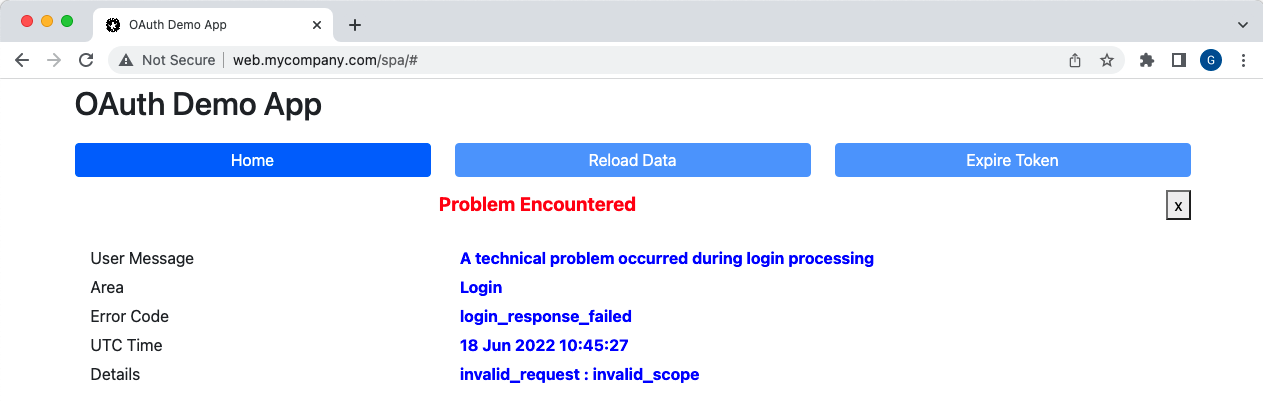
If a login redirect is attempted, we receive an error response, and it is standard for OAuth errors to be returned in error / error_description fields:
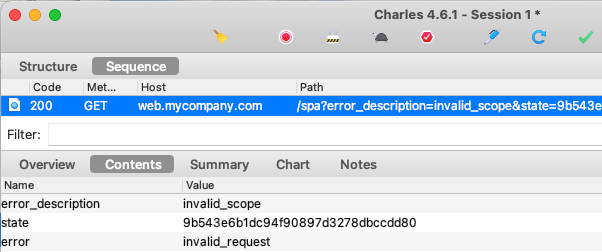
The error details are read for us by the oidc-client-ts library, and our UI presents the error in a clear manner to help with problem resolution:
Note also that errors are only returned to the client when a recognised Client ID and Redirect URI are provided, and if this is not the case the authorization server will render an error page instead:
Step 11. View Access Token Claims
After step 8 the SPA workflow typically continues by the SPA calling the API with an access token. First let’s view the token claims by pasting the JWT text into an Online Viewer:
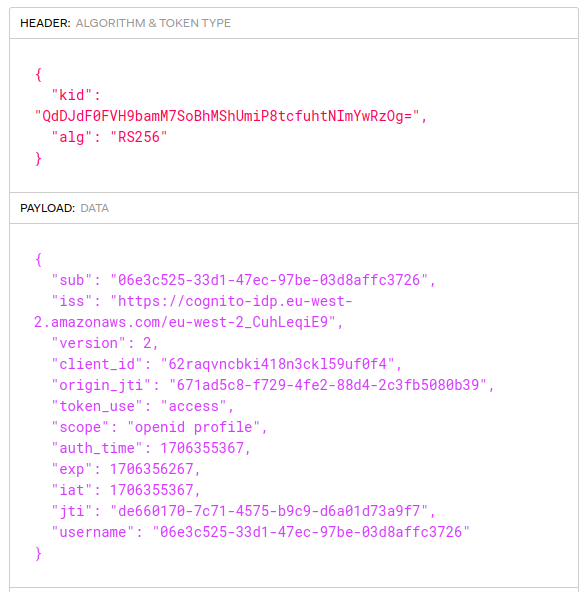
The token is a JWT that is digitally signed and which must be verified by APIs. The values in the payload are called ‘claims’ and the API can trust them after it has verified the digital signature:
- sub: A unique immutable identifier for the user
- iss: The authorization server that issued the token
- client_id: The identity of the SPA’s OAuth client
- scope: Scopes provide high level privileges for the token
- exp: The time when the token expires
Many authorization servers also issue an ‘aud‘ claim, where the audience can represent one or more related APIs that can accept the access token.
Currently the access token contains only generic protocol claims. For the second code sample it will be updated to include custom claims that the API uses for its business authorization.
Step 12. View ID Token Claims
Because the SPA included the openid scope, an ID Token is also received, which provides proof of authentication to the UI. The audience claim of this token is therefore the client ID of the SPA:
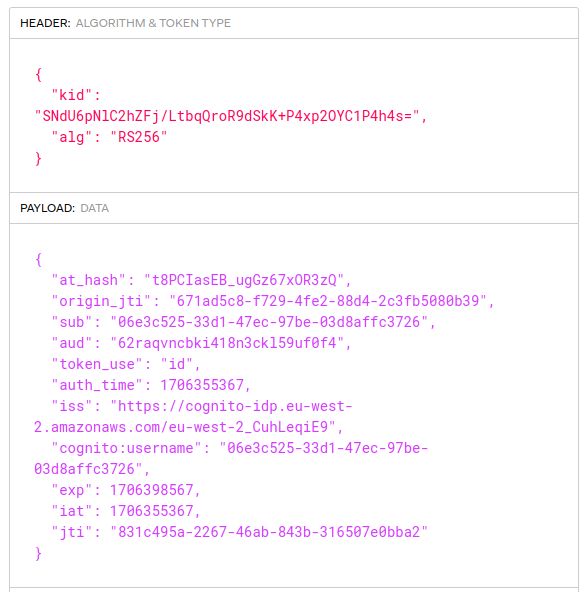
The ID Tokens post explains how I always configure the authorization server to exclude any personally data such as names and emails from ID tokens. This reduces security concerns about unintentionally revealing sensitive data.
Step 13. UI Downloads User Info
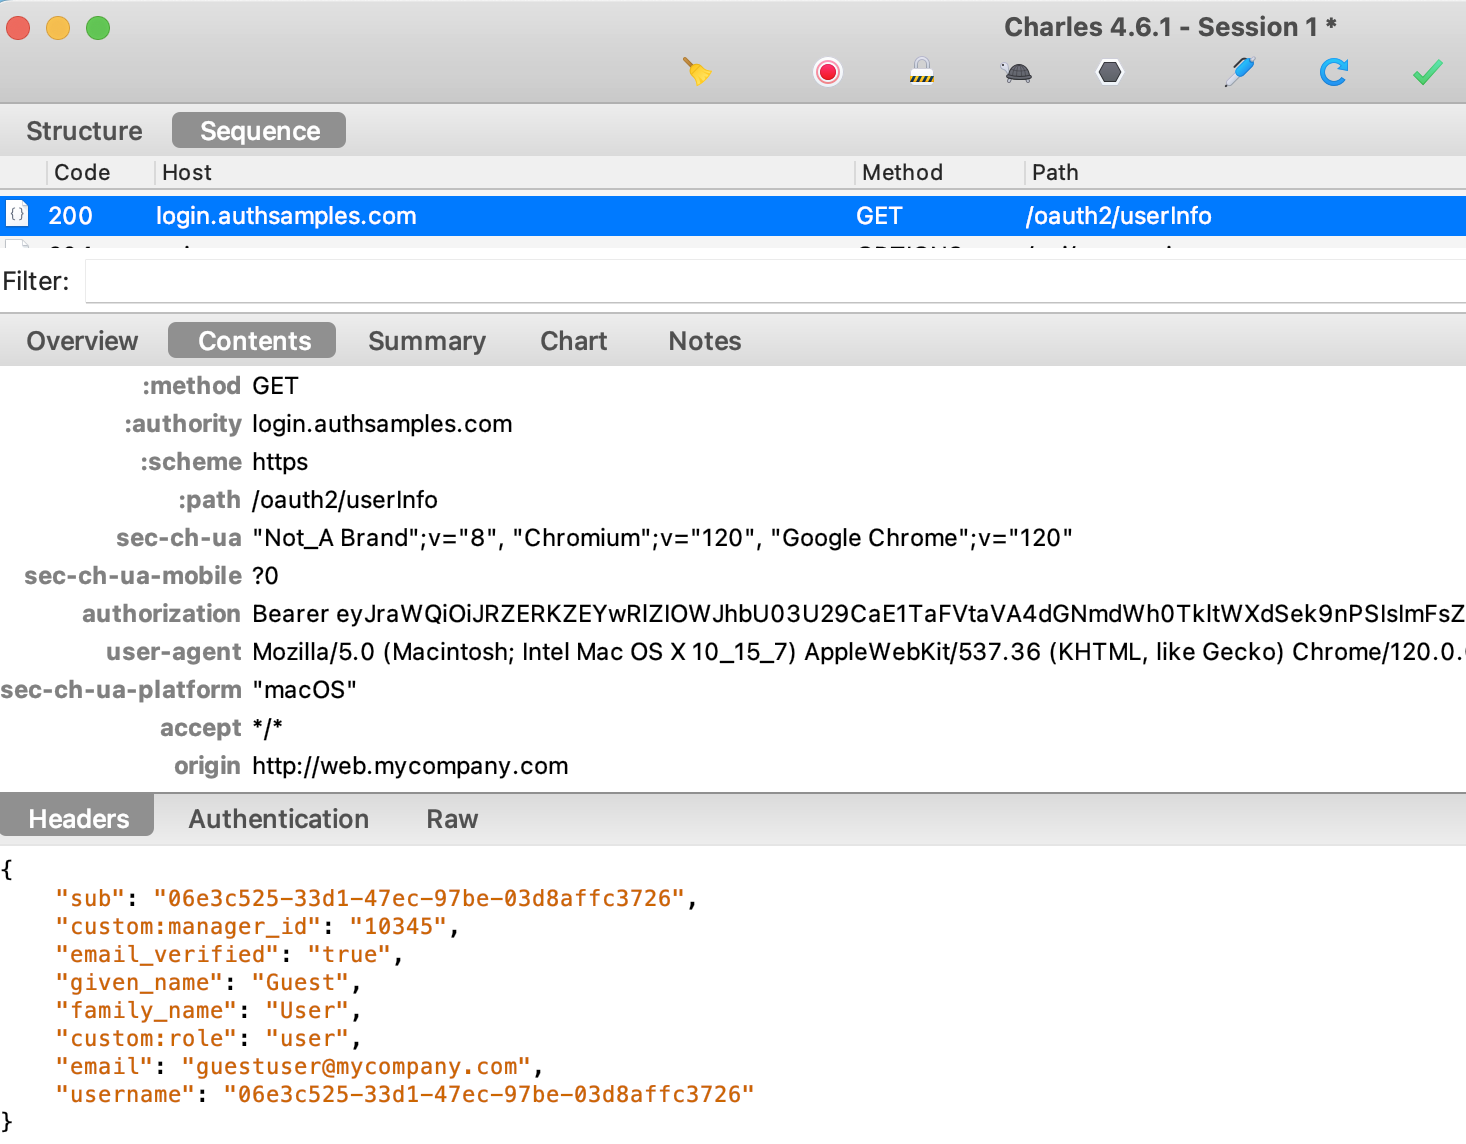
Next the oidc-client-ts library sends the access token to the authorization server’s User Info Endpoint, to get additional details for the user. I always code apps to receive personal data from this endpoint, rather than from the ID token:
Step 14. UI Stores Tokens and User Info
After login the SPA stores tokens and user info in Session Storage, so that if the page is refreshed the user does not need to re-login. We will use more secure options in future posts.
Step 15. SPA Calls API with Access Token
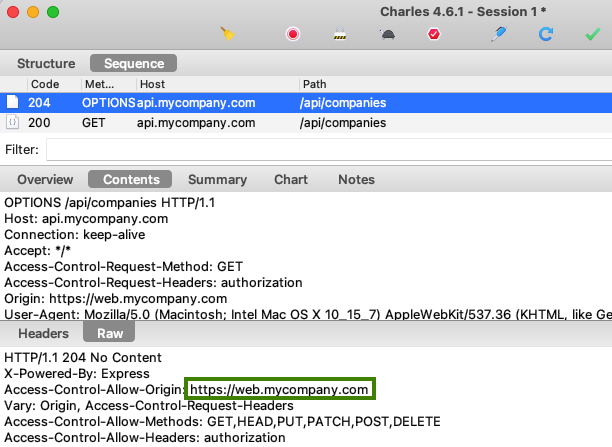
Next the SPA calls the API and, because this is a cross domain call, the browser first triggers a pre flight HTTP OPTIONS request. The API response to the pre-flight request Grants API Access to the Web Origin:
The actual API request then looks like this, and the access token is sent in the HTTP Authorization header as a bearer credential. Any party who has the access token can call the API like this:

Step 16. API Validates Access Token
When the API receives the token it is the API’s job to validate it, which typically involves checking the following:
| Property | Expectation |
|---|---|
| Issuer | The token is from our authorization server |
| Audience | The token was issued for our API |
| Digital Signature | The token has not been tampered with since issued |
| Active | The token is valid at the current time and not expired |
To verify the access token’s digital signature, the API must download token signing public keys from AWS Cognito. This is done when the JOSE security library calls the JWKS endpoint:
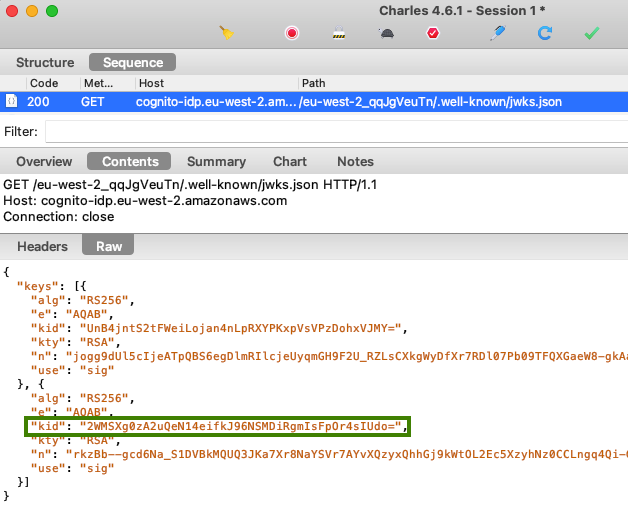
The response contains JSON Web Keys, and the security library selects the one that matches the key identifier (kid) in the access token’s JWT header. The library then forms a public key and uses it to digitally verify the JWT.
Any good API security library will then cache JSON Web Keys in memory to avoid unnecessary lookups on subsequent API requests, whose access tokens use the same key identifier.
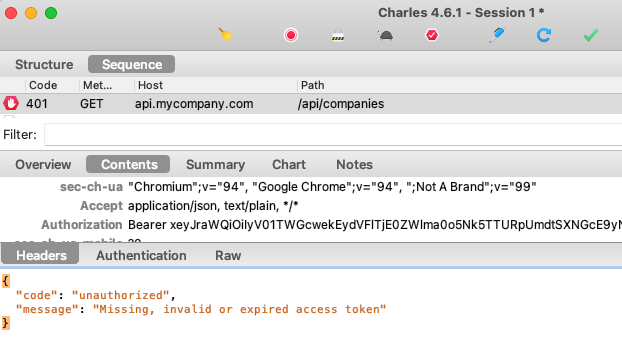
Step 17. API Returns Correct Error Status Codes
If the API’s token validation fails, the API must return one of these error statuses in the response:
- If the token is missing, invalid or expired, return a 401 response
- If there was a technical problem in the API, return a 500 response
It is worth testing these scenarios to ensure that the API returns useful error responses to the SPA. The second failure scenario can be tested by configuring an invalid JWKS endpoint in the API’s configuration:
{
    "api": {
        "port": 80,
        "trustedOrigins": [
            "http://web.mycompany.com"
        ],
        "useProxy": false,
        "proxyUrl": "http://127.0.0.1:8888"
    },
    "oauth": {
        "jwksEndpoint": "https://cognito-idp.eu-west-2.amazonaws.com/eu-west-2_qqJgVeuTn/.well-known/jwks.jsonxxx",
        "algorithm": "RS256",
        "issuer": "https://cognito-idp.eu-west-2.amazonaws.com/eu-west-2_qqJgVeuTn",
        "audience": ""
    }
}
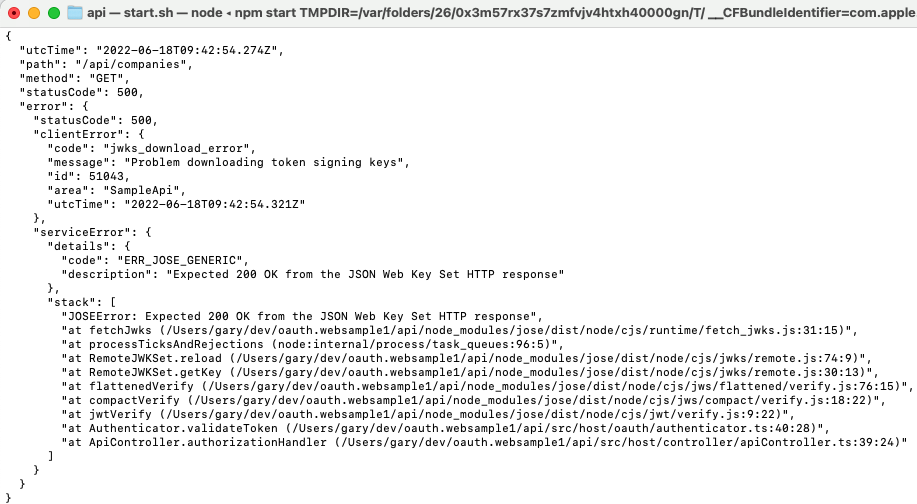
The API then returns a 500 error to the UI, since a technical problem has occurred that is not the fault of the client. This is clearly indicated in the error display, so that troubleshooting could focus on the API:
Meanwhile the API performs some basic but readable error logging, including the error returned to the client and the exception details. We will explore API supportability in more depth for future posts.
Step 18. API uses Claims for Authorization
Once token validation has completed, the API can trust claims from the JWT and use them to authorize access to data. A common check would be to only return data for the user identified by the subject from the access token:
- Filtering collections to only return items the user is entitled to
- Denying access if an unauthorized single item was requested
Step 19. API Returns 401 when the Token Expires
The UI will continue to use the access token until it expires 15 minutes after login, or the user closes their browser. This can be simulated by clicking Expire Token followed by Reload Data:
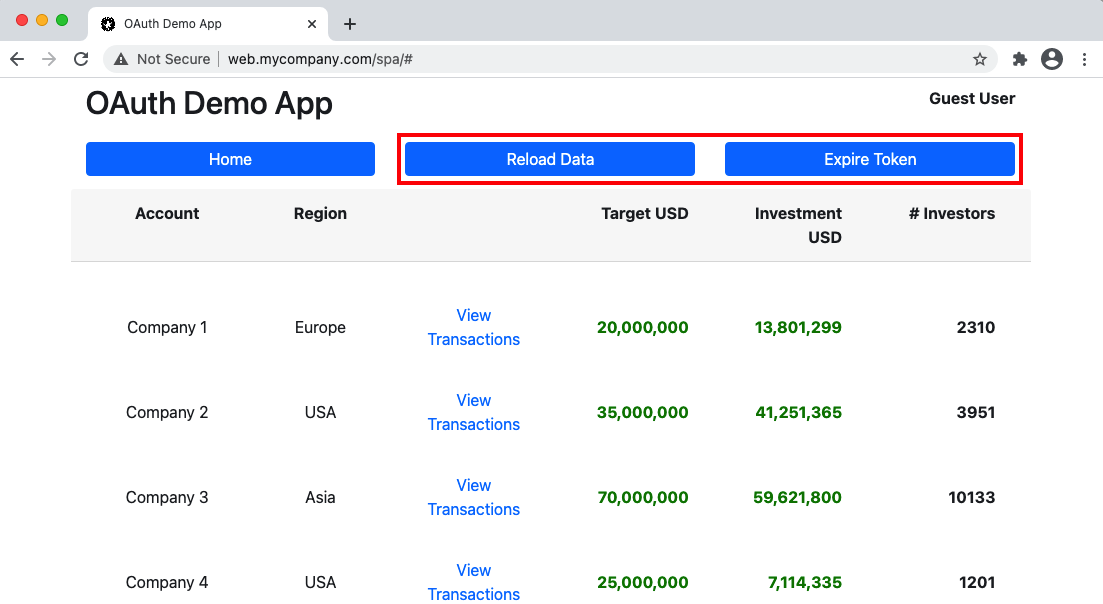
Of course we cannot really change time to expire a token, so this test operation simply adds characters to the token to cause the API token validation to fail with a 401:
Step 20. SPA Handles Access Token Expiry
The SPA is coded to expect 401 responses and deal with them without end user problems. No token renewal capability has been implemented yet, so the user is redirected to sign in again, which is not a good user experience.
Due to the SSO Session Cookie issued earlier, a Single Sign On occurs and new tokens are issued to the SPA automatically. The SPA can then continue to call the API with the new access token.
Understanding Additional OAuth Standards
Only a basic login flow is described above. The OpenID Connect specification provides a number of additional request parameters that can be used to control how authentication works and the values published to ID tokens.
Once you have a productive process for tracing HTTP requests in both browser and non-browser components, you will be able to debug many other OAuth and OpenID Connect flows in the same way.
Where Are We?
We have used OAuth technologies to securely integrate our SPA and API with an authorization server, and we understand the messages used. The initial end-to-end flow is missing some web and API lifecycle behaviours, and these will be addressed in the next code sample.
Next Steps
- Basic SPA Code Sample – Coding Key Points
- For a list of all blog posts see the Index Page