Background
Previously we introduced our Final Desktop Sample and explained its key behaviour. This post summarizes the main coding techniques. See also the Client Side API Journey to understand the background and the requirements being met.
React Update
We have updated our Electron app to use React. This mostly involved just copying in the completed views from our earlier React SPA, and the desktop app uses many of the same coding techniques.
return (
    <>
        <TitleView {...getTitleProps()} />
        <HeaderButtonsView {...getHeaderButtonProps()} />
        {model.error && <ErrorSummaryView {...getErrorProps()} />}
        <>
            <SessionView {...getSessionProps()} />
            <Routes>
                <Route path='/'              element={<CompaniesContainer {...getCompaniesProps()} />} />
                <Route path='/companies/:id' element={<TransactionsContainer {...getTransactionsProps()} />} />
                <Route path='/loggedout'     element={<LoginRequiredView {...getLoginRequiredProps()} />} />
                <Route path='*'              element={<CompaniesContainer {...getCompaniesProps()} />} />
            </Routes>
        </>
    </>
);
The only real difference in React coding is that the HashRouter must be used in Electron apps. The renderer side of the app, in the renderer.tsx source file, therefore starts a Single Page Application as follows:
const root = ReactDOM.createRoot(document.getElementById('root') as HTMLElement);
const props = {
    viewModel: new AppViewModel(),
};
root.render (
    <StrictMode>
        <ErrorBoundary>
            <HashRouter>
                <App {...props} />
            </HashRouter>
        </ErrorBoundary>
    </StrictMode>
);
Electron Security Updates
We have updated our app to follow Electron Security Recommendations so that code running in the Chromium browser use low privileges and the best practice settings:
this._window = new BrowserWindow({
    width: 1280,
    height: 720,
    minWidth: 800,
    minHeight: 600,
    webPreferences: {
        nodeIntegration: false,
        contextIsolation: true,
        sandbox: true,
        preload: path.join(app.getAppPath(), './preload.js'),
    },
});
We will cover further details of security related code changes at the end of this post. First we will describe how features for Private URI Schemes and Secure Token Storage were implemented.
Private URI Scheme Registration
In our Main process we register our Private URI Scheme at application startup, which writes to user specific areas of the operating system:
private async _registerPrivateUriScheme(): Promise<void> {

    if (process.platform === 'win32') {

        app.setAsDefaultProtocolClient(
            this._configuration!.oauth.privateSchemeName,
            process.execPath,
            [app.getAppPath()]);

    } else {
        app.setAsDefaultProtocolClient(this._configuration!.oauth.privateSchemeName);
    }
}
In order to receive private URI scheme notifications deterministically, the desktop app restricts itself to a single running instance:
public execute(): void {

    const primaryInstance = app.requestSingleInstanceLock();
    if (!primaryInstance) {
        app.quit();
        return;
    }
}
Sending Private URI Scheme Notifications
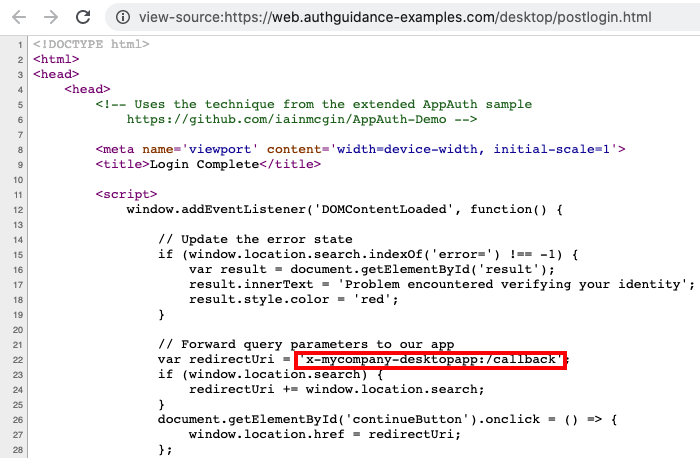
As discussed in the previous post, the response to OAuth login and logout operations originates from an Interstitial Web Page. The following code then invokes a deep link to return the authorization code to the app:
Receiving Deep Links
When the URL is invoked, the operating system raises an event that the app subscribes to, which executes the following code:
private _handleDeepLink(deepLinkUrl: string): void {

    if (this._window) {

        if (this._window.isMinimized()) {
            this._window.restore();
        }

        this._window.focus();
    }

    this._ipcEvents.handleDeepLink(deepLinkUrl);
}
The main process first asks an OAuth class to process the deep link if it is a login or logout response. Otherwise, the notification is considered to be a general deep link and is forwarded to the React app:
public handleDeepLink(deepLinkUrl: string): boolean {

    if (this._authenticatorService.handleDeepLink(deepLinkUrl)) {
        return true;
    }

    const url = UrlParser.tryParse(deepLinkUrl);
    if (url && url.pathname) {
        const path = url.pathname.replace(this._configuration.oauth.privateSchemeName + ':', '');
        this._window!.webContents.send(IpcEventNames.ON_DEEP_LINK, path);
    }

    return false;
}
Resuming OAuth Operations
As for our first desktop sample, login and logout responses are processed based on the OAuth state parameter. This enables us to find and resume the calback that was created when the system browser was opened:
public handleLoginResponse(queryParams: any): void {

    const state = queryParams.state;
    if (state) {
        const callback = this._getCallbackForState(queryParams.state);
        if (callback) {
            callback(queryParams);
            this._clearState(state);
        }
    }
}
Secure Token Storage
A TokenStorage class is used, to wrap the use of Electron safe storage. This object manages saving, loading and deleting tokens. These are stored in encrypted text files for the logged in user account:
public load(): TokenData | null {

    try {

        const encryptedBytesBase64 = this._store.get(this._key);
        if (!encryptedBytesBase64) {
            return null;
        }

        const json = safeStorage.decryptString(Buffer.from(encryptedBytesBase64, 'base64'));
        return JSON.parse(json);

    } catch (e: any) {

        return null;
    }
}
The OAuth processing code calls the TokenStorage class after the following events:
- When the Desktop App Starts, to load tokens
- After the Authorization Code Grant, to save tokens
- After the Refresh Token Grant, to update tokens
- When the user Logs Out, to remove tokens
Concurrent Operations
React renders our desktop app’s views in a non deterministic sequence, so the following two views can call an API in parallel:
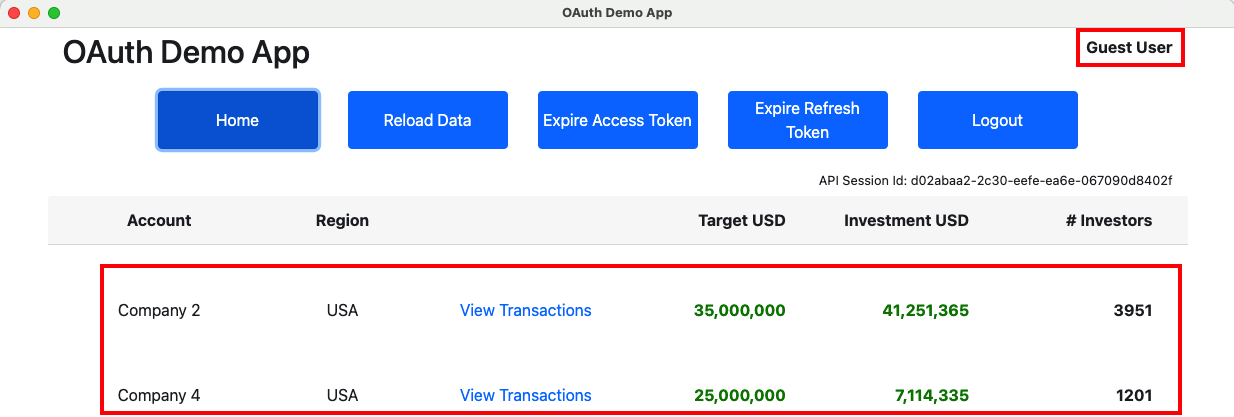
This can lead to the following scenarios and the desktop app handles concurrency correctly in all cases. This is done using the same coding techniques as the earlier React SPA:
- One or both views could experience a technical error
- One or both views may need to refresh an access token
- One or both views may need to trigger a login redirect
Electron Browser Settings
In our initial code sample we included Javascript code in our index.html page via a require statement. This no longer works with Node integration disabled, so we now bundle the Javascript code for the Electron Renderer Process, then reference bundles in the index.html file, as for the final SPA:
<!DOCTYPE html>
<html lang='en'>
    <head>
        <meta charset='utf-8'>
        <title>OAuth Demo App</title>

        <link rel='stylesheet' href='bootstrap.min.css'>
        <link rel='stylesheet' href='app.css'>
    </head>
    <body>
        <div id='root' class='container'></div>

        <script type='module' src='vendor.bundle.js'></script>
        <script type='module' src='app.bundle.js'></script>
    </body>
</html>
The main side of the app also implements a Content Security Policy for the React app:
session.defaultSession.webRequest.onHeadersReceived((details, callback) => {

    let policy = '';
    if (this._useBasicContentSecurityPolicy) {

        policy += "script-src 'self' 'unsafe-eval'";

    } else {

        const trustedHosts = this._configuration!.app.trustedHosts.join(' ');
        policy += "default-src 'none';";
        policy += " script-src 'self';";
        policy += ` connect-src 'self' ${trustedHosts};`;
        policy += " child-src 'self';";
        policy += " img-src 'self';";
        policy += " style-src 'self';";
        policy += " object-src 'none';";
        policy += " frame-ancestors 'none';";
        policy += " base-uri 'self';";
        policy += " form-action 'self'";
    }

    callback({
        responseHeaders: {
            ...details.responseHeaders,
            'Content-Security-Policy': [policy],
        },
    });
});
Compiled Electron Code
A single code base is used for main and renderer processes, which provides the simplest development setup. At deployment time I separated concerns to produce the following self-contained assets ready to deploy. Webpack is used to pull out code from the node_modules folder into bundles:
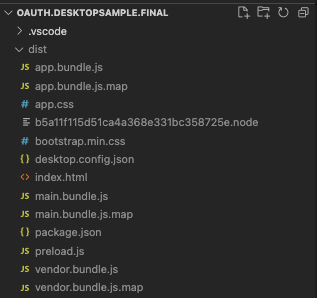
The main app is built into a main.bundle.js file using the following webpack configuration. This bundle only contains code used by the main.ts entry point and does not include any code for React views. Similarly, renderer bundles only contain code used by the renderer.tsx entry point:
import path from 'path';
import webpack from 'webpack';

const dirname = process.cwd();
const config: webpack.Configuration = {

    target: ['electron-main'],
    experiments: {
        outputModule: true,
    },

    devtool: 'source-map',
    context: path.resolve(dirname, './src'),

    entry: {
        app: ['./main.ts']
    },
    module: {
        rules: [
            {
                test: /\.ts$/,
                use: [{
                    loader: 'ts-loader',
                    options: {
                        onlyCompileBundledFiles: true,
                        configFile: '../tsconfig-main.json',
                    },
                }],
                exclude: /node_modules/,
            }
        ]
    },
    resolve: {
       extensions: ['.ts', '.js']
    },
    output: {
       path: path.resolve(dirname, './dist'),
        filename: 'main.bundle.js',
        chunkFormat: 'module',
    }
};

export default config;
The ts-loader module is instructed to use distinct tsconfig.json files for the main and renderer processes. Note also that the outputModule and chunkFormat parameters are required to build ECMAScript output for the main bundle and to avoid the use of the older CommonJS output format.
Inter Process Communication
High privilege operations such as opening the system browser or using secure token storage cannot be implemented by the React app. Instead it must use IPC events. A number of these are defined:
export class IpcEventNames {

    public static readonly ON_GET_COMPANIES = 'api_companies';
    public static readonly ON_GET_TRANSACTIONS = 'api_transactions';
    public static readonly ON_GET_OAUTH_USER_INFO = 'api_oauthuserinfo';
    public static readonly ON_GET_API_USER_INFO = 'api_userinfo';

    public static readonly ON_LOGIN = 'oauth_login';
    public static readonly ON_LOGOUT = 'oauth_logout';
    public static readonly ON_TOKEN_REFRESH = 'oauth_tokenrefresh';
    public static readonly ON_CLEAR_LOGIN_STATE = 'oauth_clearstate';
    public static readonly ON_EXPIRE_ACCESS_TOKEN = 'oauth_expireaccesstoken';
    public static readonly ON_EXPIRE_REFRESH_TOKEN = 'oauth_expirerefreshtoken';

    public static readonly ON_DEEP_LINK_STARTUP_PATH = 'get_startup_url';
    public static readonly ON_DEEP_LINK = 'private_scheme_url';
}
A Preload Script is used to define an API with which the renderer process can request the main process to perform a higher security operation. This makes a ‘window.api‘ object available to the React apps’ JavaScript code.
const {contextBridge, ipcRenderer} = require('electron');

contextBridge.exposeInMainWorld('api', {

    sendIpcMessage: async function(name, requestData) {

        return new Promise((resolve) => {

            ipcRenderer.send(name, requestData);
            ipcRenderer.on(name, (event, responseData) => {
                resolve(responseData);
            });
        });
    },

    receiveIpcMessage: function(name, callback) {

        ipcRenderer.on(name, (event, responseData) => {
            callback(responseData);
        });
    }
});
The React app uses a RendererIpcEvents entry point for sending IPC events. OAuth and API operations are forwarded to the main process:
export class RendererIpcEvents {

    public async getCompanyList(options: FetchOptions) : Promise<any> {
        return await this._sendRequestResponseIpcMessage(IpcEventNames.ON_GET_COMPANIES, {options});
    }

    public async getCompanyTransactions(id: string, options: FetchOptions) : Promise<any> {
        return await this._sendRequestResponseIpcMessage(IpcEventNames.ON_GET_TRANSACTIONS, {id, options});
    }

    public async login(): Promise<void> {
        await this._sendRequestResponseIpcMessage(IpcEventNames.ON_LOGIN, {});
    }

    public async logout(): Promise<void> {
        await this._sendRequestResponseIpcMessage(IpcEventNames.ON_LOGOUT, {});
    }

    public async tokenRefresh(): Promise<void> {
        await this._sendRequestResponseIpcMessage(IpcEventNames.ON_TOKEN_REFRESH, {});
    }
}
These requests are received by a MainIpcEvents entry point in the main process, which returns a result or an error response to the caller:
export class MainIpcEvents {

    public register(): void {

        ipcMain.on(IpcEventNames.ON_GET_TRANSACTIONS, this._onGetCompanyTransactions);
        ipcMain.on(IpcEventNames.ON_LOGIN, this._onLogin);
        ipcMain.on(IpcEventNames.ON_TOKEN_REFRESH, this._onTokenRefresh);
    }

    private async _onGetCompanyTransactions(event: IpcMainEvent, args: any): Promise<void> {

        await this._processAsyncRequestResponseIpcMessage(
            IpcEventNames.ON_GET_TRANSACTIONS,
            () => this._fetchService.getCompanyTransactions(args.id, args.options));
    }

    /*
     * Run a login redirect on the system browser
     */
    private async _onLogin(): Promise<void> {

        await this._processAsyncRequestResponseIpcMessage(
            IpcEventNames.ON_LOGIN,
            () => this._authenticatorService.login());
    }

    private async _onTokenRefresh(): Promise<void> {

        await this._processAsyncRequestResponseIpcMessage(
            IpcEventNames.ON_TOKEN_REFRESH,
            () => this._authenticatorService.tokenRefresh());
    }
}
OAuth and API Classes
The following main classes are used to handle OAuth and API logic. The strategy is to drive behaviour from the renderer process so that the React app is in control. The interplay is a little intricate, since the app also handles many error conditions.
| Class | Responsibilities |
|---|---|
| FetchClient | A forwarder that also manages client side caching of API responses |
| FetchService | Does the main work of sending API requests with access tokens to the remote API endpoints |
| AuthenticatorClient | A forwarder to initiate login and token related operations |
| AuthenticatorService | Does the main work of integrating with the AppAuth-JS library to trigger login and token requests, then handle responses |
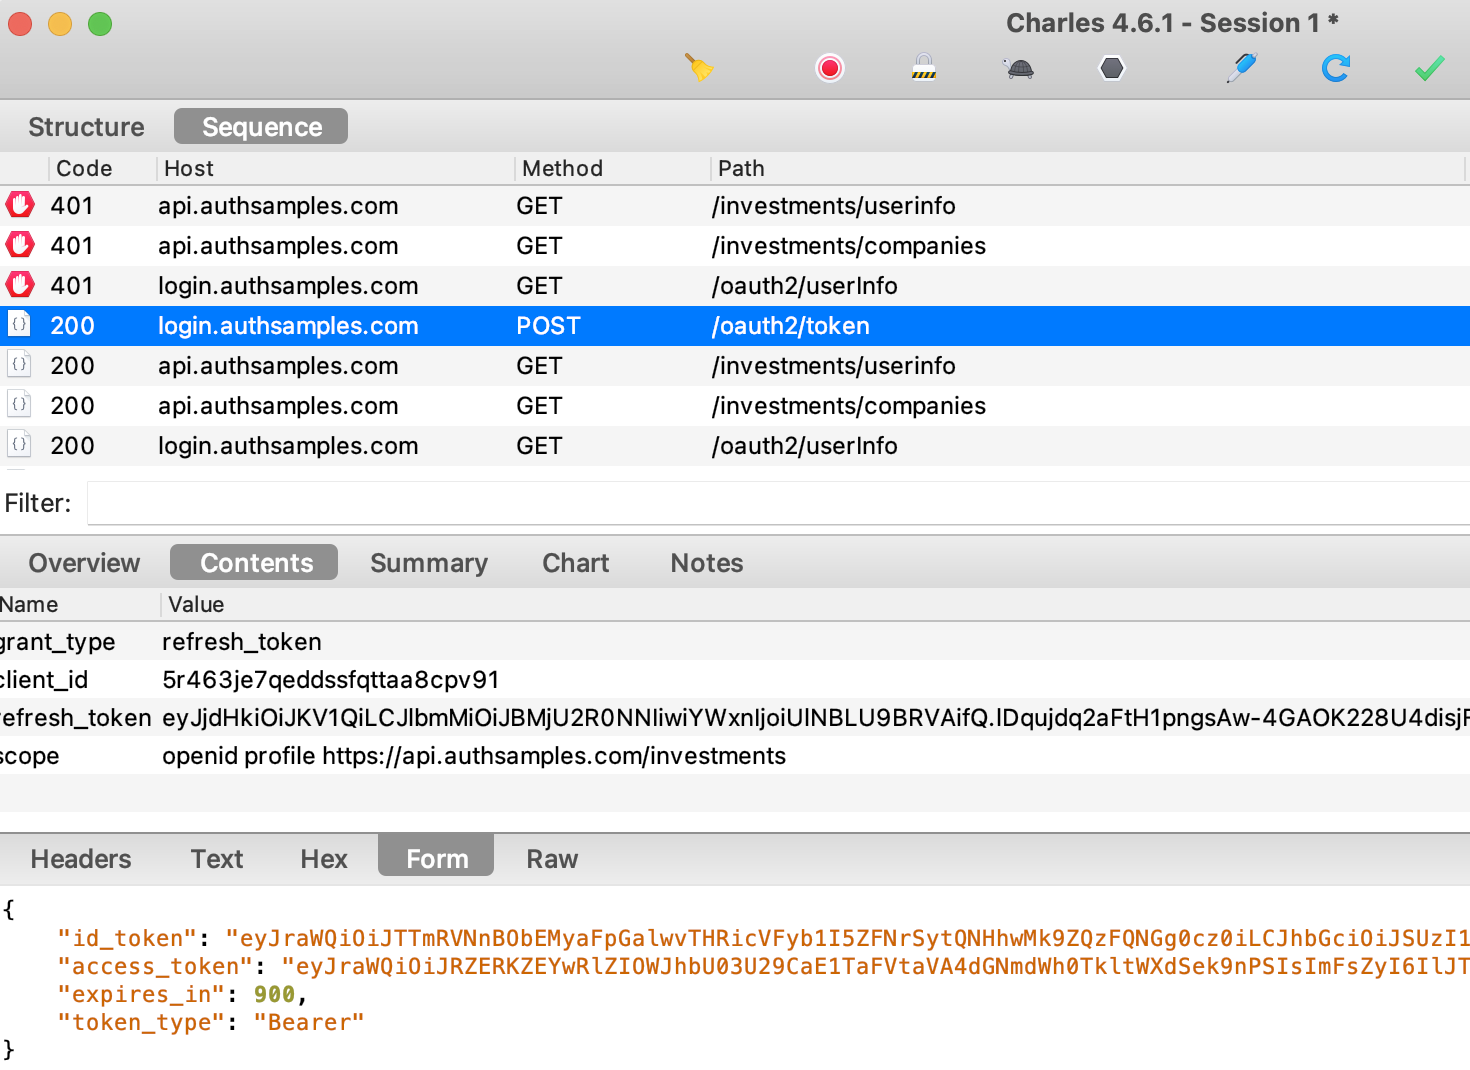
Debugging HTTP Requests
Since all OAuth and API requests are sent from the main side of the app, you won’t see any HTTP requests in the Electron Dev Tools. To view the HTTP requests you instead need to run an HTTP proxy tool.
To do so, set useProxy=true in the desktop.config.json file. To enable SSL trust for the proxy root certificate on a development computer, first set the following environment variable. This is a hack to work around problems where NODE_EXTRA_CA_CERTS is broken in ElectronJS:
export NODE_TLS_REJECT_UNAUTHORIZED=0
./build.sh
./run.sh
You will then see that the desktop app sends requests with tokens and acts as a public client, as is standard for a desktop app.
AppAuth Libraries
This blog demonstrates mobile integration using the recommendations from RFC8252. Doing so does not mandate use of the AppAuth libraries though. If you run into any library blocking issues, the code flow could be implemented fairly easily in the AuthenticatorImpl class.
Where Are We?
We have updated the Electron Desktop App with new features that improve usability and security, and have now completed this blog’s desktop app. Next we will begin coverage of OAuth for mobile apps.
Next Steps
- Next we will discuss Android Setup and run the AppAuth code sample
- For a list of all blog posts see the Index Page