Background
The previous post on User Data Management ensured that a subset of user attributes are stored in the authorization server. In this post we will focus on data protection in APIs, using identity attributes issued to access tokens.
The security techniques for OAuth API authorization are published in many online articles. This post summarizes some security best practices, but its main focus is manageability, for scalable authorization.
Managing API Authorization
The end-to-end flow to get data in a client might look like this, where a token containing the user identity is sent and then authorization is enforced by one or more APIs: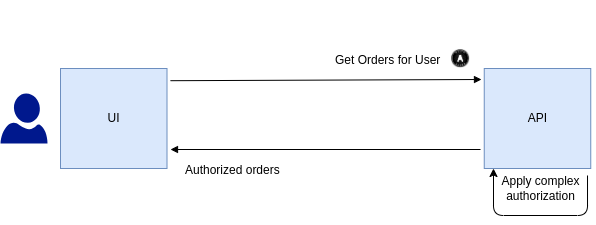
The above example might include handling business rules like these:
- User bob has full access to orders from his own branch
- User bob has read access to orders from other branches in his area
- User bob has no access to orders from branches in other areas
In some cases, end-to-end flows involve multiple APIs. Each API team should be able to manage authorization productively, without depending too much on an identity team. Achieving this outcome requires an authorization design where scopes and claims are designed with insight.
API Authorization Steps
The OAuth 2.0 authorization framework is primarily about protecting business data using access tokens. You can think of it as three main steps:
| Step | Description |
|---|---|
| Token Validation | JWT Access Token Validation, to ensure integrity of the message credential |
| Scope Checks | Sanity checks to ensure that an access token is allowed to be used for a particular business area |
| Claims Based Authorization | Detailed permission checks against resources, using claims to apply business rules |
Step 1: Token Validation
The JWT Access Token Validation post described how an API verifies the JWT’s digital signature. If the token is not valid a 401 error is returned:
{
  "code": "invalid_token",
  "message": "Missing, invalid or expired access token"
}
Think of token validation as an entry level check to authenticate the request to the API, after which the API can trust data in the access token’s payload.
Step 2: Scopes
Access tokens are used to restrict API privileges granted to clients. This starts by assigning one or more scopes to the OAuth client when it is registered in the authorization server.
The OAuth 2.0 specification does not define how scopes should be used, and that is up to each architect to design. Often a good choice is to do so based on business area, starting with high level values:
| Examples | Usage |
|---|---|
| sales | Access tokens can call API endpoints that deal with sales, such as in an online retail use case |
| finance | Access tokens can call API endpoints that deal with more security sensitive areas, related to finance and money |
A client that is issued an access token with only a ‘sales‘ scope can never call ‘finance‘ API endpoints. This would be immediately rejected by the API, with a 403 forbidden error. This is true even if the user has finance rights.
Scaling Scopes
Scopes are fixed at design time and typically cannot be used for dynamic purposes, such as different scopes for different types of user. Aim to keep scopes fairly high level, since creating too many scopes too early can result in productivity problems.
As APIs scale it is common for them to call each other. All of them must validate an access token, such as by forwarding the token between APIs. Solutions such as creating a separate scope for each microservice can work against this goal.
Built-In Scopes
In addition to business scopes, user facing applications typically use OpenID Connect built-in scopes, which represent areas of the user’s personal data. These tend to be more fine-grained than the business scopes:
| Examples | Usage Scenario |
|---|---|
| openid | Allows an app to use the user’s identity |
| profile | Allows an app to get a user’s name related information |
| Allows an app to access a user’s email address(es) | |
| phone | Allows an app to access a user’s phone number(s) |
Audience Checks
APIs also have an expected audience. This provides a way to group APIs together, to enable access tokens to be shared, or to prevent it. In a small microservices setup, one option is to use values like this:
| API | Audience |
|---|---|
| Orders | api.mycompany.com |
| Products | api.mycompany.com |
| Billing | api.mycompany.com |
Step 3: Claims
The deeper authorization behaviour in OAuth is using claims effectively. Claims are trusted values used for user identification and authorization. The following main requirements exist when designing claims:
| Requirement | Description |
|---|---|
| Least Privilege | The client receives a least privilege access token, rather than being granted all of a user’s privileges |
| Correct Authorization | The API must receive an object that enables it to implement its business authorization |
| Access Token Confidentiality | Access tokens returned to internet clients should not reveal the scopes and claims |
| API Manageability | Frequent coordinated rollouts of APIs and the authorization server should not be required |
Access Token Claims
The authorization server issues claims based on the scopes configured against the client. The authorization server setup blog post explains how this works for this blog’s example setup in AWS Cognito, where a lambda function issues different custom claims depending on the scope.
In some cases, claims issued are dynamic. APIs cannot always decide how to authorize solely from a user ID in an access token. Sometimes they instead need to be provided with values by the access token.
Access Token Confidentiality
Access tokens are only meant to be read by APIs. Ideally, clients should not be able to read access tokens. As a privacy best practice, some authorization servers can issue access tokens in a ‘reference‘ or ‘opaque‘ format to internet clients.
When APIs receives opaque access tokens they can then use OAuth token introspection to get the claims. Ideally this should be done in an API gateway, and the authorization server should return claims as a JWT. The API gateway can then forward the JWT to APIs.
Claims Principal
After APIs validate their JWT access token, the claims in the JWT payload are trusted, since the API has cryptographically proven that they were issued by the authorization server.
These claims then form a claims principal object that is injected into service logic classes. The values the API logic needs to implement its authorization are then readily available:
export class CompanyService {

    private readonly _repository: CompanyRepository;
    private readonly _claims: ClaimsPrincipal;

    public constructor(repository: CompanyRepository, claims: ClaimsPrincipal) {
        this._repository = repository;
        this._claims = claims;
    }
}
A well designed claims principal expresses your API’s main authorization and is useful to your API’s code. It help to enable API security code that is easy to use and extend over time.
Extensible Claims
There are also a few deeper behaviours you may run into later in your API journey that require you to refine your claims design:
| Requirement | Description |
|---|---|
| Technology Limitations | Some authorization servers may have limitations meaning you cannot issue your desired claims |
| Versioning and Compatibility | The access token claims should be stable as your business authorization evolves |
| Manageability and Deployment | You should not need to continually deploy APIs and the authorization server together |
If you run into this type of issue, you can use a secondary technique that still forms the best claims principal for each API, without introducing productivity problems. This involves receiving the main identity claims in the JWT access token, after which the API looks up fine grained permissions from its own data:

This results in a claims principal object whose overall contents an API team can control, without depending on an identity team:
export class ClaimsPrincipal {
    public jwtClaims: JWTPayload;
    public extraClaims: ExtraClaims;
}
This blog’s API code examples use this technique. It provides additional choices but should not be overused. True claims are those asserted by the authorization server. The main identity values should always be issued to access tokens when possible.
This Blog’s Example Claims
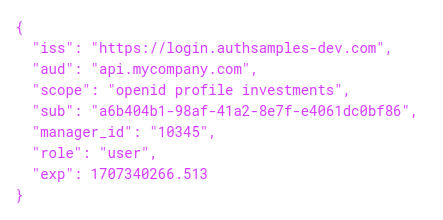
This blog’s APIs will use the following form of access token payload. When designing access tokens, imagine you had to explain its security to a reviewer or a PEN tester. You should be able to point out how the scopes and claims restrict privileges.
In this blog’s access tokens, the scope restricts access to an investments business area. The scope and audience would allow the access token to be forwarded between multiple related APIs. A custom claim for manager_id provides a familiar user identity to the API. A custom role claim is also issued:
Meanwhile, the following extra claims are looked up when an access token is first received:
| Extra Claim | Description |
|---|---|
| Title | A business title for the end user, which is displayed by the user facing application |
| Regions | An array claim representing a simplified version of the branches concept described earlier in this post |
The API then authorizes using both the role from the access token and the regions array from the extra claims:
private _isUserAuthorizedForCompany(company: Company): boolean {

    const role = ClaimsReader.getStringClaim(this._claims.jwt, CustomClaimNames.role).toLowerCase();
    if (role === 'admin') {
        return true;
    }

    if (role !== 'user') {
        return false;
    }

    const extraClaims = this._claims.extra as SampleExtraClaims;
    const found = extraClaims.regions.find((c) => c === company.region);
    return !!found;
}
Claims Caching Algorithm
This blog’s APIs uses the following algorithm for OAuth processing, where a thread safe memory cache stores a hash of the access token mapped to extra claims. This ensures that the extra claims lookup only occurs occasionally.
export class OAuthAuthorizer {

    public async execute(request: Request): Promise<ClaimsPrincipal> {

        const accessToken = BearerToken.read(request);
        if (!accessToken) {
            throw ErrorFactory.createClient401Error('No access token was supplied in the bearer header');
        }

        const jwtClaims = await this._accessTokenValidator.execute(accessToken);

        const accessTokenHash = createHash('sha256').update(accessToken).digest('hex');
        let extraClaims = await this._cache.getExtraUserClaims(accessTokenHash);
        if (extraClaims) {
            this._extraClaimsProvider.createClaimsPrincipal(jwtClaims, extraClaims, request);
        }

        extraClaims = await this._extraClaimsProvider.lookupExtraClaims(jwtClaims, request);

        await this._cache.setExtraUserClaims(accessTokenHash, extraClaims!, jwtClaims.exp!);

        return this._extraClaimsProvider.createClaimsPrincipal(jwtClaims, extraClaims, request);
    }
}
This technique adds complexity to API code. Avoid it when getting started with OAuth API security and instead use claims only from the access token payload. Understand though that in future you may need design options for evolving the finer grained authorization values.
One reason I use the above algorithm is to show how to customize OAuth middleware in some mainstream technology stacks. It can be useful to know how to do this, to provide best control over current and future API security behaviour.
Where Are We?
We have described some ways to deal with tokens and claims, to implement API authorization. When dealing with business rules there is a balance between security and manageability, since the authorization server should not be overly coupled to volatile business logic.
Next Steps
- Next we will summarize this blog’s User Authentication Behaviour
- For a list of all blog posts see the Index Page