Initial Authorization Server Setup

Background

Previously we discussed factors to consider when designing JWT Access Token Validation. Next we will describe how to get started with an authorization server.

Step 1: Define Base URLs

First it is worth understanding where an authorization server fits in an OAuth architecture. I like to start by designing base URLs. The following logical values are used for this blog’s code samples. For a real company the three components may be hosted in unrelated domains.

Development Base URL Description
https://web.mycompany.com A base URL for static web content
https://api.mycompany.com A base URL for APIs
https://login.mycompany.com The OAuth Authorization Server

On a development computer you can configure working domain names by just editing the hosts file, which exists at one of these locations:

OS Path
Windows c:\system32\drivers\etc\hosts
macOS / Linux /etc/hosts

Add entries such as the following to represent development domains, which is just another way of using localhost, but with real world URLs:

127.0.0.1  localhost web.mycompany.com api.mycompany.com login.mycompany.com

This blog’s Final SPA will require a same site relationship between the web origin and API entry points called from the browser, and the development base URLs will change.

Step 2: Choose an Initial Authorization Server

By default, this blog’s code samples use my personal AWS Cognito system at https://login.authsamples.com. Much of the difficult security work for SPAs and APIs are outsourced to this component.
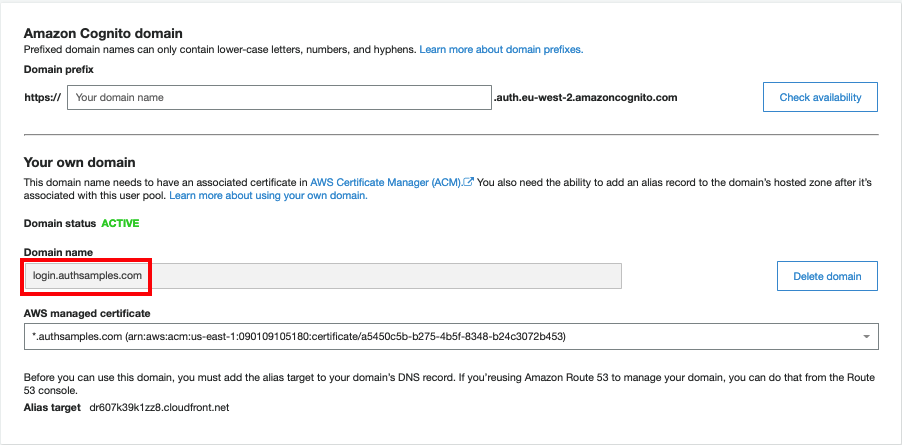
A key point when starting with OAuth is to point your apps to HTTPS endpoints developed by security experts rather than having to write or build the code for the authorization server. Choose one of these options initially, which are typically free for developers:

Type Description
Cloud Hosted A cloud platform’s authorization server, such as those provided by AWS or Microsoft, with internet OAuth endpoints
Cloud Native A Docker based authorization server, with local OAuth endpoints

Either provides a simple and convenient option when getting started with OAuth. This blog will show how to integrate user facing apps and APIs, using portable code. A useful goal is for these components to be compliant with any standards-based authorization server.

Step 3: Create the User Accounts Schema

The authorization server will store core identity fields about users. It will also issue some of these user attributes as claims to access tokens. APIs will then authorize using received claims.

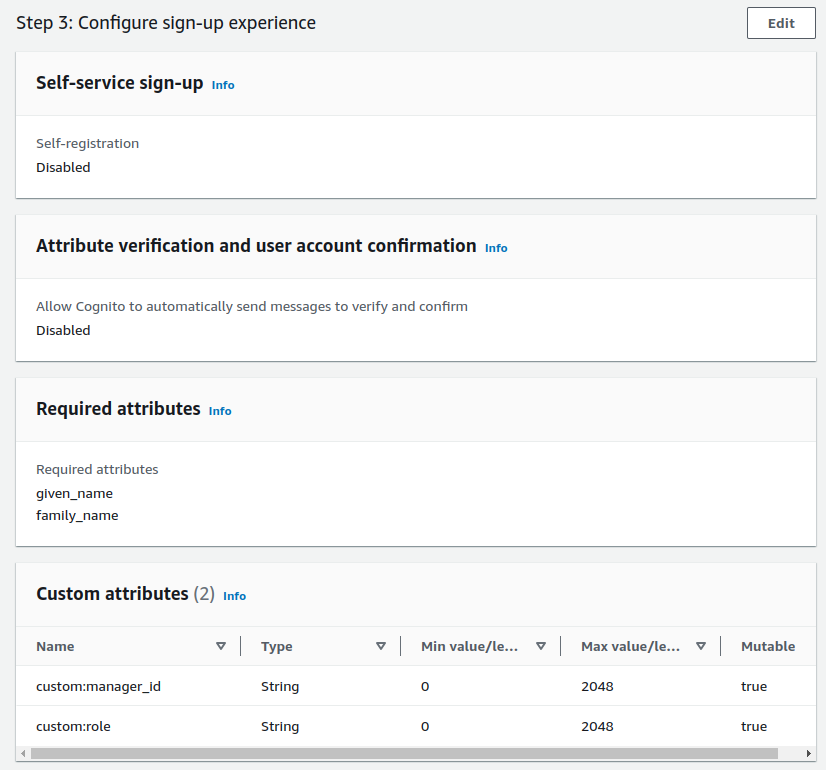
For this blog I set up the authorization server to authenticate users with an email and password, and to also store name details. Custom fields called manager_id and role were added. The values assigned to users will be issued to access tokens later:
Step 4: Create Test User Accounts

In AWS Cognito I acted as an administrator to create two initial user accounts for testing and populated all of the user schema fields. Anyone reading this blog can sign into the code samples with these user accounts.

Step 5: Configure the Login User Experience

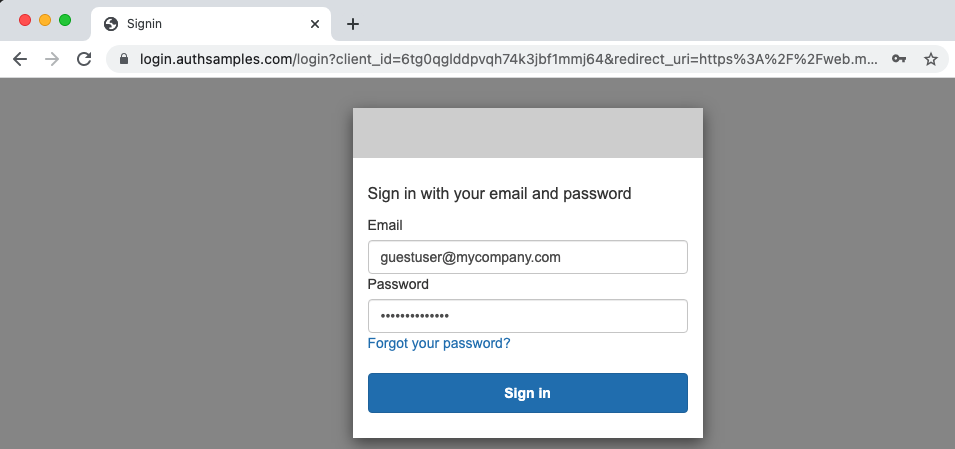
An authorization server should enable many possible ways for users to authenticate. For this blog I use only simple logins where an email and password are entered for the above test user accounts.
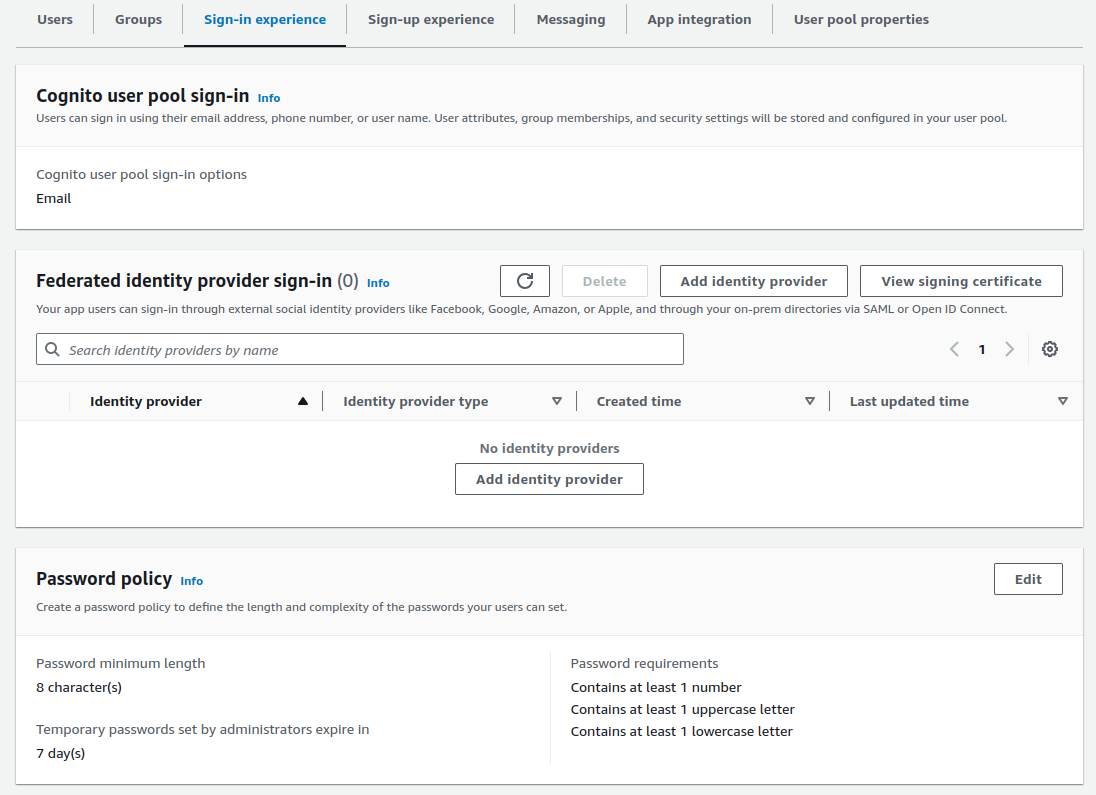
This blog’s frontend code samples all perform an authorization code flow and therefore support many other ways to authenticate users. To update to a different method, the authorization server would be reconfigured. No application code would need to change.

Step 6: Locate Open ID Connect Metadata

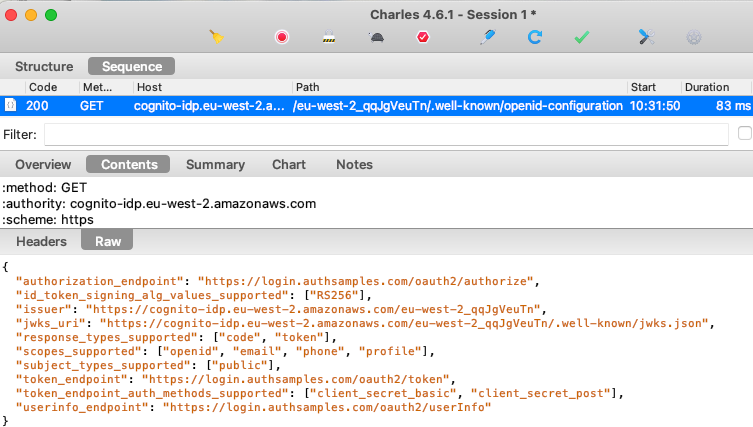
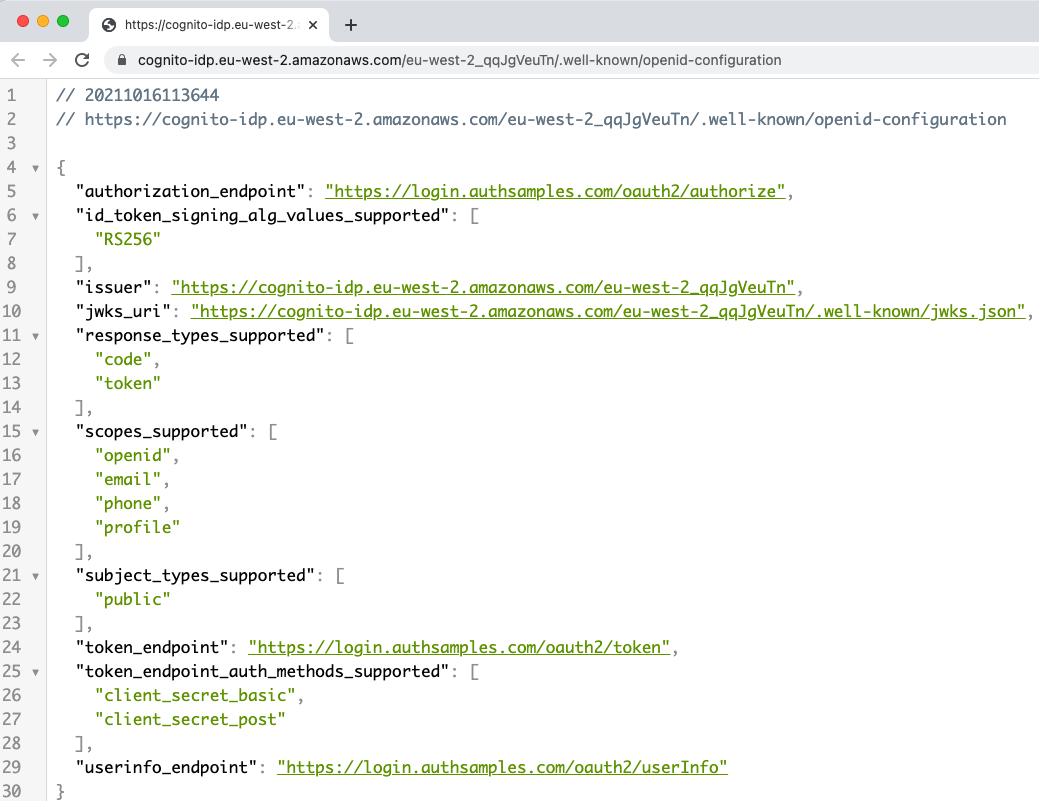
Authorization servers have a base URL and usually publish OpenID Connect metadata at a subpath of ‘.well-known/openid-configuration‘. The response provides endpoints that applications will connect to:
Step 7: Register OAuth Clients

Apps typically need to be registered as OAuth clients using an Admin UI, where fields such as Client ID, Redirect URI and Scope are configured.
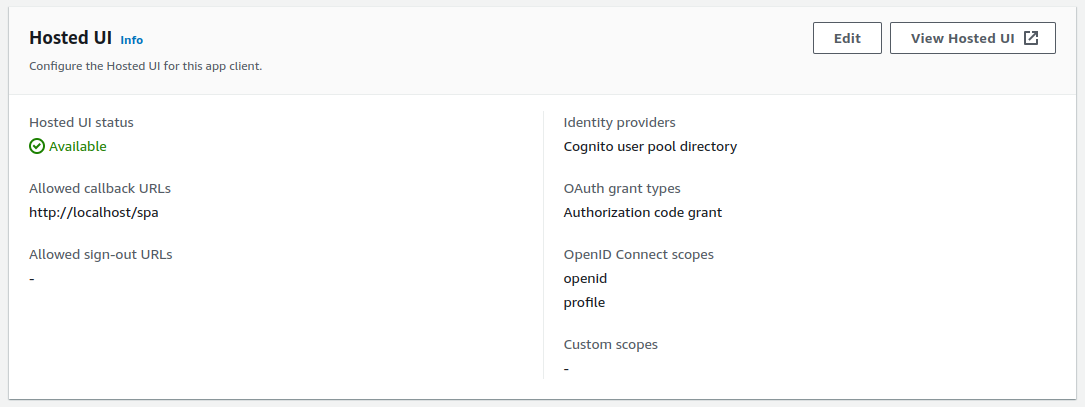
The scopes assigned to clients will determine the access token claims delivered to APIs, and used for claims based authorization later. In this manner each client gets different API permissions.

Step 8: Configure Token Lifetimes

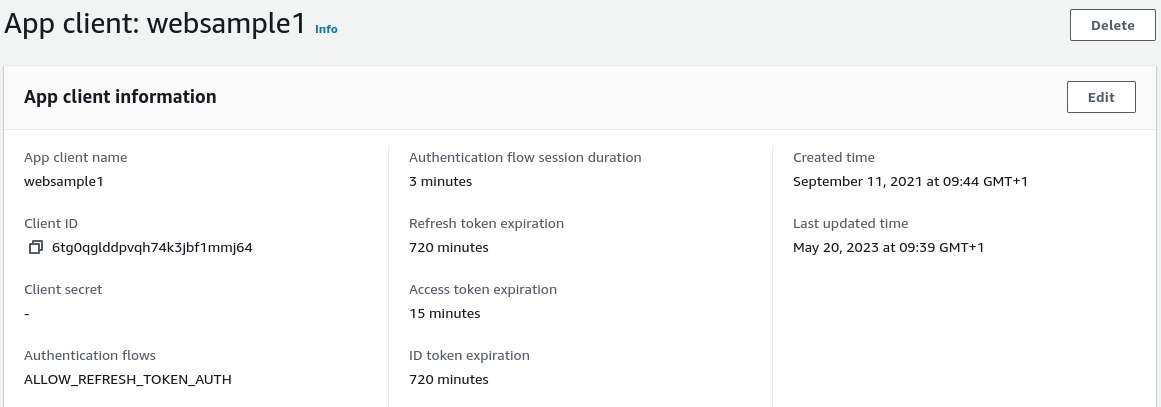
OAuth client data will include token lifetimes. This blog’s code samples use the following values:

  • The access token lifetime is 15 minutes and access tokens may expire multiple times during the user’s authenticated session
  • Refresh token lifetime is 12 hours, which becomes the maximum time for the user’s authenticated session
  • The ID token lifetime is also 12 hours, though this time is not used, since the ID token only conveys proof of the authentication event
Step 9: Configure Applications

Applications are configured with OAuth settings, used as input data to security libraries. In our code samples we will use JSON configuration files.

Our initial SPA points to Cognito’s issuer base URL and the SPA’s security library then looks up metadata to get the other details it needs:

{
    "app": {
        "webOrigin":        "http://web.mycompany.com",
        "apiBaseUrl":       "http://api.mycompany.com/api"
    },
    "oauth": {
        "authority":        "https://cognito-idp.eu-west-2.amazonaws.com/eu-west-2_CuhLeqiE9",
        "clientId":         "62raqvncbki418n3ckl59uf0f4",
        "redirectUri":      "http://localhost/spa",
        "scope":            "openid profile"
    }
}

The OAuth configuration for APIs is based on how OAuth access tokens are validated, and where token signing keys are downloaded from:

{
    "api": {
        "port": 80,
        "trustedOrigins": [
            "http://web.mycompany.com",
            "http://localhost"
        ],
        "useProxy": false,
        "proxyUrl": "http://127.0.0.1:8888"
    },
    "oauth": {
        "jwksEndpoint": "https://cognito-idp.eu-west-2.amazonaws.com/eu-west-2_CuhLeqiE9/.well-known/jwks.json",
        "algorithm": "RS256",
        "issuer": "https://cognito-idp.eu-west-2.amazonaws.com/eu-west-2_CuhLeqiE9",
        "audience": ""
    }
}

Step 10: Build Apps that use OAuth Standards

The initial objective should be to use security libraries to integrate OAuth in a standards based and portable manner, and to test end-to-end flows:

Area Description
UIs Getting logins working in a user friendly way, along with related operations such as user creation and password recovery
APIs Protecting data with OAuth, by validating access tokens, then authorizing requests based on claims

Step 11: Clarify Requirements

During the journey of integrating OAuth into apps, you will form a better idea of what you want from the authorization server. Before committing to a vendor, ensure there are no blocking issues in your end-to-end flows, in areas such as user data storage, usability, reliability and extensibility .

If your initial choice of provider does not meet your requirements you can then spend some time reviewing alternative choices. When your clients and APIs integrate OAuth in a standards based way, switching authorization servers will require only minimal changes to application code.

Where Are We?

We have discussed the basics, to get started with OAuth development, in a way that gives you time to learn. This blog’s code samples will implement modern security while avoiding vendor lock-in. A later post provides further details on the AWS Cognito setup.

Next Steps

JWT Access Token Validation

Background

Previously we drilled into API Coding Key Points for the initial code sample. Next we will describe the most mainstream way in which APIs validate JWT access tokens. These techniques are covered in many online resources. This post summarizes some best practices, but focuses primarily on simple and productive setups when working with JWTs.

Common Requirements

When designing token validation in APIs there are a few factors to consider:

Factor Description
Simple Code Validating a JWT should not require a great amount of code or complicate your API
Enable API Authorization The output from JWT validation should provide the main values the API needs for authorization
Best Security Capabilities Aim to use modern, secure and efficient JWT algorithms
Developer Understanding You should understand how the validation works, so that you can ensure it is doing the right things
Useful Errors You must ensure that API clients receive useful error responses when access tokens fail validation

Libraries v Frameworks

Some technology stacks provide a ‘Resource Server Framework‘ that operates like a black box and requires very little code. This may work fine, but this blog uses a library approach to meet the above behaviors.

JOSE Libraries

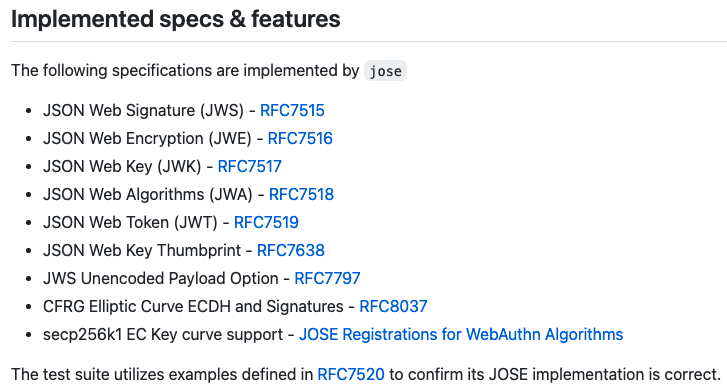
This blog will provide APIs developed in the following languages and in each case will use a JSON Object Signing and Encryption (JOSE) library, so that the most leading edge security options are available, in case ever needed in future:

Technology JOSE Library
Node.js jose
Java jose4j
.NET jose-jwt

JOSE libraries support a number of OAuth related security specifications. These can be read by developers to strengthen their OAuth knowledge. JOSE libraries are also useful for issuing mock tokens in API tests.

JWT Validation Code

The JWT validation code in our initial API required very little code. First, when the application starts, an object was created to download and cache token signing public keys from the authorization server:

export class JwksRetriever {

    public constructor(configuration: OAuthConfiguration, httpProxy: HttpProxy) {

        const jwksOptions = {
            agent: httpProxy.agent,
        } as RemoteJWKSetOptions;

        this._remoteJWKSet = createRemoteJWKSet(new URL(configuration.jwksEndpoint), jwksOptions);
    }
}

Code similar to the following was used in the access token validator class, which runs on every API request:

const accessToken = this._readAccessToken(request);
if (!accessToken) {
    throw ErrorFactory.fromMissingTokenError();
}

const options = {
    algorithms: [this._configuration.algorithm],
    issuer: this._configuration.issuer,
} as JWTVerifyOptions;

if (this._configuration.audience) {
    options.audience = this._configuration.audience;
}

const result = await jwtVerify(accessToken, this._jwksRetriever.remoteJWKSet, options);

const userId = this._getClaim(result.payload.sub, 'sub');
const scope = this._getClaim(result.payload['scope'], 'scope');
return new ClaimsPrincipal(userId, scope.split(' '));

Viewing JWT Access Tokens

A JWT access tokens consists of three parts:

  • Header
  • Payload
  • Signature

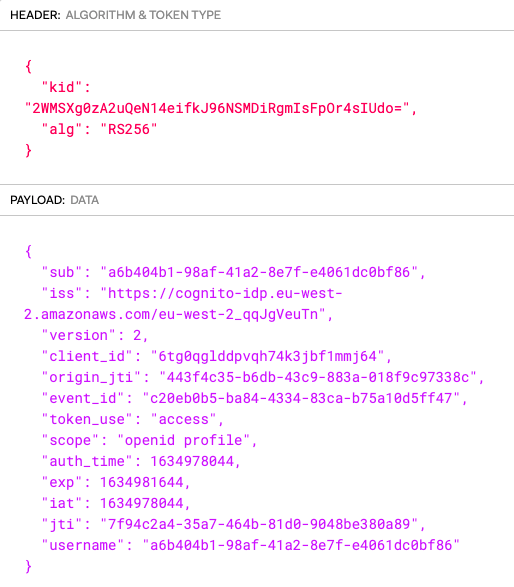
The authorization server uses an asymmetric private key to create the digital signature, and the public key can be made available to any party that needs to cryptographically verify it. Here is an example AWS Cognito JWT access token from this blog’s first code sample:

eyJraWQiOiIyV01TWGcwekEydVFlTjE0ZWlma0o5Nk5TTURpUmdtSXNGcE9yNHNJVWRvPSIsImFsZyI6IlJTMjU2In0.eyJzdWIiOiJhNmI0MDRiMS05OGFmLTQxYTItOGU3Zi1lNDA2MWRjMGJmODYiLCJpc3MiOiJodHRwczpcL1wvY29nbml0by1pZHAuZXUtd2VzdC0yLmFtYXpvbmF3cy5jb21cL2V1LXdlc3QtMl9xcUpnVmV1VG4iLCJ2ZXJzaW9uIjoyLCJjbGllbnRfaWQiOiI2dGcwcWdsZGRwdnFoNzRrM2piZjFtbWo2NCIsIm9yaWdpbl9qdGkiOiI0NDNmNGMzNS1iNmRiLTQzYzktODgzYS0wMThmOWM5NzMzOGMiLCJldmVudF9pZCI6ImMyMGViMGI1LWJhODQtNDMzNC04M2NhLWI3NWExMGQ1ZmY0NyIsInRva2VuX3VzZSI6ImFjY2VzcyIsInNjb3BlIjoib3BlbmlkIHByb2ZpbGUiLCJhdXRoX3RpbWUiOjE2MzQ5NzgwNDQsImV4cCI6MTYzNDk4MTY0NCwiaWF0IjoxNjM0OTc4MDQ0LCJqdGkiOiI3Zjk0YzJhNC0zNWE3LTQ2NGItODFkMC05MDQ4YmUzODBhODkiLCJ1c2VybmFtZSI6ImE2YjQwNGIxLTk4YWYtNDFhMi04ZTdmLWU0MDYxZGMwYmY4NiJ9.CM5j3AXOGNL77AjW1-QImb6uwR8JE6ZojWOfKI-nZJhkCsDlSmG2qMpq6Ntkm-Pve6zA9TkWbCWSA1MHKwgQPMXobz5UDQSJSGwiEIa4L9Q6eCGIEDs5153DkXRD4KLYu-SGLOgSurzRuc-EUINDA7zyErNDKGbaFf8qPV5QuMTCQGO-h1SkvLU85yc8Xp6Q8MYv9ydf1oWukjCJdDSzlUdjP6Vsb3V5xKaTBWFvHpwoo5cwyD51Pu8Lsu7p7B-vQAfzXjfgPjnc5EQY_fNYZoh9MaB6b3EnGgZz0oY9gCZHhlr_cRxgZlR_-J9KeUIYcW5Mna-J5GYFe6eRcEePxw

We can paste this into an Online JWT Viewer to view the details, and note the Key Identifier (kid) field in the JWT header:

API Validation Steps

OAuth secured APIs must validate JWT access tokens on every request. This is designed to be a fast and scalable operation. The API must provide correct inputs to the security library in order for this to be done correctly:

Check Description
Algorithm The API specifies one or more algorithms that can be used, and AWS Cognito tokens use the mainstream RS256 option
Issuer The API expects the issuer in the token to match the authorization server the API trusts
Audience The audience represents a set of related APIs, and the API must specify a value such as api.mycompany.com
Time Access tokens should be short lived, such as 15 minutes, and the API must check the token is valid for use and not expired
Public Key The API provides the token signing public key to the library,  most commonly by configuring a trusted download URL

API OAuth Configuration

The initial API reflected the above settings in its configuration file. At the time of writing, AWS Cognito does not issue an audience claim by default, so the value used for validation was left blank.

{
    "api": {
        "port": 80,
        "trustedOrigins": [
            "http://localhost"
        ],
        "useProxy": false,
        "proxyUrl": "http://127.0.0.1:8888"
    },
    "oauth": {
        "jwksEndpoint": "https://cognito-idp.eu-west-2.amazonaws.com/eu-west-2_CuhLeqiE9/.well-known/jwks.json",
        "algorithm": "RS256",
        "issuer": "https://cognito-idp.eu-west-2.amazonaws.com/eu-west-2_CuhLeqiE9",
        "audience": ""
    }
}

Failed Token Validation

When any token validation checks fail, the API should return an error response with a 401 status code. Traditionally error details are returned in www-authenticate response headers, which may be the preferred option in some use cases. This blog instead uses a JSON payload with these fields:

{
  "code": "invalid_token",
  "message": "Missing, invalid or expired access token"
}

In production systems this type of error is expected to occur frequently, since clients use short lived access tokens. When a client receives this response, a token refresh operation will be performed.

Token Signing Public Keys

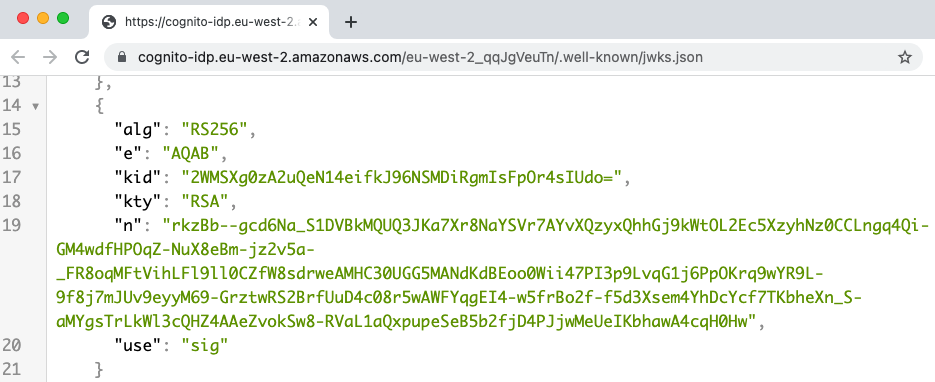
The API provides the security library with a trusted JWKS endpoint. The URL for my AWS Cognito authorization server is at the below address:

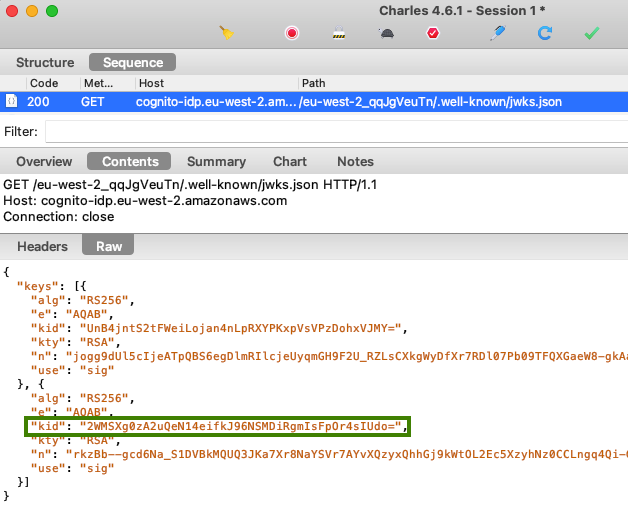
This endpoint returns multiple public keys in a JSON Web Key Set and each of these has a key identifier. The entry whose kid value matches that in the access token’s JWT header is used to verify the token:

JWT Signature Verification

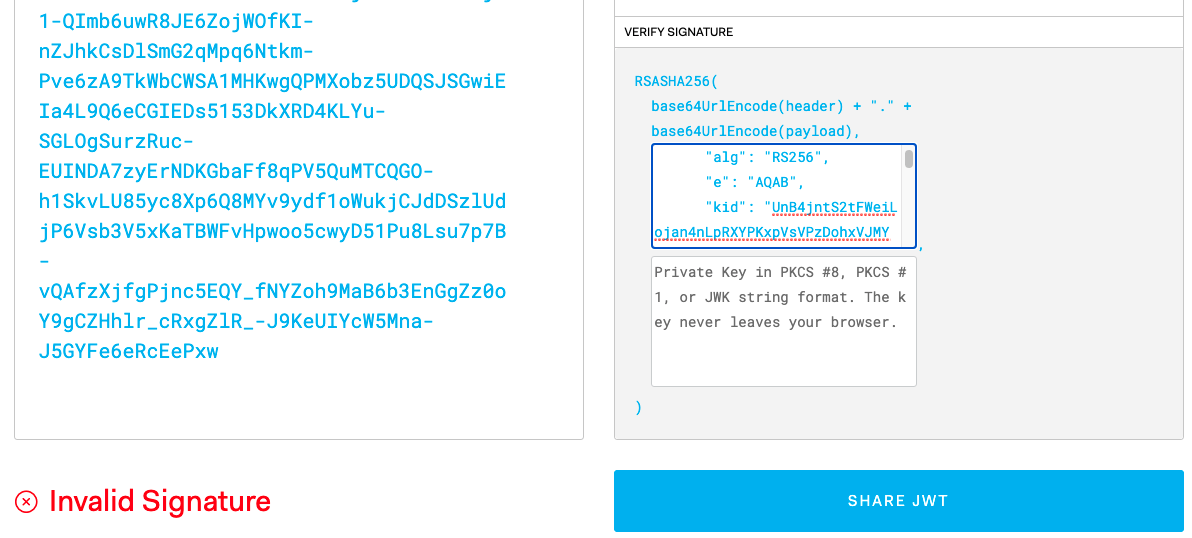
The above JWT Viewer website allows us to manually paste in the expected public JSON Web Key. If we paste in a value from the JWKS endpoint whose kid does not match that in the JWT header, there is a verification failure:

This result will also be returned if a malicious party issues a JWT with their own private key, and sends it to the API, or if a JWT is tampered with and its contents altered.

JSON Web Key Set Caching

Any good JOSE library will also cache the JSON Web Key Set details in memory, with the following behaviour on subsequent requests:

Input Library Action
Same kid The cached JSON Web Key is used, to prevent the need for further calls to the authorization server’s JWKS endpoint
New kid A new call to the JWKS endpoint is made, to get updated JSON Web Keys, including the new key identifier

Token Signing Key Renewal

The authorization server will rotate its cryptographic keys occasionally, which will result in a new private key being used to sign JWTs and new public keys being made available for verification.

For a while the JWKS endpoint will then return both old and new keys, until the old one is retired. A good API security library will cache JWKs correctly, so that the API seamlessly copes with renewal.

With OAuth, the key management and renewal is externalized from applications and APIs. This significantly reduces complexity, especially as the number of components grows.

API Authorization

Once the JWT processing is done, the claims in the JWT payload can be trusted by the API and used to authorize requests for API data. We will discuss use of claims in further detail in this blog’s Authorization Design.

Where Are We?

We covered the key behavior and design choices when validating JWTs in APIs, in a way that is easy for developers to learn. Next we will make some recommendations on getting started with your own authorization server.

Next Steps

Basic API – Coding Key Points

Background

Previously we covered SPA Coding Key Points for the first code sample. In this post we’ll drill into some important identity related code in the API.

Code Layout

The API uses Node.js Express as the HTTP server and is coded in TypeScript. The business functionality is in a logic folder and the plumbing, including OAuth handling, is in the host folder:

Dependencies

Use of third party libraries has been kept fairly simple, and the most interesting dependency in the package.json file is the jose security library, used to validate JWTs:

"dependencies": {
  "cors": "^2.8.5",
  "express": "^4.18.2",
  "fs-extra": "^11.1.1",
  "jose": "^5.0.1",
  "on-headers": "^1.0.2",
  "https-proxy-agent": "^5.0.1",
  "winston": "^3.8.2"
}

API Entry Point

When npm start is run, the startup/app.ts class executes, which configures the Express HTTP server and then starts listening for requests:

(async () => {

    const logger = new ApiLogger();
    try {

        const configBuffer = await fs.readFile('api.config.json');
        const configuration = JSON.parse(configBuffer.toString()) as Configuration;

        const expressApp = express();
        const httpServer = new HttpServerConfiguration(expressApp, configuration, logger);
        await httpServer.initializeApi();

        httpServer.initializeWebStaticContentHosting();
        httpServer.startListening();

    } catch (e) {

        const error = ErrorFactory.fromServerError(e);
        logger.startupError(error);
    }
})();

The startup logic is in the HttpServerConfiguration class, whose main role is to define the following aspects:

  • How each REST URL is processed, via the get expressions
  • How cross cutting concerns are handled, via the use expressions
public async initializeApi(): Promise<void> {

    const corsOptions = {
        origin: this._configuration.api.trustedOrigins,
        maxAge: 86400,
    };
    this._expressApp.use('/api/*', cors(corsOptions) as any);
    this._expressApp.use('/api/*', this._apiController.onWriteHeaders);

    this._expressApp.use('/api/*', this._catch(this._apiLogger.logRequest));
    this._expressApp.use('/api/*', this._catch(this._apiController.authorizationHandler));

    this._expressApp.get('/api/companies', this._catch(this._apiController.getCompanyList));
    this._expressApp.get(
        '/api/companies/:id/transactions',
        this._catch(this._apiController.getCompanyTransactions));

    this._expressApp.use('/api/*', this._apiController.onRequestNotFound);
    this._expressApp.use('/api/*', this._apiController.onException);
}

The API then continues by configuring an HTTP listener, after which it runs indefinitely.

API Configuration

The API uses a configuration file in a similar manner to the SPA, and this includes details used for JWT validation, as discussed shortly:

{
    "api": {
        "port": 80,
        "trustedOrigins": [
            "http://web.mycompany.com"
        ],
        "useProxy": false,
        "proxyUrl": "http://127.0.0.1:8888"
    },
    "oauth": {
        "jwksEndpoint": "https://cognito-idp.eu-west-2.amazonaws.com/eu-west-2_CuhLeqiE9/.well-known/jwks.json",
        "algorithm": "RS256",
        "issuer": "https://cognito-idp.eu-west-2.amazonaws.com/eu-west-2_CuhLeqiE9",
        "audience": ""
    }
}

Web Static Content Hosting

Our sample API also uses Express to host web static content, so that our SPA’s files can be downloaded to the browser. This is done for the following reasons:

  • Demonstrating  that a web host should require only minimal code
  • Reducing the number of parts so that the back end is easier to run
public initializeWebStaticContentHosting(): void {

    this._express.use('/spa', express.static('../spa'));
    this._express.use('/favicon.ico', 
}

In the real world you would use a separate web host component, and this will often be a Content Delivery Network. The Final SPA will switch to using a dedicated web host.

Service Logic Classes

The most mainstream coding model for API technology stacks involves receiving API requests into a controller class, then calling other testable business logic classes.

In our first Node.js sample we will wire up these classes manually via an ApiController class, though we will use dependency injection in later API code samples:

public async getCompanyList(request: Request, response: Response): Promise<void> {

    const reader = new JsonFileReader();
    const repository = new CompanyRepository(reader);
    const service = new CompanyService(repository, response.locals.claims);

    const result = await service.getCompanyList();
    ResponseWriter.writeObjectResponse(response, 200, result);
}

API is Non Blocking

Whenever the API performs I/O, as for the below CompanyRepository class, it does so using a standard async / await coding model, so that other code can execute on the current thread while I/O is in progress:

public async getCompanyTransactions(id: number): Promise<CompanyTransactions | null> {

    const companyList = await this._jsonReader.readData<Company[]>('data/companyList.json');
    const foundCompany = companyList.find((c) => c.id === id);
    if (foundCompany) {

        const companyTransactions =
            await this._jsonReader.readData<CompanyTransactions[]>('data/companyTransactions.json');

        const foundTransactions = companyTransactions.find((ct) => ct.id === id);
        if (foundTransactions) {
            foundTransactions.company = foundCompany;
            return foundTransactions;
        }
    }

    return null;
}

Authorization Middleware

Express uses a middleware terminology for describing functions that handle cross cutting concerns. The first of these in our code sample is to validate the JWT access token before allowing business logic to run:

public async authorizationHandler(
    request: Request,
    response: Response,
    next: NextFunction): Promise<void> {

    const claims = await this._accessTokenValidator.execute(request);
    response.locals.claims = claims;
    next();

There are two main responsibilities involved in authorization in an OAuth secured API. The second of these occurs in the business logic:

Responsibility Description
Authenticate Requests Digitally verify received JWT access tokens and return a 401 response if not valid
Perform Authorization Trust claims from the payload of the JWT and use them for authorization

Authenticating Requests

The API uses an ‘AccessTokenValidator‘ class to do the work for the first of the above tasks. The OAuth token verification is done by the security library, which only requires a little code:

public async execute(request: Request): Promise<ClaimsPrincipal> {

    try {

        const accessToken = this._readAccessToken(request);
        if (!accessToken) {
            throw ErrorFactory.fromMissingTokenError();
        }

        const options = {
            algorithms: [this._configuration.algorithm],
            issuer: this._configuration.issuer,
            audience: this._configuration.audience,
        };
        const result = await jwtVerify(accessToken, this._jwksRetriever.remoteJWKSet, options);

        const userId = this._getClaim(result.payload.sub, 'sub');
        const scope = this._getClaim(result.payload['scope'], 'scope');
        return new ClaimsPrincipal(userId, scope.split(' '));

    } catch (e: any) {

        if (e.code === 'ERR_JOSE_GENERIC') {
            throw ErrorFactory.fromJwksDownloadError(e);
        }

        throw ErrorFactory.fromTokenValidationError(e);
    }
}

The API is responsible for providing correct inputs to the library, so it is important for API developers to understand these, which are summarised in a separate Access Token Validation page.

Claims Principal

After the JWT has been digitally verified, its claims can be trusted and used by the API’s business logic, to authorize access to resources. The claim values are provided by an object that we will call a ‘ClaimsPrincipal‘:

export class ClaimsPrincipal {

    private _subject: string;
    private _scopes: string[];

    public constructor(subject: string, scopes: string[]) {
        this._subject = subject;
        this._scopes = scopes;
    }

    public get subject(): string {
        return this._subject;
    }

    public get scopes(): string[] {
        return this._scopes;
    }
}

Authorizing Requests

The code sample then injects the claims principal into its business logic classes as follows:

export class CompanyService {

    private readonly _repository: CompanyRepository;
    private readonly _claims: ClaimsPrincipal;

    public constructor(repository: CompanyRepository, claims: ClaimsPrincipal) {
        this._repository = repository;
        this._claims = claims;
    }
}

If an attempt is made to access unauthorized data then a forbidden error can be returned:

private _unauthorizedError(companyId: number): ClientError {
    return new ClientError(
        404,
        ErrorCodes.companyNotFound,
        `Company ${companyId} was not found for this user`);
}

Claims Based Authorization

For the first code sample default claims are used, but any real world system will need to use claims from business data in order to implement their authorization. We will drill into this topic in future posts.

API Logs

The initial API code sample does some basic logging, where each API request writes a ‘log entry‘ in JSON format, represented by the following class:

export class LogEntry {

    public readonly _utcTime: Date;
    public _path: string;
    public _method: string;
    public _statusCode: number;
    public _error: ClientError | ServerError | null;
}

By default this leads to lightweight output as follows:

API Error Handling

The API also performs solid error handling, with these main classes:

Class Description
ServerError Represents a technical problem in the API
ClientError Represents a useful error response for an API client
ExceptionHandler Catches any exceptions thrown by the API
ErrorFactory Used to create exceptions to throw
ErrorCodes A list of error causes

An unhandled exception handler is used to deal with adding error details to logs and returning a useful response to the SPA:

public static handleError(exception: any, response: Response): ClientError {

    const handledError = ErrorFactory.fromException(exception);
    if (exception instanceof ClientError) {

        const clientError = handledError as ClientError;
        const logEntry = response.locals.logEntry as LogEntry;
        logEntry.setError(clientError);
        return clientError;

    } else {

        const serverError = handledError as ServerError;
        const logEntry = response.locals.logEntry as LogEntry;
        logEntry.setError(serverError);
        return serverError.toClientError();
    }
}

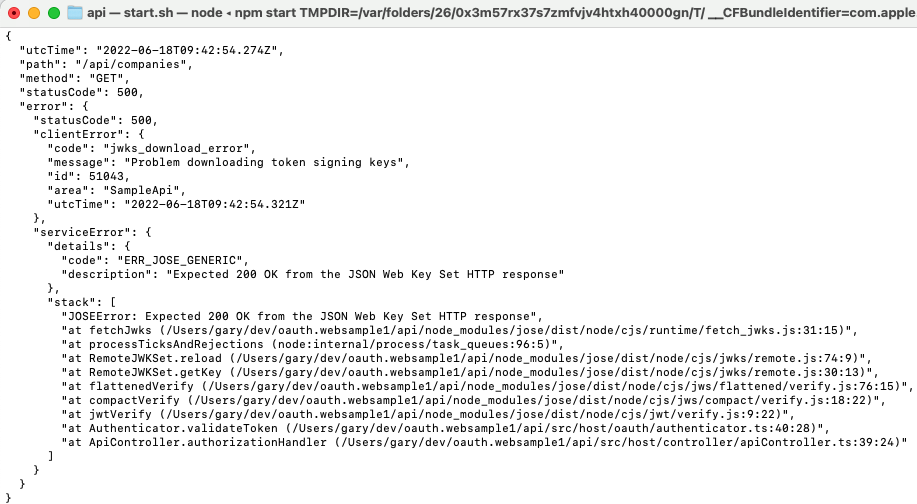
Errors are included in logs and any technical problems, such as when contacting OAuth endpoints, are output with a 500 status and include extra details to help with fast problem resolution:

Supportability

Future posts will drill much deeper into logging and error handling. These are high value areas for back end systems, and people productivity is improved when they are implemented in a solid end-to-end manner.

Where Are We?

The initial API integrates with an Authorization Server and validates JWTs correctly. The API also does some initial work on claims, logging and error handling, and we will do more work on these areas for future samples.

Next Steps

Basic SPA – Coding Key Points

Background

Our initial SPA and API OAuth Messages write up explained the HTTP/S messages used by our code sample. Next we will focus on code needed for the SPA’s OAuth and API requests. See also the Client Side API Journey to understand the background and the requirements being met.

SPA Code

The SPA uses the following types of static resource that are downloaded to the browser. In this blog we will keep HTML and CSS simple, so that our main code focus for SPAs is the JavaScript logic:

Area Implementation Details
HTML We use a single static index.html page and its DOM elements are updated dynamically
CSS We use Bootstrap to control layout in a mobile first manner, and for most styling
JavaScript We use TypeScript code that gets compiled to JavaScript bundles when it runs in the browser

The SPA uses only a handful of external dependencies, expressed in its package.json file. The most interesting of these is the oidc-client-ts library, which implements OpenID Connect in JavaScript.

"dependencies": {
    "axios": "^1.6.7",
    "mustache": "^4.2.0",
    "oidc-client-ts": "^2.4.0"
}

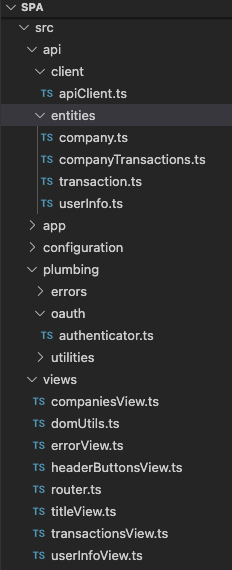
Concerns are separated into a number of TypeScript classes, and in particular we keep plumbing separated from the application logic:

SPA Views

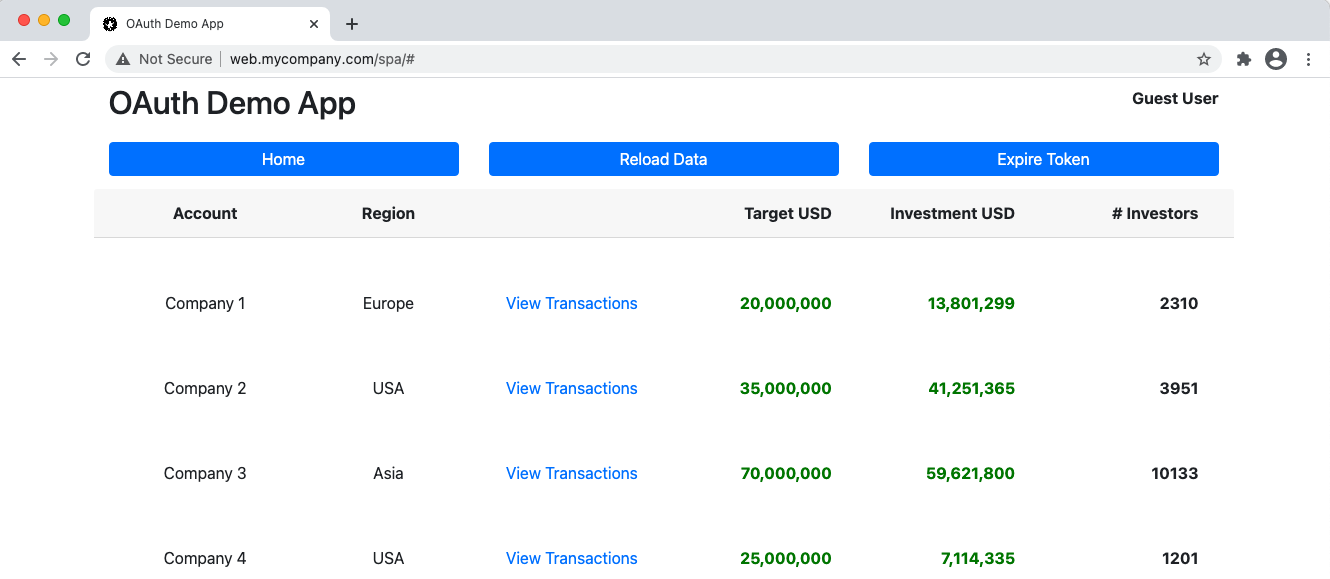
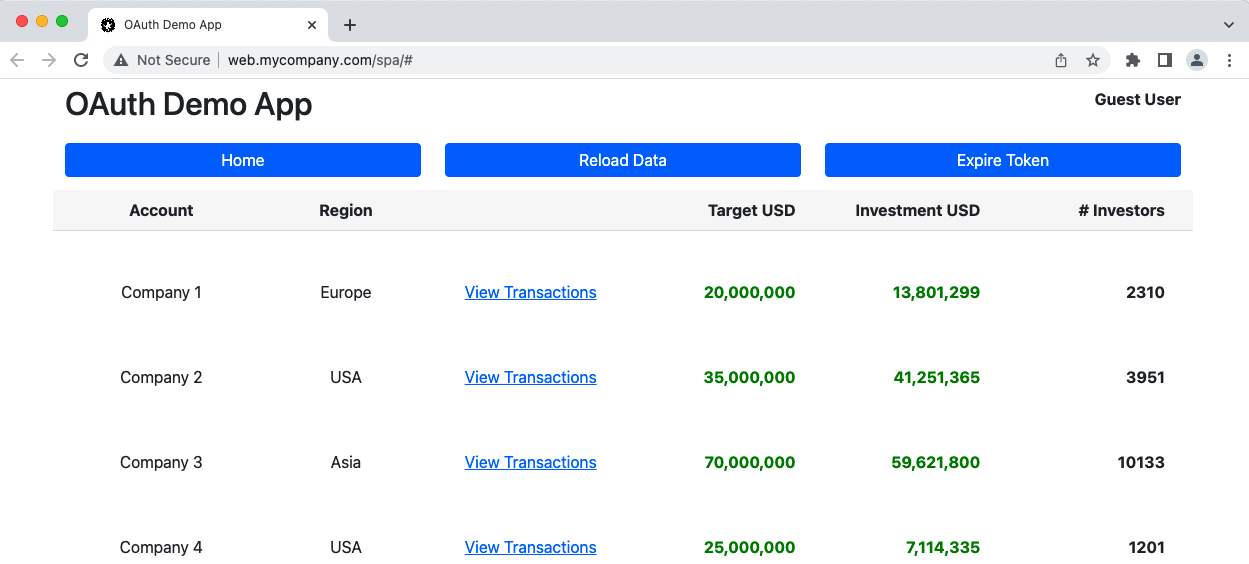
Our SPA looks like this visually and consists of a number of subviews, arranged via rows and columns:

The Bootstrap Grid System is used to lay out elements at runtime, and the HTML we deploy is minimal:

<!DOCTYPE html>
<html lang='en'>
    <head>
        <meta charset='utf-8'>
        <base href='/spa/' />
        <title>OAuth Demo App</title>

        <link rel='stylesheet' href='css/bootstrap.min.css'>
        <link rel='stylesheet' href='css/app.css'>
    </head>
    <body>
        <div id='root' class='container' />
        
        <script type='module' src='dist/vendor.bundle.js'></script>
        <script type='module' src='dist/app.bundle.js'></script>
    </body>
</html>

As the user navigates between screens, a main element within the root element will be updated with a different view.

SPA Entry Point

When our SPA’s index.html page loads, it creates a global instance of an application class defined in the App.ts file, and calls execute on it:

public async execute(): Promise<void> {

    try {
        window.onhashchange = this._onHashChange;

        this._initialRender();

        await this._initialiseApp();

        await this._handleLoginResponse();

        await this._loadMainView();

    } catch (e) {

        this._errorView?.report(e);
    }
}

Application Startup

The startup logic looks like this, and involves downloading the SPA’s configuration from the server, then initialising the oidc-client-ts library, as well as setting up a class to interact with the API:

private async _initialiseApp(): Promise<void> {

    this._configuration = await ConfigurationLoader.download('spa.config.json');

    this._authenticator = new Authenticator(this._configuration.oauth);

    this._apiClient = new ApiClient(this._configuration.app.apiBaseUrl, this._authenticator);

    this._router = new Router(this._apiClient, this._errorView!);

    this._isInitialised = true;
}

Security Library Configuration

Our SPA configuration contains the following values, to enable it to connect to the API and to perform OAuth login redirects:

{
    "app": {
        "webOrigin":        "http://web.mycompany.com",
        "apiBaseUrl":       "http://api.mycompany.com/api"
    },
    "oauth": {
        "authority":        "https://cognito-idp.eu-west-2.amazonaws.com/eu-west-2_CuhLeqiE9",
        "clientId":         "62raqvncbki418n3ckl59uf0f4",
        "redirectUri":      "http://localhost/spa",
        "scope":            "openid profile"
    }
}

The oidc-client-ts provides a UserManager class and the SPA’s Authenticator class wraps this, to simplify code in the rest of the app:

export class Authenticator {

    private readonly _userManager: UserManager;

    public constructor(config: OAuthConfiguration) {

        const settings = {

            authority: config.authority,
            client_id: config.clientId,
            redirect_uri: config.redirectUri,
            scope: config.scope,
            response_type: 'code',
            loadUserInfo: true,
            automaticSilentRenew: false,
            monitorSession: false,

        };

        this._userManager = new UserManager(settings);
    }
}

Triggering Login Redirects

As part of the execute method, a Router class determines the initial view based on the SPA’s current URL and its hash fragments:

public async loadView(): Promise<void> {

    this._errorView.clear();

    const transactionsCompany = this.getTransactionsViewId();
    if (transactionsCompany) {

        const view = new TransactionsView(this._apiClient, transactionsCompany);
        await view.load();

    } else {

        const view = new CompaniesView(this._apiClient);
        await view.load();
    }
}

This results in the view executing and attempting to call an API in order to get its data:

public async load(): Promise<void> {

    try {

        const data = await this._apiClient.getCompanyList();
        this._renderData(data);

    } catch (e) {

        DomUtils.text('#main', '');
        throw e;
    }
}

The view calls an ApiClient class, which tries to get an access token from the Authenticator class so that it can make the API call requested:

private async _callApi(path: string, method: Method, dataToSend?: any): Promise<any> {

    const url = `${this._apiBaseUrl}${path}`;
    let token = await this._authenticator.getAccessToken();
    if (!token) {
        await this._authenticator.startLogin(null);
        throw ErrorHandler.getFromLoginRequired();
    }
}

On the first request there will be no access token:

public async getAccessToken(): Promise<string> {

    const user = await this._userManager.getUser();
    if (user && user.access_token) {
        return user.access_token;
    }

    return null;
}

This causes the ApiClient class to run an OpenID Connect redirect. The in-flight API call is also terminated, with a login_required error. The SPA’s error handling code ignores this error code, which prevents any error details from being rendered.

The code to begin the redirect looks like this, and the SPA’s location before the redirect is saved to session storage. A more complex app might also save other page state:

private async _startLogin(): Promise<void> {

    const data = {
        hash: location.hash.length > 0 ? location.hash : '#',
    };

    try {
        await this._userManager.signinRedirect({state: data});
    } catch (e) {
        throw ErrorHandler.getFromLoginOperation(e, ErrorCodes.loginRequestFailed);
    }
}

The first code sample assumes that only a single API request is in-flight at a time. This blog’s final UI code samples will show a way to trigger login redirects when the frontend makes concurrent requests to APIs.

Handling Login Responses

When the login is completed, the browser will return to the app with an Authorization Code, and will invoke the SPA’s index.html page again, which will restart the SPA.

The SPA must handle the login response as part of its application startup. This ensures that an access token can be retrieved and avoids repeating the process in a redirect loop.

If the SPA starts normally or as part of a page reload, handleLoginResponse is a no-op, but if it is an OpenID Connect response the current URL will have one of the following forms:

  • https://localhost/spa?code=xxx&state=789024578
  • https://localhost/spa?error=invalid_request&state=789024578

If the SPA calculates that the current location is an OpenID Connect response it asks the oidc-client-ts library to process the response to exchange the code for tokens. The SPA then performs these actions:

  • Restores the location and state before the redirect
  • Removes the OpenID Connect response from the browser history
public async handleLoginResponse(): Promise<void> {

    if (location.search) {

        const args = new URLSearchParams(location.search);
        const state = args.get('state');
        if (state) {

            const storedState = await this._userManager.settings.stateStore?.get(state);
            if (storedState) {

                let redirectLocation = '#';
                try {

                    const user = await this._userManager.signinRedirectCallback();
                    redirectLocation = user.state.hash;
                    this._loginTime = new Date().getTime();

                } catch (e: any) {

                    throw ErrorHandler.getFromLoginOperation(e, ErrorCodes.loginResponseFailed);

                } finally {

                    history.replaceState({}, document.title, redirectLocation);
                }
            }
        }
    }
}

This means the SPA supports Deep Linking, where the user can bookmark a page, then access it in a new browser session. After signing in, the user will return directly to the bookmarked location:

Rendering User Info

After login the SPA renders the logged in user’s name, and this information is stored in the UserManager class of the oidc-client-ts library, A user profile can be accessed with the following code:

public async getUserInfo(): Promise<UserInfo | null> {

    const user = await this._userManager.getUser();
    if (user && user.profile) {
        if (user.profile.given_name && user.profile.family_name) {

            return {
                givenName: user.profile.given_name,
                familyName: user.profile.family_name,
            };
        }
    }

    return null;
}

The initial SPA uses the default behaviour of the oidc-client-ts library, and stores token and user information in HTML 5 Session Storage.

API Calls with Access Tokens

The SPA can now successfully get an access token from the oidc-client-ts library and call the API with it. The axios library is used for HTTP calls, which has good support for reading HTTP error responses:

private async _callApiWithToken(
    url: string,
    method: Method,
    dataToSend: any,
    accessToken: string): Promise<any> {

    const response = await axios.request({
        url,
        method,
        data: dataToSend,
        headers: {
            'Authorization': `Bearer ${accessToken}`,
        },
    });

    AxiosUtils.checkJson(response.data);
    return response.data;
}

The API credential is a Bearer Token, and if an attacker can somehow get hold of one they can also send it to the API. A key OAuth security mitigation to protect against this is to keep access tokens short lived.

Safe Input Handling

We use the technically simple Mustache Template Library to bind received data to the main element of our SPA. This ensures that we safely handle any potentially dangerous input received from the API or other sources.

private _renderData(data: CompanyTransactions): void {

    const viewModel = {
        title: `Today's Transactions for ${data.company.name}`,
        transactions: data.transactions.map((transaction) => {
            return {
                id: transaction.id,
                investorId: transaction.investorId,
                formattedAmountUsd: Number(transaction.amountUsd).toLocaleString(),
            };
        }),
    };

    const htmlTemplate =
        `<div class='card border-0'>
            <div class='card-header row fw-bold'>
                <div class='col-12 text-center mx-auto fw-bold'>
                    {{title}}
                </div>
            </div>
            <div class='row'>
                {{#transactions}}
                    <div class='col-lg-4 col-md-6 col-xs-12'>
                        <div class='card'>
                            <div class='card-body'>
                                <div class='row'>
                                    <div class='col-6'>Transaction ID</div>
                                    <div class='col-6 text-end valuecolor fw-bold'>{{id}}</div>
                                </div>
                                <div class='row'>
                                    <div class='col-6'>Investor ID</div>
                                    <div class='col-6 text-end valuecolor fw-bold'>{{investorId}}</div>
                                </div>
                                <div class='row'>
                                    <div class='col-6'>Amount USD</div>
                                    <div class='col-6 text-end moneycolor fw-bold'>{{formattedAmountUsd}}</div>
                                </div>
                            </div>
                        </div>
                    </div>
                {{/transactions}}
            </div>
        </div>`;

    const html = mustache.render(htmlTemplate, viewModel);
    DomUtils.html('#main', html);
}

In later posts we will update our SPA to use React, and this web framework will provide similar input protection.

Navigation via Hash Change Events

The SPA performs navigation after user actions by simply setting a hash fragment value, such as #company=2. The application class subscribes to the window.onhashchange and asks the router to reload the main view.

Each navigation action triggers additional API requests, and eventually the access token stored in the SPA will expire. The SPA must be prepared for this type of expiry event in order to run reliably.

Reliable API Calls

Any reliable OAuth client must implement the following behaviour:

  • If an API call fails with a 401
  • Then try to get a new access token, once only
  • Then retry the API call, once only

The code is structured to enable this, though the first code sample does not yet implement token refresh:

private async _callApi(path: string, method: Method, dataToSend?: any): Promise<any> {

    const url = `${this._apiBaseUrl}${path}`;

    const token = await this._authenticator.getAccessToken();
    if (!token) {
        await this._authenticator.startLogin(null);
        throw ErrorHandler.getFromLoginRequired();
    }

    try {

        return await this._callApiWithToken(url, method, dataToSend, token);

    } catch (e: any) {

        const error = e as UIError;
        if (error.statusCode !== 401)
            throw e;

        await this._authenticator.startLogin(error);
        throw ErrorHandler.getFromLoginRequired();
    }
}

The SPA does not try to anticipate API 401 responses based on expiry times, since there are multiple reasons why these could occur. The SPA also never reads the content of access tokens, since only APIs should do this.

SPA Error Handling

The SPA uses a number of error codes that it can program against, and some error codes can be returned from the API or the Authorization Server:

export class ErrorCodes {

    public static readonly loginRequired = 'login_required';

    public static readonly loginRequestFailed = 'login_request_failed';

    public static readonly loginResponseFailed = 'login_response_failed';

    public static readonly generalUIError = 'ui_error';

    public static readonly networkError = 'network_error';

    public static readonly jsonDataError = 'json_data_error';

    public static readonly responseError = 'http_response_error';

    public static readonly companyNotFound = 'company_not_found';

    public static readonly invalidCompanyId = 'invalid_company_id';
}

The SPA’s ErrorHandler class translates errors into an object that contains error codes and other useful fields . This includes parsing the OAuth error and error_description fields from Cognito error responses:

private static _getOAuthExceptionMessage(exception: any): string {

    let oauthError = '';
    if (exception.error) {
        oauthError = exception.error;
        if (exception.error_description) {
            oauthError += ` : ${exception.error_description.replace(/\+/g, ' ')}`;
        }
    }

    if (oauthError) {
        return oauthError;
    } else {
        return ErrorHandler._getExceptionMessage(exception);
    }
}

The API does not return sensitive error details to the SPA, so the error data can be safely displayed. The final SPA will improve on this UX, by only showing detailed error information when a ‘Details‘ link is clicked:

OAuth introduces additional endpoints, messages and configuration settings into UI clients, so there is plenty of scope for problems when getting integrated. I recommend implementing solid error handling and simulating failures early, since doing so improves productivity.

Where Are We?

We have explained how the initial SPA is coded, and the oidc-client-ts security library is doing the difficult security work. The SPA’s code will be extended in the second code sample, to complete its session management.

Next Steps

SPA and API – OAuth Messages

Background

In our last post we described How to Run the Basic SPA Sample. Next we will take a closer look at HTTP messages used by our UI and API, to understand OAuth request and response payloads.

OAuth Workflows

Using an OAuth secured app generates a workflow of HTTP messages, starting from when the SPA is initially accessed, proceeding through to logins, then API calls, then dealing with token expiry and logouts.

This page will provide screenshots to visualise the partial workflow covered by the initial code sample when using AWS Cognito as the authorization server, and we will point out the most important behaviour.

Developer URLs

This blog recommends an OAuth development setup where three logical domains similar to the following are used on a development computer. This best enables thinking about the responsibility of each component.

Component Base URL
SPA http://web.mycompany.com
API http://api.mycompany.com
Authorization Server http://login.mycompany.com

When using an HTTP value for the SPA’s redirect URI, Cognito has a restriction on the using a localhost based value for the redirect URI. The code example manages this by redirecting back to the correct domain name when it receives a login response.

Viewing OAuth Messages

Most of the time I trace HTTP/S messages using a proxy tool rather than browser tools. This allows me to view traffic from both the SPA and API together. See the below post if you are new to this type of tool:

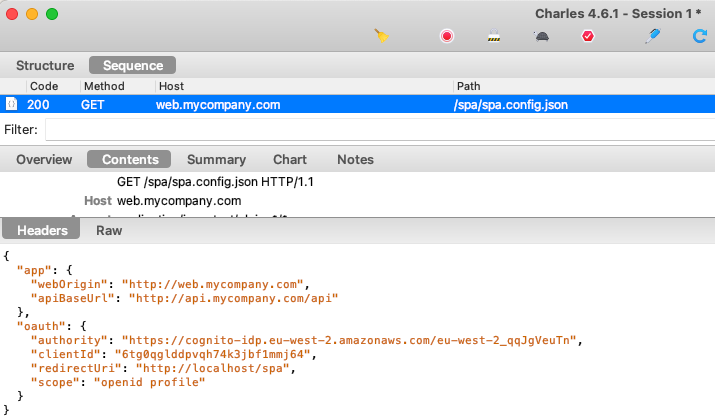
Step 1. SPA Downloads its Configuration

The sample first downloads configuration settings from the server, since I don’t want to hard code these details in Javascript code.

Step 2. A Login Redirect is Triggered

As part of loading views, the SPA looks for an existing access token. It does not have one yet, so the SPA asks the oidc-client-ts library to begin an authorization request.

Step 3. SPA Gets OpenID Connect Metadata

The first thing the security library does is make a cross origin HTTP request to get OpenID Connect metadata at the below URL. In some systems you will need to enable CORS permissions for. this to work:

The metadata response includes details about the authorization server capabilities and its OpenID Connect endpoints:

Step 4. SPA Redirects to Authorization Endpoint

The oidc-client-ts library then creates an authorization redirect URL using OpenID Connect keywords. The SPA sets its location to this URL, to cause a front channel browser redirect to Cognito’s Authorization Endpoint:

Authorization servers will check parameters and only allow requests from valid applications, whose Client ID and Redirect URI are registered as an OAuth client.

The Authorization Code Flow (PKCE) is recognised by the presence of the response_type=code and code_challenge parameters. Note also that we use the following scope parameters:

Scope Meaning
openid OpenID Connect is being used as the sign in protocol
profile Needed later to get the User’s Name from the User Info Endpoint

Step 5. User Authenticates

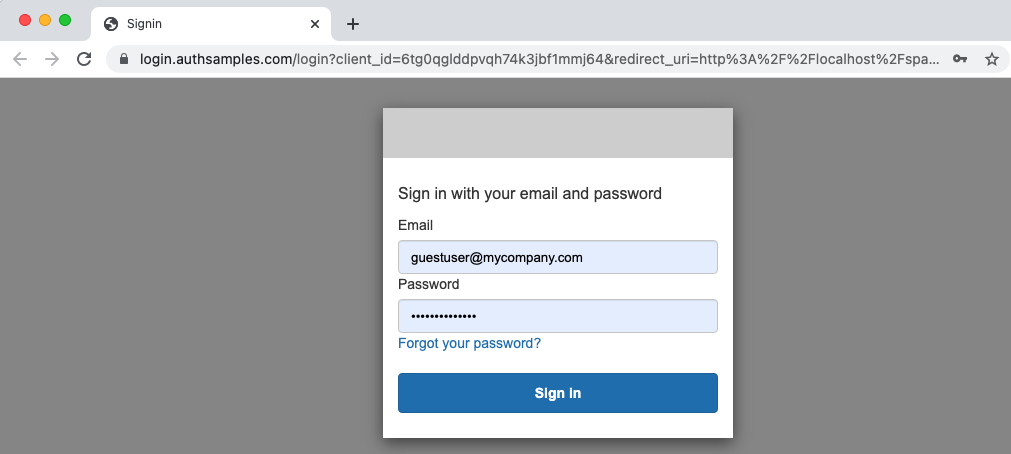
Next the login screen is presented and in a real app the user would type valid Cognito password credentials as proof of identity. In this blog however we are just using well known test users to allow anyone to sign in:

Step 6. An Authenticated User Session is Started

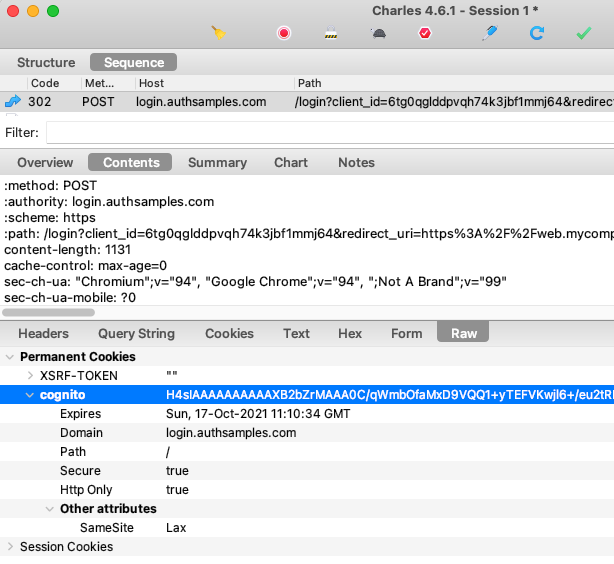
Once a login completes successfully, a session or ‘SSO’ cookie is set by the authorization server. In subsequent requests the authorization server knows the user is already signed in when it receives this cookie, and can avoid login prompts.

The most standard option for identity systems is to use SameSite=none, to inform browsers that this is a third party cookie. Cognito instead uses SameSite=lax which will cause some token renewal problems in later posts.

Step 7. An Authorization Response is Returned

Cognito then triggers a redirect back to the SPA with the successful authorization result, which is an Authorization Code. The SPA’s main page must then execute again and handle this login response:

The security library takes care of OAuth security checks such as verifying that the response state parameter matches the request state parameter, so we do not have to write this type of code ourselves.

Step 8. SPA Swaps Code for Tokens

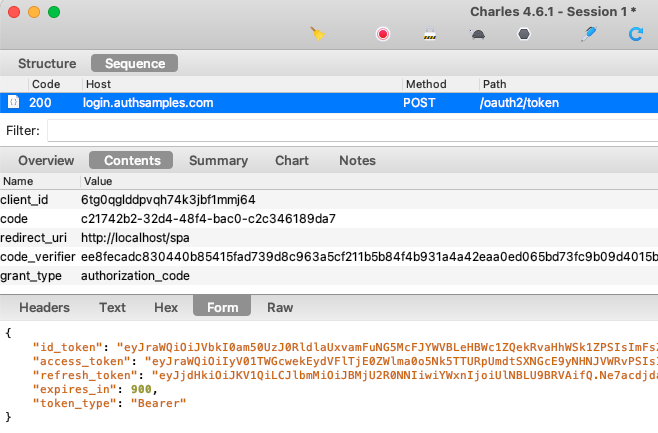
The SPA then makes a direct HTTPS back channel request to the Authorization Server’s Token Endpoint. This is an Authorization Code Grant message to swap the code for tokens:

In OAuth there are multiple grant messages and this is just one of them. The result of all grant messages is to receive tokens, and we have configured Cognito to return access tokens with a short 15 minute expiry.

An OAuth flow for SPAs should avoid returning refresh tokens to the browser, since it is a long lived credential and the browser has nowhere secure to store it. Yet AWS Cognito does not allow the refresh token to be disabled. The Final SPA will show a better way to deal with refresh tokens.

Step 9. Proof Key for Code Exchange is Used

PKCE is an extension to the original authorization code flow, and involves the following additional steps:

  • UI generates a runtime secret (code_verifier) when beginning a login redirect
  • UI sends a hash of the secret (code_challenge) in the authorization request
  • UI posts the code verifier when exchanging the code for tokens
  • Authorization server verifies that hash of the verifier matches the challenge received earlier, before issuing tokens

This protects against some types of attack, such as a malicious party sending an intercepted authorization code to the authorization server. 

Step 10. Login Errors are Handled

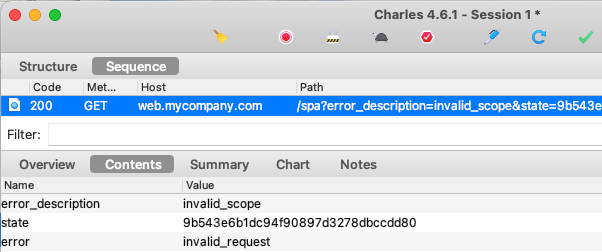
Login requests can sometimes result in errors being returned, so let’s see an example of this. We will configure an invalid scope in our SPA, and ensure that the error is handled in a controlled manner:

{
    "app": {
        "webOrigin":        "http://web.mycompany.com",
        "apiBaseUrl":       "http://api.mycompany.com/api"
    },
    "oauth": {
        "authority":        "https://cognito-idp.eu-west-2.amazonaws.com/eu-west-2_qqJgVeuTn",
        "clientId":         "6tg0qglddpvqh74k3jbf1mmj64",
        "redirectUri":      "http://localhost/spa",
        "scope":            "openid profile xxx"
    }
}

If a login redirect is attempted, we receive an error response, and it is standard for OAuth errors to be returned in error / error_description fields:

The error details are read for us by the oidc-client-ts library, and our UI presents the error in a clear manner to help with problem resolution:

Note also that errors are only returned to the client when a recognised Client ID and Redirect URI are provided, and if this is not the case the authorization server will render an error page instead:

Step 11. View Access Token Claims

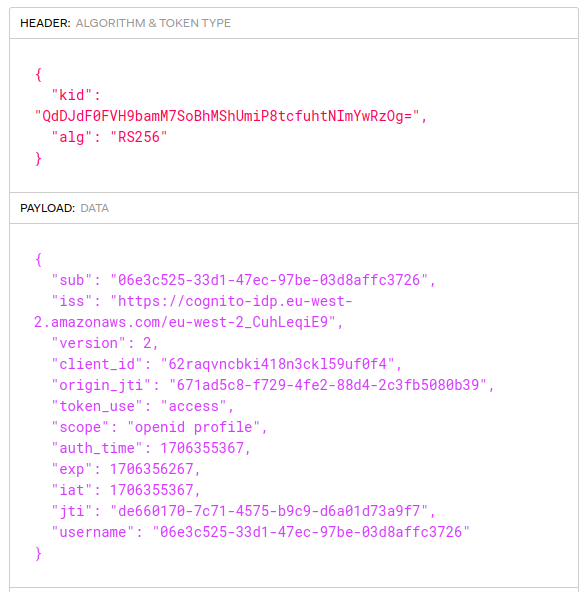
After step 8 the SPA workflow typically continues by the SPA calling the API with an access token. First let’s view the token claims by pasting the JWT text into an Online Viewer:

The token is a JWT that is digitally signed and which must be verified by APIs. The values in the payload are called ‘claims’ and the API can trust them after it has verified the digital signature:

  • sub: A unique immutable identifier for the user
  • iss: The authorization server that issued the token
  • client_id: The identity of the SPA’s OAuth client
  • scope: Scopes provide high level privileges for the token
  • exp: The time when the token expires

Many authorization servers also issue an ‘aud‘ claim, where the audience can represent one or more related APIs that can accept the access token.

Currently the access token contains only generic protocol claims. For the second code sample it will be updated to include custom claims that the API uses for its business authorization.

Step 12. View ID Token Claims

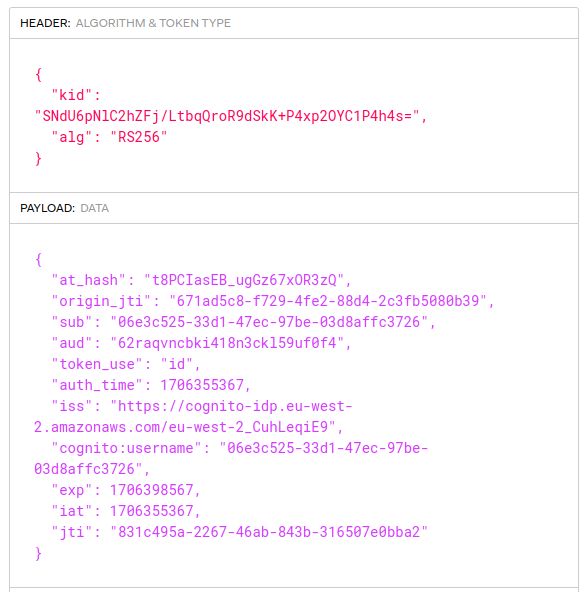
Because the SPA included the openid scope, an ID Token is also received, which provides proof of authentication to the UI. The audience claim of this token is therefore the client ID of the SPA:

The ID Tokens post explains how I always configure the authorization server to exclude any personally data such as names and emails from ID tokens. This reduces security concerns about unintentionally revealing sensitive data.

Step 13. UI Downloads User Info

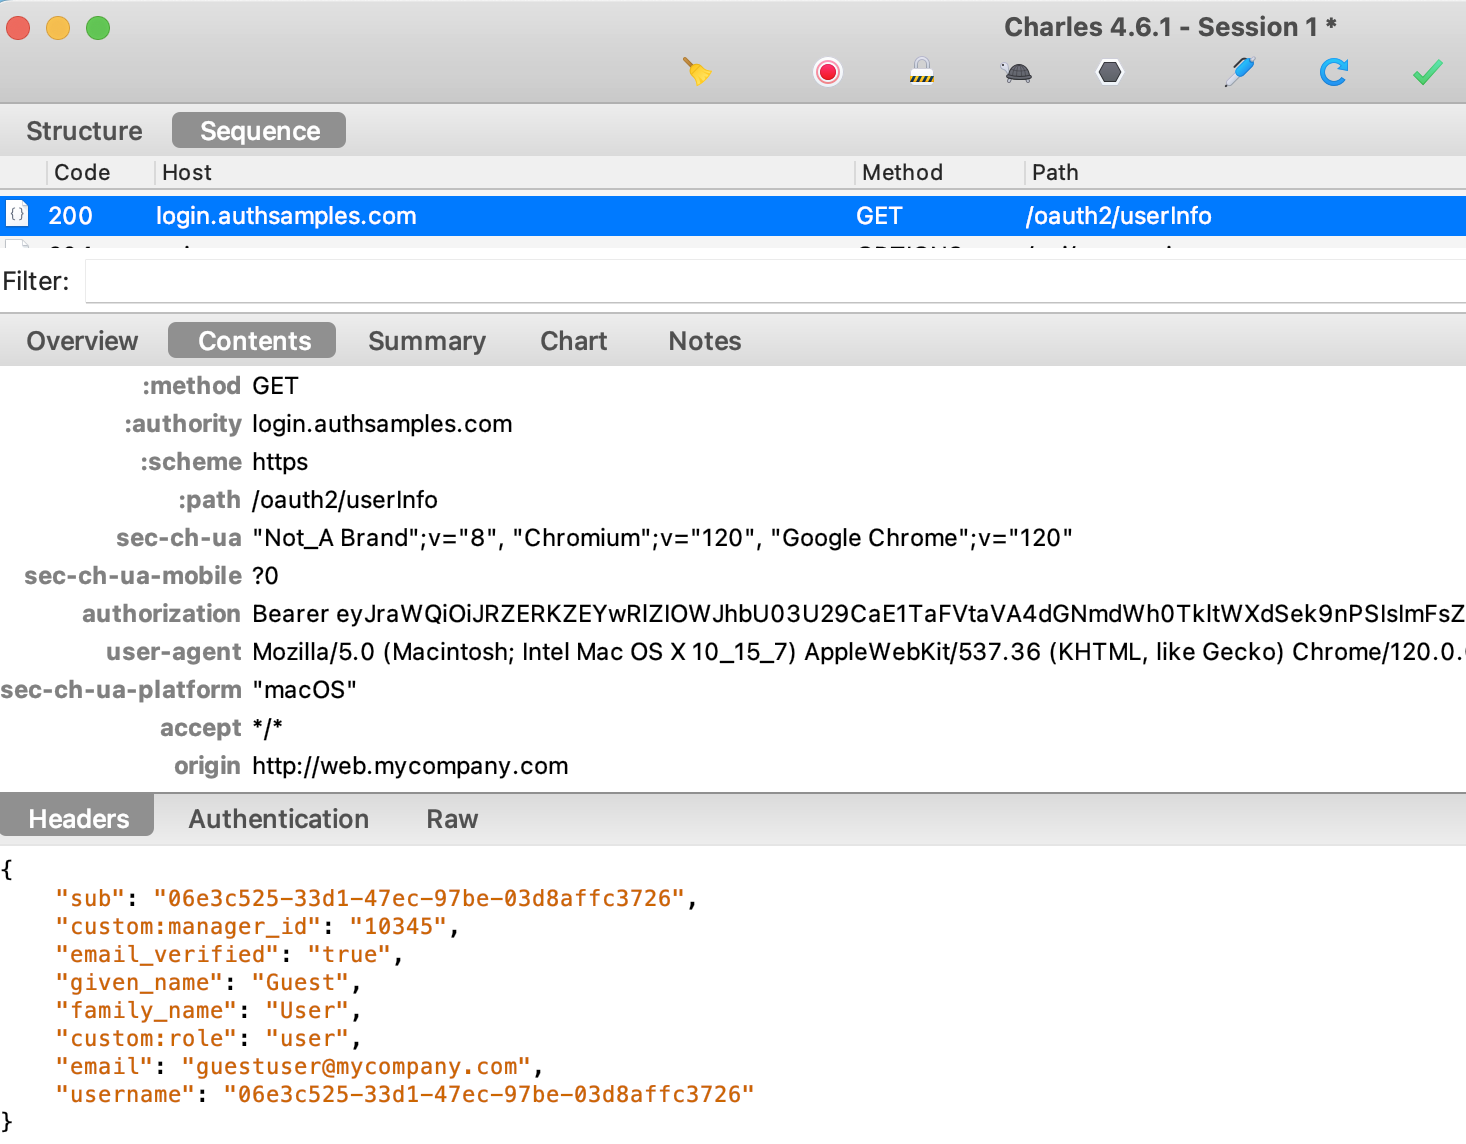
Next the oidc-client-ts library sends the access token to the authorization server’s User Info Endpoint, to get additional details for the user. I always code apps to receive personal data from this endpoint, rather than from the ID token:

Step 14. UI Stores Tokens and User Info

After login the SPA stores tokens and user info in Session Storage, so that if the page is refreshed the user does not need to re-login. We will use more secure options in future posts.

Step 15. SPA Calls API with Access Token

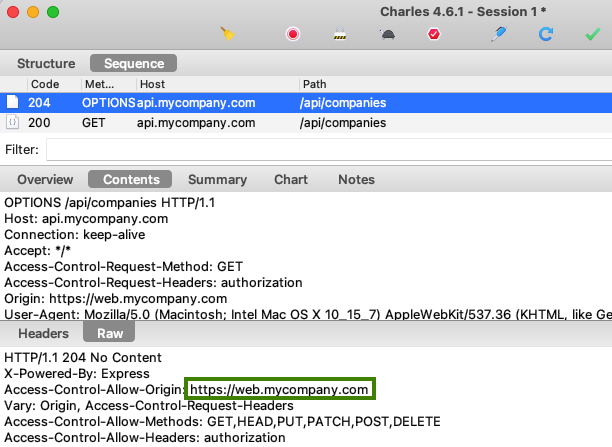
Next the SPA calls the API and, because this is a cross domain call, the browser first triggers a pre flight HTTP OPTIONS request. The API response to the pre-flight request Grants API Access to the Web Origin:

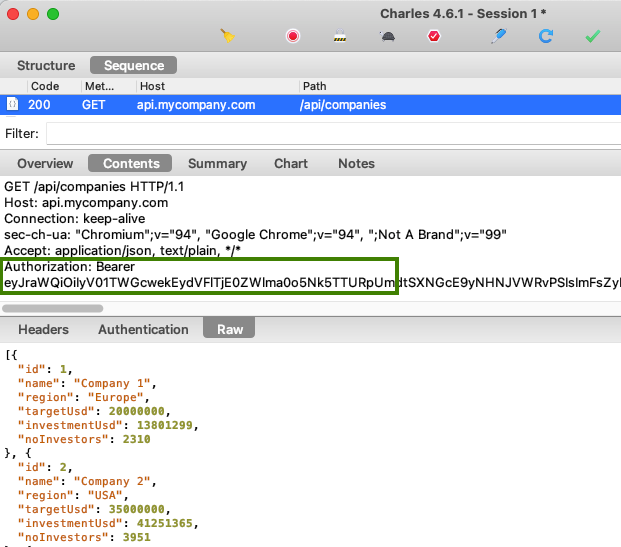
The actual API request then looks like this, and the access token is sent in the HTTP Authorization header as a bearer credential. Any party who has the access token can call the API like this:

Step 16. API Validates Access Token

When the API receives the token it is the API’s job to validate it, which typically involves checking the following:

Property Expectation
Issuer The token is from our authorization server
Audience The token was issued for our API
Digital Signature The token has not been tampered with since issued
Active The token is valid at the current time and not expired

To verify the access token’s digital signature, the API must download token signing public keys from AWS Cognito. This is done when the JOSE security library calls the JWKS endpoint:

The response contains JSON Web Keys, and the security library selects the one that matches the key identifier (kid) in the access token’s JWT header. The library then forms a public key and uses it to digitally verify the JWT.

Any good API security library will then cache JSON Web Keys in memory to avoid unnecessary lookups on subsequent API requests, whose access tokens use the same key identifier.

Step 17. API Returns Correct Error Status Codes

If the API’s token validation fails, the API must return one of these error statuses in the response:

  • If the token is missing, invalid or expired, return a 401 response
  • If there was a technical problem in the API, return a 500 response

It is worth testing these scenarios to ensure that the API returns useful error responses to the SPA. The second failure scenario can be tested by configuring an invalid JWKS endpoint in the API’s configuration:

{
    "api": {
        "port": 80,
        "trustedOrigins": [
            "http://web.mycompany.com"
        ],
        "useProxy": false,
        "proxyUrl": "http://127.0.0.1:8888"
    },
    "oauth": {
        "jwksEndpoint": "https://cognito-idp.eu-west-2.amazonaws.com/eu-west-2_qqJgVeuTn/.well-known/jwks.jsonxxx",
        "algorithm": "RS256",
        "issuer": "https://cognito-idp.eu-west-2.amazonaws.com/eu-west-2_qqJgVeuTn",
        "audience": ""
    }
}

The API then returns a 500 error to the UI, since a technical problem has occurred that is not the fault of the client.  This is clearly indicated in the error display, so that troubleshooting could focus on the API:

Meanwhile the API performs some basic but readable error logging, including the error returned to the client and the exception details. We will explore API supportability in more depth for future posts.

Step 18. API uses Claims for Authorization

Once token validation has completed, the API can trust claims from the JWT and use them to authorize access to data. A common check would be to only return data for the user identified by the subject from the access token:

  • Filtering collections to only return items the user is entitled to
  • Denying access if an unauthorized single item was requested

Step 19. API Returns 401 when the Token Expires

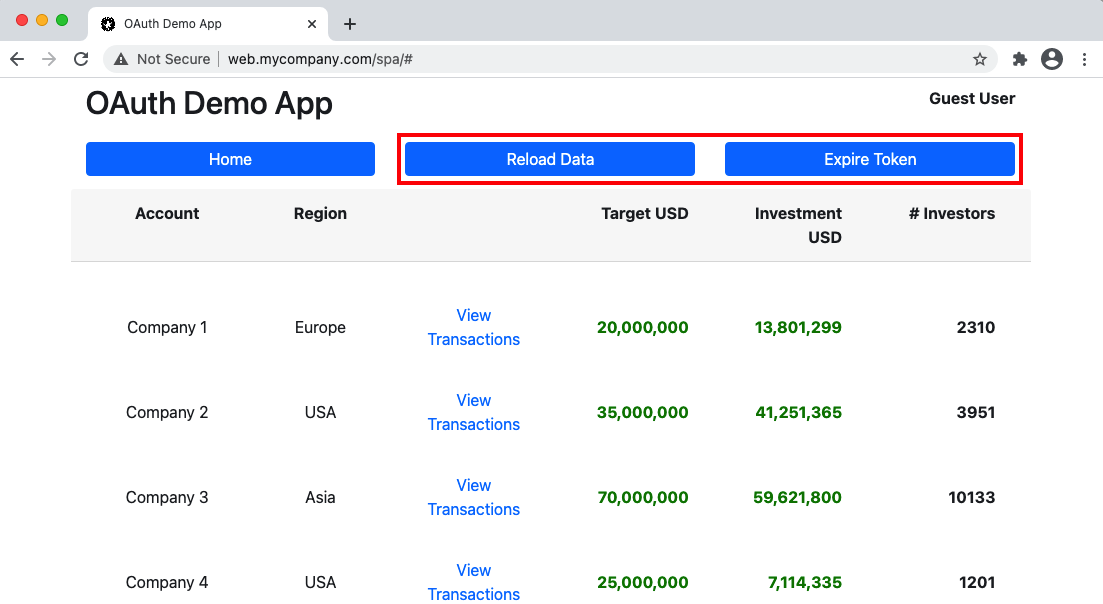
The UI will continue to use the access token until it expires 15 minutes after login, or the user closes their browser. This can be simulated by clicking Expire Token followed by Reload Data:

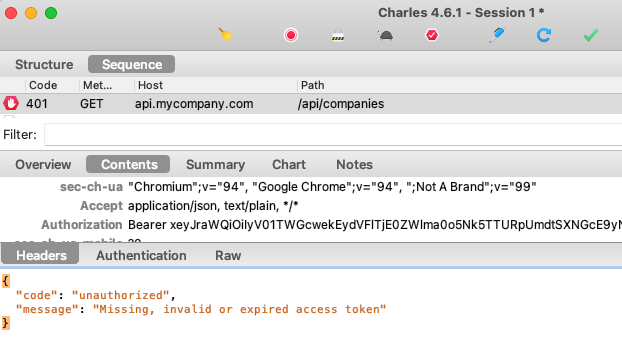
Of course we cannot really change time to expire a token, so this test operation simply adds characters to the token to cause the API token validation to fail with a 401:

Step 20. SPA Handles Access Token Expiry

The SPA is coded to expect 401 responses and deal with them without end user problems. No token renewal capability has been implemented yet, so the user is redirected to sign in again, which is not a good user experience.

Due to the SSO Session Cookie issued earlier, a Single Sign On occurs and new tokens are issued to the SPA automatically. The SPA can then continue to call the API with the new access token.

Understanding Additional OAuth Standards

Only a basic login flow is described above. The OpenID Connect specification provides a number of additional request parameters that can be used to control how authentication works and the values published to ID tokens.

Once you have a productive process for tracing HTTP requests in both browser and non-browser components, you will be able to debug many other OAuth and OpenID Connect flows in the same way.

Where Are We?

We have used OAuth technologies to securely integrate our SPA and API with an authorization server, and we understand the messages used. The initial end-to-end flow is missing some web and API lifecycle behaviours, and these will be addressed in the next code sample.

Next Steps

Basic SPA – How to Run the Sample

Background

The Overview Page summarised the behaviour of the initial SPA and API code sample. Next we will get it running on a Developer PC, then visually describe the important OAuth related behaviour.
Prerequisites

This blog’s code examples run in any Linux based terminal, and are tested on Ubuntu, Windows and macOS. On Windows it is expected that a Git Bash shell is used. Also ensure that an up to date version of Node.js is installed for your operating system.

Step 1: Download Code from GitHub

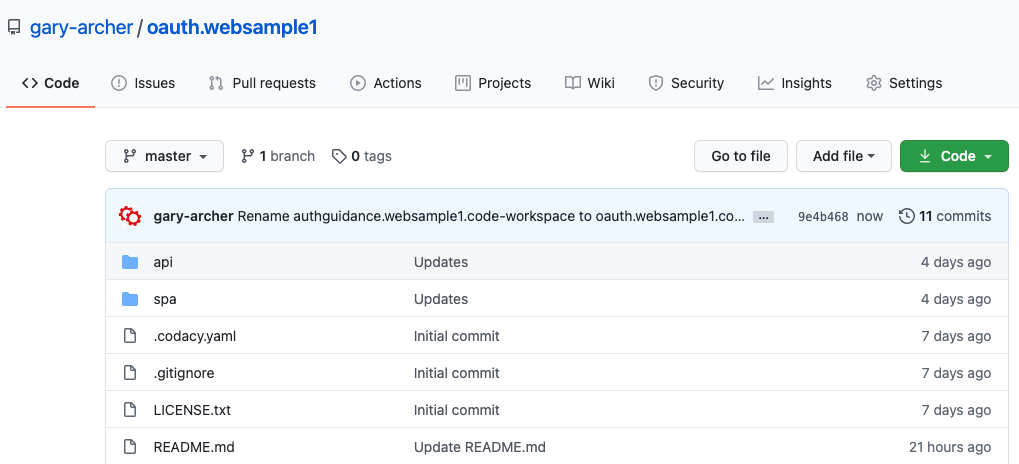
The project is available here, consisting of a UI and API component. It can be downloaded / cloned to your local PC with this command:

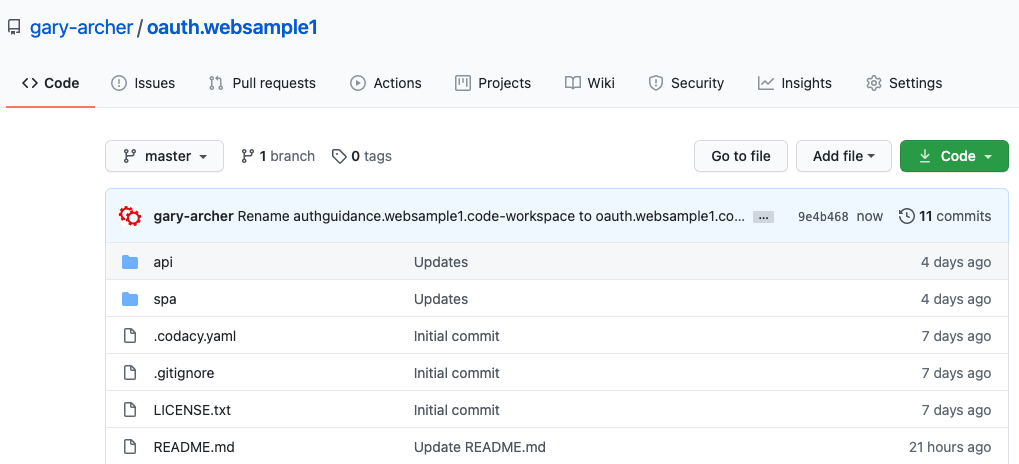
  • git clone https://github.com/gary-archer/oauth.websample1

Step 2: View Code in an IDE

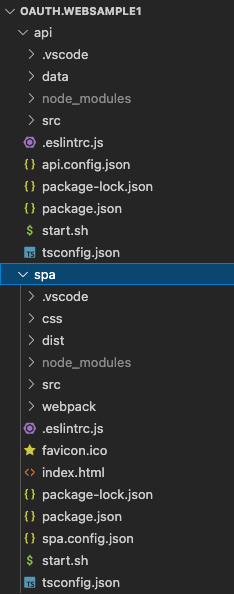
I use Visual Studio Code on macOS and Windows, but any editor can be used. Select ‘Open Folder‘ then browse to oauth.websample1:

The project demonstrates a code setup to aim for. Firstly, JavaScript code runs in the browser and is focused on a great user experience. Secondly, API code serves data to frontends. All code is business focused, with less plumbing than older ‘web back end‘ solutions.

Step 3: View Configuration

Both the SPA and API use configuration files that highlight important OAuth settings. The SPA acts as an ‘OAuth Client‘ and uses these fields:

{
    "app": {
        "webOrigin":        "http://web.mycompany.com",
        "apiBaseUrl":       "http://api.mycompany.com/api"
    },
    "oauth": {
        "authority":        "https://cognito-idp.eu-west-2.amazonaws.com/eu-west-2_qqJgVeuTn",
        "clientId":         "6tg0qglddpvqh74k3jbf1mmj64",
        "redirectUri":      "http://localhost/spa",
        "scope":            "openid profile"
    }
}

The API acts as an ‘OAuth Resource Server‘ and uses these fields. We will explain these settings as we progress.

{
    "api": {
        "port": 80,
        "trustedOrigins": [
            "http://web.mycompany.com"
        ],
        "useProxy": false,
        "proxyUrl": "http://127.0.0.1:8888"
    },
    "oauth": {
        "jwksEndpoint": "https://cognito-idp.eu-west-2.amazonaws.com/eu-west-2_qqJgVeuTn/.well-known/jwks.json",
        "algorithm": "RS256",
        "issuer": "https://cognito-idp.eu-west-2.amazonaws.com/eu-west-2_qqJgVeuTn",
        "audience": ""
    }
}

Step 4: Authorization Server Setup

Both the SPA and API use endpoints from my personal AWS Cognito account, which is a low cost cloud solution. Jump ahead to these future posts for further details:

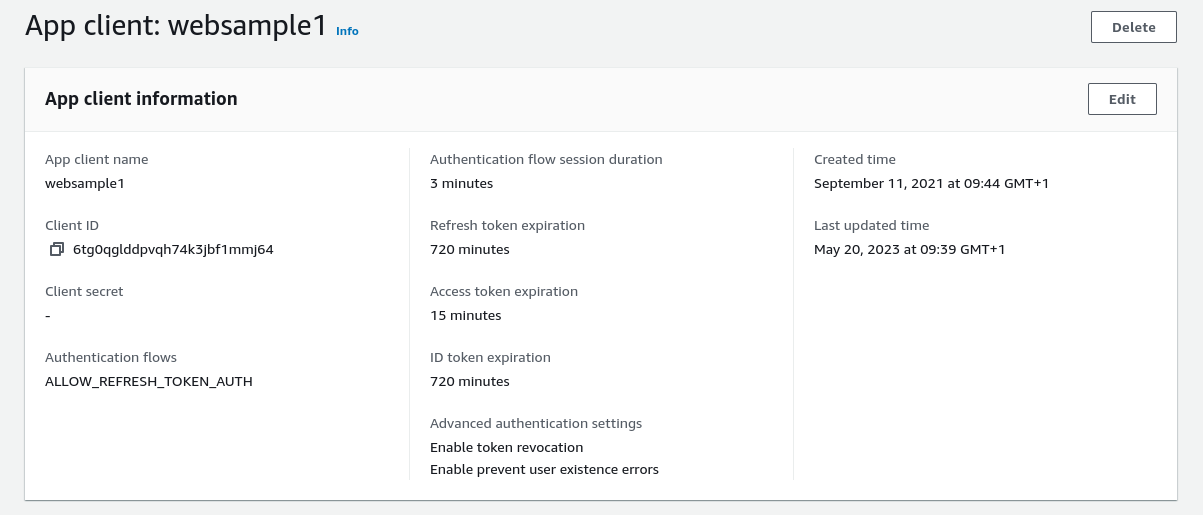
OAuth clients must be registered at the Authorization Server, and our SPA includes an online entry as follows:

The registered OAuth settings for Client ID, Redirect URI and Scope allow these values to be used by applications. The same values must be used in the SPA’s own configuration.

For the first code sample we will use HTTP URLs, and Cognito requires us to register a host name of localhost in this case. For future samples we will register HTTPS URLs instead.

This blog’s code samples are standards based, so you can change configurations to point to your own Authorization Server instead. You will then be able to use your own preferred URLs and ports for the SPA and API.

Step 5: User Setup

This blog will use the following main Cognito test account for signing in to the SPA. This is not a real user and no personal data is used by this blog’s code samples:

  • User = guestuser@mycompany.com
  • Password = GuestPassword1

Step 6: Domain Setup

This blog’s code samples will run on the local computer using DNS based URLs that represent a deployed architecture, and localhost based URLs will be avoided where possible. The initial code sample runs on these URLs:

Component URL
Secured API http://api.mycompany.com/api
Secured SPA http://web.mycompany.com/spa

To enable this on a development computer, add these entries to your hosts file, and see the OAuth Infrastructure Setup for further details.

127.0.0.1 localhost web.mycompany.com api.mycompany.com

Step 7: Run the SPA and API

In the root folder, run the following script to spin up the system. This essentially just runs ‘npm install‘ and ‘npm start‘ for the SPA and API components:

./start.sh

The start script then triggers child scripts that run in other terminal windows, which are invoked slightly differently depending on the host computer platform:

if [ "$PLATFORM" == 'MACOS' ]; then

  open -a Terminal ./spa/start.sh
  open -a Terminal ./api/start.sh

elif [ "$PLATFORM" == 'WINDOWS' ]; then

  GIT_BASH="C:\Program Files\Git\git-bash.exe"
  "$GIT_BASH" -c ./spa/start.sh &
  "$GIT_BASH" -c ./api/start.sh &

elif [ "$PLATFORM" == 'LINUX' ]; then

  gnome-terminal -- ./spa/start.sh
  gnome-terminal -- ./api/start.sh
fi

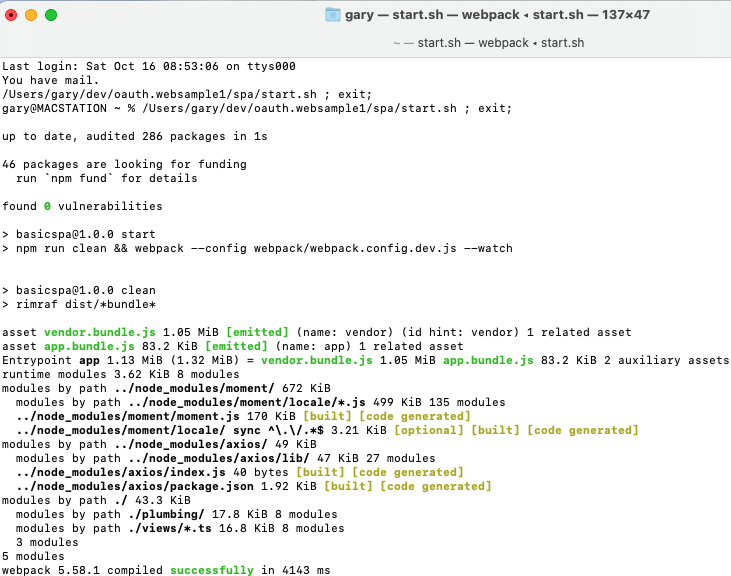
The first child terminal builds the SPA’s Javascript bundles:

The second terminal is for the API, which listens on port 80, and requires administrator privileges for the local computer. If another component is using this port, stop that process temporarily.

To keep the developer setup simple, the API also serves the SPA’s bundle files to the browser. Later in this blog we will update to a development web host, and deploy the final SPA to a Content Delivery Network.

Step 8: Login to the SPA

The script then invokes a browser at http://web.mycompany.com/spa, and the SPA triggers an OpenID Connect redirect when it loads, to get an OAuth access token, so that it can call the API:

After signing in, the SPA is rendered, which just shows hard coded fictional data returned from the API. This data is secured using OAuth access tokens, and the SPA and API code uses CORS, to support cross origin deployments.

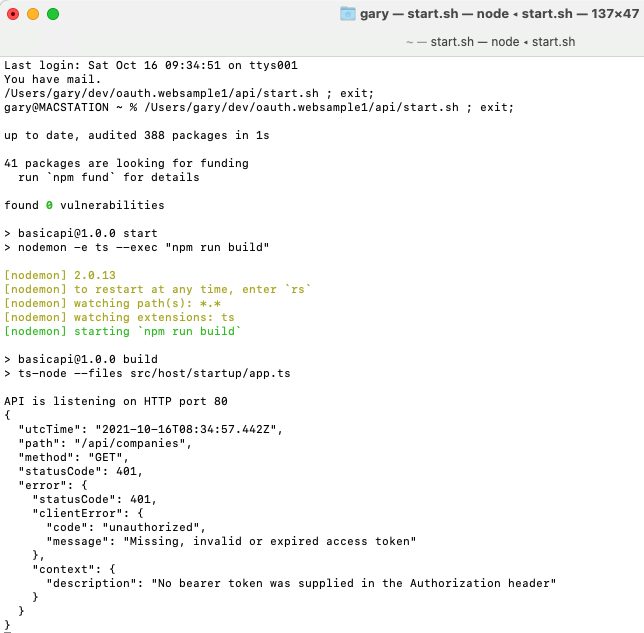
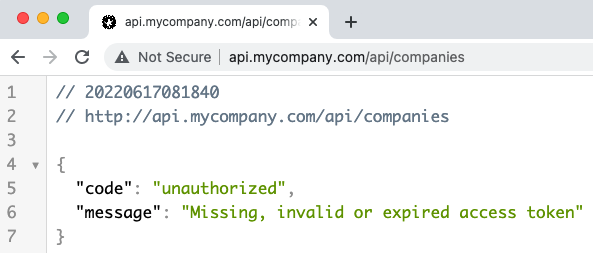
The first API call is to http://api.mycompany.com/api/companies, and if you browse there directly you will get a 401 response, since direct browsing to APIs does not send an OAuth access token:

Step 9: Run Navigation Actions

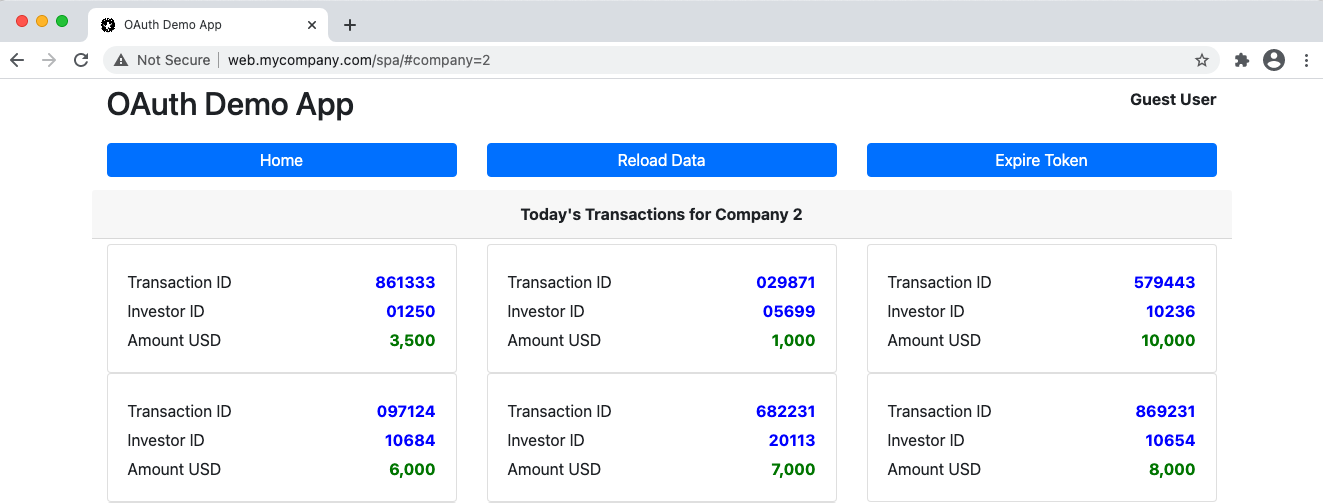
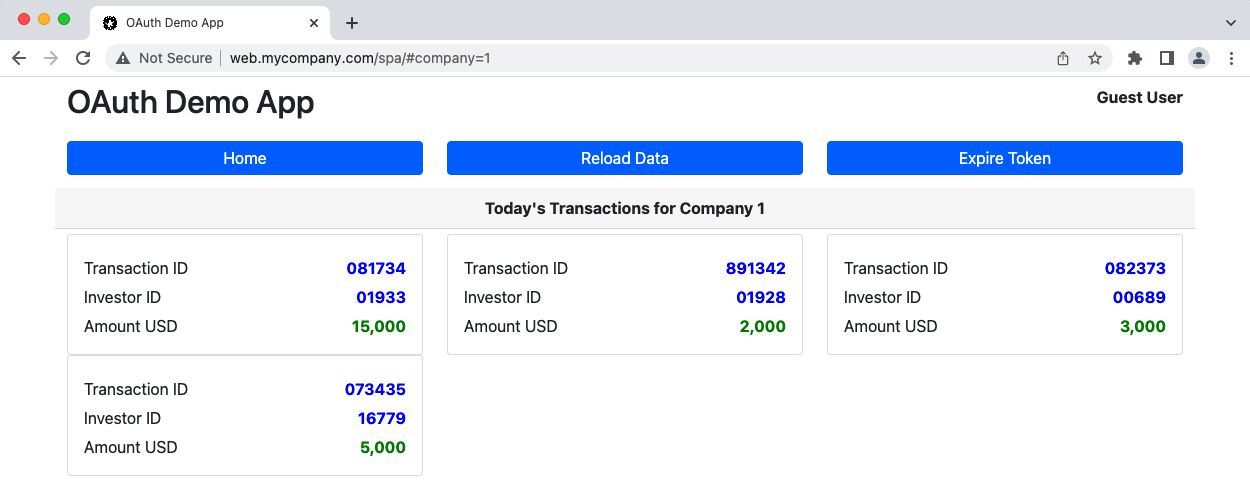
You can navigate to the SPA’s second view by clicking one of the View Transactions links. The following type of URL can also be typed in the browser:

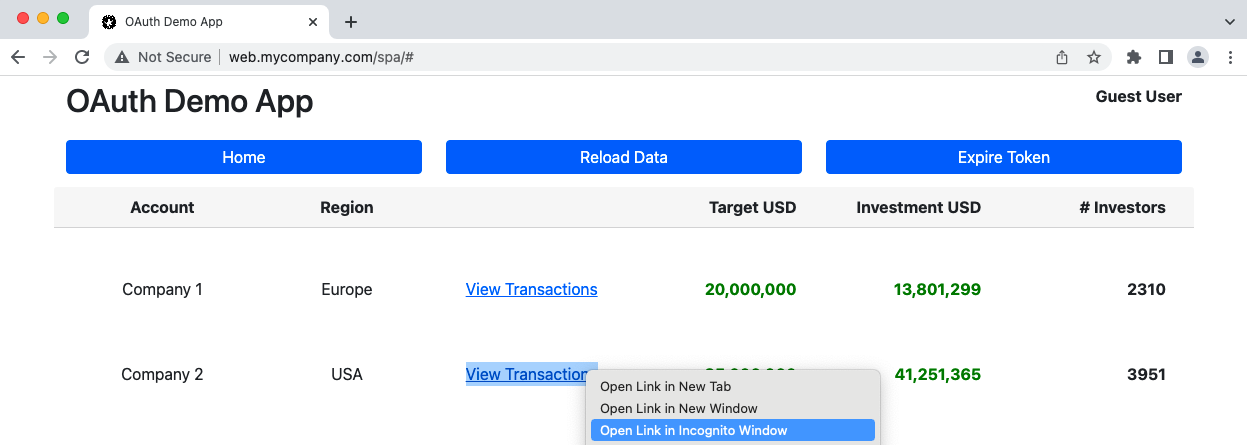
SPA URLs can be bookmarked, and this can be done by opening a new browser tab or window. If a private browser window is used, the user is redirected to sign in again, then returned to the bookmarked screen:

Step 10: Run a User Session

The SPA’s session management is incomplete in the initial sample. Every time the access token expires the user has to login again. This can be simulated by clicking Expire Token followed by Reload Data.

The code samples stores access tokens in session storage, so that page reloads do not redirect the browser. However, opening a new browser tab or window does a Single Sign On operation, to get a new access token.

Step 11: View Browser Traffic

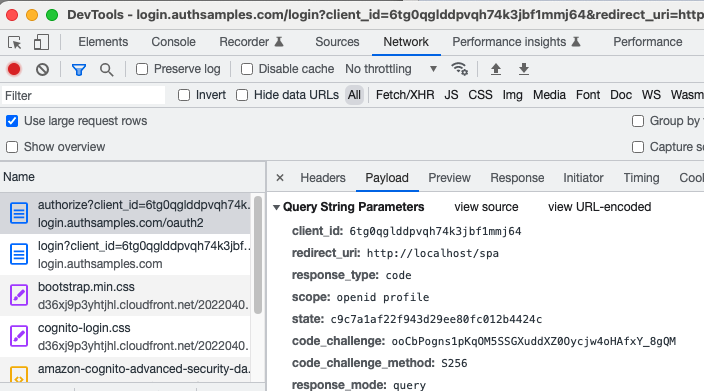
Developers need to understand OAuth messages, which are sent using an HTTP language, with input and output parameter names defined in OAuth specifications. An OAuth authorization request begins the login process, and includes a number of query string parameters:

Step 12: View Security Library Logs

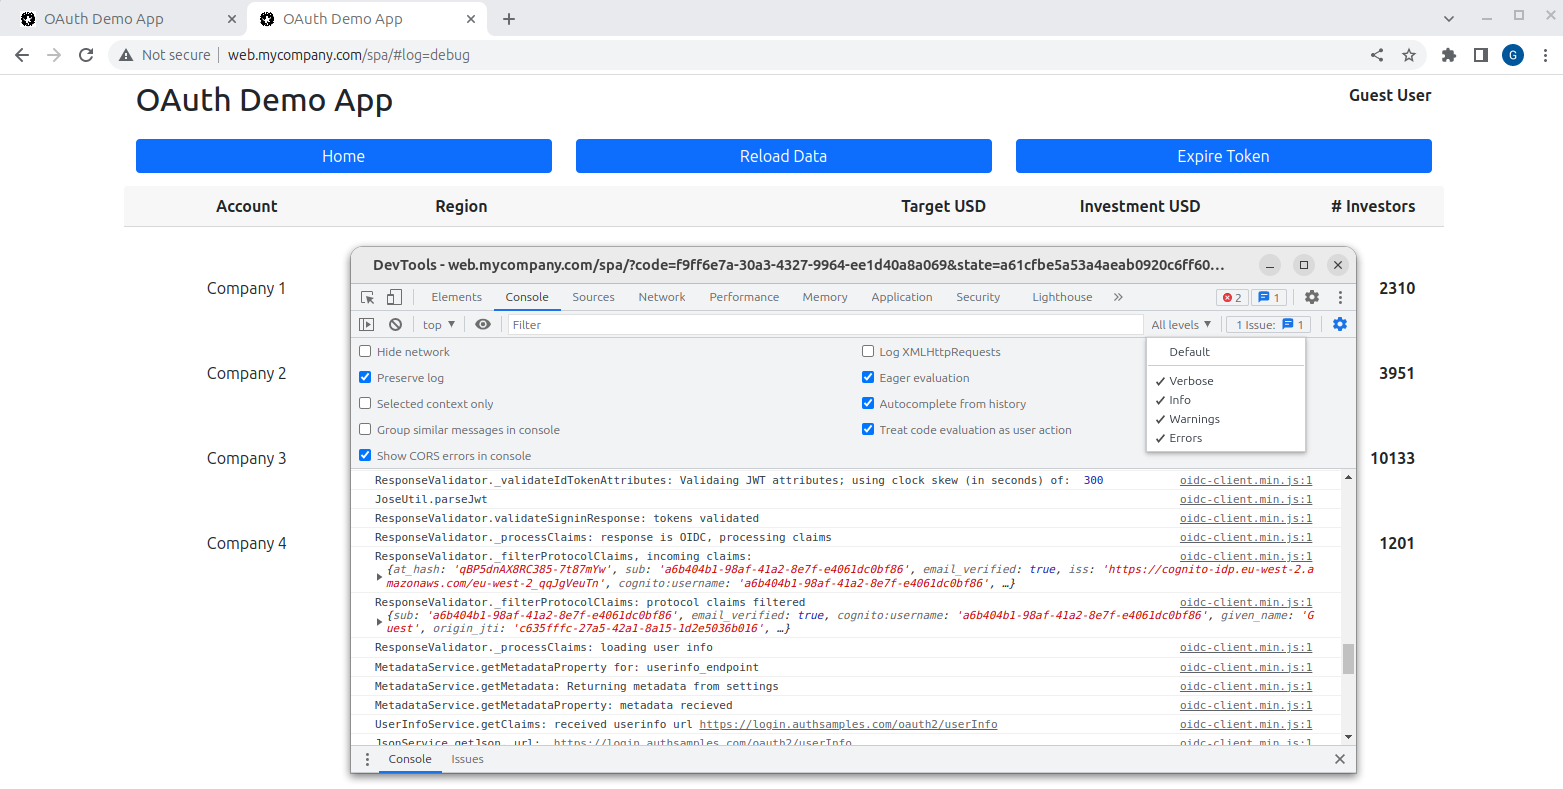
The SPA can show debug details from the oidc-client-ts library, to provide visualisation of the OAuth SPA logic. You can activate this by adding a #log=debug query parameter to the SPA, then viewing the browser console.

In the following screenshot, Google Chrome DevTools is used. Note that the Verbose level is selected in order to show debug messages, and Preserve Log is used, to maintain messages before and after login redirects.

Where Are We?

The initial code sample is focused on how an SPA, API and Authorization Server work together. Next we will drill into OAuth message details that developers should ensure they can visualize, both to understand and  be able to troubleshoot the security.

Next Steps

Basic SPA – Overview

Background

In the Web Architecture Goals page we explained that our first code sample’s objective would be to get an Integrated Setup running on a developer PC, so that access tokens are sent between a UI, API and Authorization Server.

Features

The behaviour provided in our initial sample is summarised below:

Feature Description
Authorization Server Developers can connect to a Cloud Authorization Server from code running on their PC
SPA Security Our SPA uses Authorization Code Flow (PKCE) for logins and uses Access Tokens to call the API
API Security The Web API validates JWT access tokens, then works with claims to implement authorization
Reliable Both the SPA and API handle expiry and other failure conditions in a solid manner
Real World URLs The SPA makes cross domain calls to the API on the local PC, and OAuth messages are viewable

Components

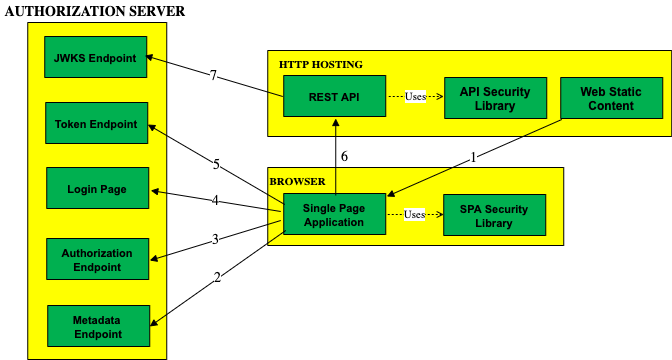
The Basic SPA Code Sample will get the below components and endpoints talking to each other, using OAuth based security:

SPAs in 2021

This sample uses the traditional SPA solution, with OpenID Connect implemented solely in Javascript. This is no longer recommended, and your production apps should instead use a Back End for Front End approach.

The traditional SPA flow remains useful for representing a pure SPA architecture, and learning about OAuth endpoints and messages. This blog’s Final SPA provides a BFF based solution, but requires a more complex flow.

Code Download

The code for our SPA and API can be downloaded from here, and we will cover full details of how to run it, and the interactions involved, in the next post:

Security Libraries

In our SPA and API we will use the following respected open source libraries from the OpenID Connect Libraries website:

Component Library Features
SPA oidc-client-ts Implements OpenID Connect lifecycle events for a browser based client, including logins, logouts and token renewal
API jose Validates JWT access tokens, returns claims and manages looking up and caching of token signing public keys

I tend to avoid vendor libraries, which are often accompanied by marketing, but can sometimes make the code in your apps less portable.

Programming Languages

This blog will use multiple technologies, and they will all be modern and cross platform. I will start with these JavaScript based stacks, and will use TypeScript for its extra language features and type checking benefits:

Component Language Platforms
SPA TypeScript Chrome / Edge / Firefox / Safari / Mobile
API Node.js + TypeScript Windows / macOS / Linux

Simple Web Technology for Early Samples

We will use modern web technology, but will avoid web frameworks to start with, so that requirements and techniques are established that would work with any technology stack:

Step Details
SPA OAuth Coding Model First show how to integrate standards based OAuth support into a Simple SPA so that we can focus on OAuth requirements
Modern SPA Framework Avoid getting sidetracked by too much web technology initially, though our Final SPA will use React

Our Code Sample Theme

This blog’s samples represent a fictional financial scenario, where sensitive investment details are displayed. In a real financial app we would need to be diligent about protecting this data:

The actual data shown is just made up and does not represent anything real. The UI just renders fixed JSON data received from the API. Our Sample UIs will also include a basic Transactions View and we will imagine that this contains sensitive details from particular investors.

This view primarily exists to demonstrate navigation and Deep Linking. Users can Bookmark URLs to Secured Resources, and UIs may need to renew a token or log the user in before presenting the view:

Where Are We?

We have an initial objective and we will build it in a solid manner, with clean code and a good separation of concerns between the SPA, an API and the authorization server.

Next Steps

Web Architecture Goals

Background

The Home Page described OAuth in terms of overall goals for a software platform. In this post we will describe what we are looking for in an Optimal Web Architecture, which is not just about security. This post briefly summarizes some goals and concerns for web apps.
Goal: Best User Experience

Client-side web apps separate HTML and data concerns to deliver a fast experience for end users. A Single Page Application (SPA) visits the server less often, and modern technologies such as React provide an ecosystem with many tools and techniques for building modern apps.
Goal: Productive Front End Development

Technologies such as React are generally simpler from a development viewpoint than older website solutions. Developers couldn’t usually deliver a modern user interface when having to use mechanisms such as postbacks.

OAuth also enables web apps to externalize their security to the authorization server, and to libraries written by experts. This results in simplified application code, due to the outsourced security.

Goal: Good Global Performance

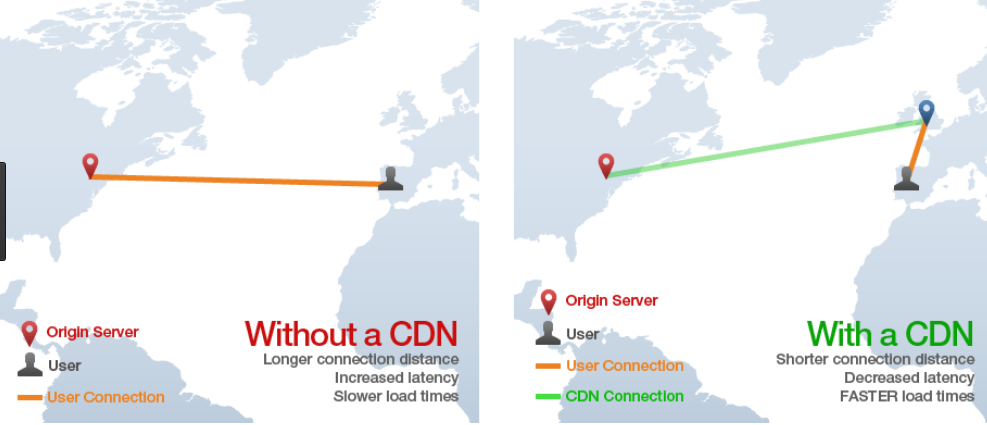
Most companies want good global performance for their Internet web applications. A Content Delivery Network (CDN) is the simplest solution for managing latency. It is harder to enable for web back ends that execute code such as cookie issuing, leading to restricted hosting options.

Goal: Best Security Capabilities

Single page applications must be able to interact with APIs, so need an API message credential. APIs must return only correct and allowed data for each user, so the user must be authenticated first.
OAuth and OpenID Connect provide powerful options for issuing access tokens as API message credentials, and authenticating the user in many possible ways. OAuth for Browser Based Apps provides some best practice recommendations.

Goal: Pass Web Security Reviews

By following web security best practices, vetted by experts, companies will avoid most vulnerabilities and perform better in PEN tests. For web apps, Cross Site Scripting (XSS) is a particular concern that must be addressed, separately to the OAuth implementation.

If an app has XSS vulnerabilities, then an attacker may be able to access secured data in exactly the same way as the real web app. Therefore, reducing the impact of XSS exploits is now a major consideration when designing web solutions.

Goal: Best Login Usability

OpenID Connect can provide multiple ways for users to sign in to an SPA, and this can include options that are both user friendly and secure. In addition, an SPA should be in full control of its navigation behavior:

  • Login Redirects: the UI should be able to save application location and state before a redirect, then restore it afterwards
  • Multi Tab Browsing: the end user should be able to use multiple browser tabs and navigate across multiple applications without issues

Goal: Good Search Results

For unsecured web apps, it is common to want to achieve good Search Engine Optimization results and Server Side Rendering is often used. For secured web apps, such as those used in this blog, views cannot be reached by search bots, and a different web architecture can be used.

Goal: Partner Web Integrations

It used to be common for web apps to show a mix of content. The host application imported JavaScript from various third parties, who provided widgets and mashups, accessed using iframe or div HTML elements.

Yet this type of solution now has major security concerns for the host application, related to XSS and user privacy. It is now preferred to compose applications using APIs, and for each organization to code its own views.

Goal: Scalable Code

Web applications can quickly become large code bases with many pages, that become difficult to manage over time, and adapt to new technologies. A code splitting design is therefore needed, so that multiple teams can work on micro-frontends at different paths within the same web domain.

The attack surface also needs to be considered, for each web domain. This should consider both the scope of API credentials and the scope of XSS threats. Larger platforms should use distinct web domains per business area, so that a low security app cannot impact a high security app.

Goal: Portable Architecture

Portability is often overlooked, but it is common to want to keep your options open. These options are relevant to SPAs:

Aspect Description
Portable Apps Implement OpenID Connect in the SPA in a standard way rather than being locked into one authorization server
Portable Hosting SPAs should be deployable by simply uploading static content, so avoid designs that prevent this

This Blog’s SPA Code Samples

This blog’s posts and the accompanying code samples will explain OAuth features and design patterns gradually, while keeping code simple:

Stage Description
Basics Getting an SPA, API and authorization server working together, with a developer friendly setup
Updated SPA session management for a complete user experience, and flexible API authorization in the API, to protect data
Final A security hardened SPA that runs from a content delivery network and interacts with cloud deployed APIs

We will aim to achieve all of the goals in this page, but it will be a tricky journey. Once complete though, the architecture will be in a great place.

Where Are We?

We have highlighted some desired behavior, and next we will start our first objective, by running an initial OAuth secured SPA and API code sample on a developer PC.

Next Steps