Cloud Native Updates

Background

Previously we described this blog’s Serverless API Coding Model. This completes a cloud version 1 architecture, where the SPA is deployed to a Content Delivery Network, and the API side of the architecture runs without needing to manage any infrastructure.

Cloud Native

Cloud native platforms such as Kubernetes provide an alternative for the API side of the architecture, with richer options for both deployed systems and the type of solution that can be run on a development computer. I think of this as a cloud version 2 architecture.

Future Updates

In future I will enable developers to run this blog’s code samples using cloud native supporting components, which will further improve the developer experience. This will not affect the OAuth designs I have used, so no code in either APIs or user facing apps will need to change.

Next Steps

  • For a list of all blog posts see the Index Page

Serverless API Coding Model

Background

Previously I described this blog’s Serverless API Deployment. Next we will explain how we have coded this blog’s lambda based APIs, to include the behaviours from this blog’s API Journey – Server Side blog post.

Portable Coding Model

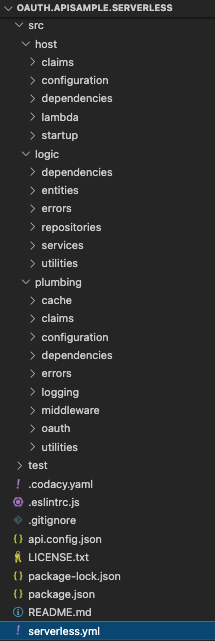
In our earlier Node.js API we used the Express HTTP Server.  As part of migrating to AWS Serverless, we have only changed the API’s host layer. The API logic classes are identical to the earlier API:

Since the code is largely the same as our earlier Express based sample, this post will primarily explain the differences in setup and OAuth processing.

Lambda Entry Points

The entry point to lambda functions is equivalent to our earlier Rest Controller classes and looks like this:

  • A service class is resolved and asked to do the work
  • Cross cutting concerns execute before and after service logic
const container = new Container();
const baseHandler = async (): Promise<APIGatewayProxyResult> => {

    const baseClaims = container.get<BaseClaims>(BASETYPES.BaseClaims);
    ScopeVerifier.enforce(baseClaims.scopes, 'transactions_read');

    const service = container.get<CompanyService>(SAMPLETYPES.CompanyService);
    const companies = await service.getCompanyList();

    return ResponseWriter.objectResponse(200, companies);
};

const configuration = new LambdaConfiguration();
const handler = configuration.enrichHandler(baseHandler, container);

export {handler};

Applying Cross Cutting Concerns

Lambdas are enriched by injecting middleware classes to manage aspects such as Authorization, Logging and Error Handling:

public enrichHandler(baseHandler: AsyncHandler, container: Container)
    : middy.MiddyfiedHandler<APIGatewayProxyEvent, APIGatewayProxyResult> | AsyncHandler {

    const configuration = this._loadConfiguration();

    const base = new BaseCompositionRoot(container)
        .useLogging(configuration.logging, loggerFactory)
        .useOAuth(configuration.oauth)
        .withCustomClaimsProvider(new SampleCustomClaimsProvider(), configuration.cache)
        .useHttpProxy(httpProxy)
        .register();

    const loggerMiddleware = base.getLoggerMiddleware();
    const exceptionMiddleware = base.getExceptionMiddleware();
    const authorizerMiddleware = base.getAuthorizerMiddleware();
    const customHeaderMiddleware = base.getCustomHeaderMiddleware();

    return middy(async (event: APIGatewayProxyEvent, context: Context) => {
        return baseHandler(event, context);

    })
        .use(loggerMiddleware)
        .use(exceptionMiddleware)
        .use(authorizerMiddleware)
        .use(customHeaderMiddleware);

}

Earlier Node.js samples used middleware built into the Express Web Server, whereas for AWS Lambdas we are using the Middy Library, to separate plumbing code from the API’s logic classes:

Middy provides interception points called before, after and error. As an example, our LoggerMiddleware class updates log entries using the following code:

export class LoggerMiddleware implements middy.MiddlewareObj<APIGatewayProxyEvent, APIGatewayProxyResult> {

    private readonly _container: Container;
    private readonly _loggerFactory: LoggerFactoryImpl;

    public constructor(container: Container, loggerFactory: LoggerFactoryImpl) {
        this._container = container;
        this._loggerFactory = loggerFactory;
    }

    public before(request: middy.Request<APIGatewayProxyEvent, APIGatewayProxyResult>): void {

        const logEntry = this._loggerFactory.createLogEntry();
        this._container.rebind<LogEntryImpl>(BASETYPES.LogEntry).toConstantValue(logEntry);
        logEntry.start(request.event, request.context);
    }

    public after(request: middy.Request<APIGatewayProxyEvent, APIGatewayProxyResult>): void {

        const logEntry = this._container.get<LogEntryImpl>(BASETYPES.LogEntry);
        if (request.response && request.response.statusCode) {
            logEntry.setResponseStatus(request.response.statusCode);
        }
        logEntry.end();
        logEntry.write();
    }
}

Middleware Classes

Our sample uses the following middleware classes, which are equivalent to those in our earlier Node.js code:

Middleware Class Responsibility
LoggerMiddleware Manages the log entry for each request, by logging request and response details
OAuthAuthorizer JWT access token validation, creating the claims principal and identity logging
CustomHeaderMiddleware Allows advanced client side testing of APIs, to enable error rehearsal
UnhandledExceptionHandler A central place for adding error details to logs, and producing the client error

Dependency Injection

With Serverless lambdas I continue to use a modern and productive coding model based on dependency injection. This has benefits around code clarity, extensibility and testing:

@injectable()
export class CompanyService {

    private readonly _repository: CompanyRepository;
    private readonly _claims: SampleCustomClaims;

    public constructor(
        @inject(SAMPLETYPES.CompanyRepository) repository: CompanyRepository,
        @inject(BASETYPES.CustomClaims) claims: SampleCustomClaims) {

        this._repository = repository;
        this._claims = claims;
    }

In AWS, the entire API is spun up on every single HTTP request. There is no need to implement the Child Container Per Request pattern, as used by the earlier Node.js API. If ever needed in future, the same technique of storing the child container in the request object would be used.

JWT Access Token Validation

Previously we explained this blog’s approach to JWT Validation in APIs, which involves caching the token signing public keys in memory. For the Serverless API I needed to provide a custom key retriever to the JOSE library:

const result = await jwtVerify(accessToken, this._jwksRetriever.getKey, options);

A function with the following method signature is required, and this blog’s implementation gets cached keys from DynamoDB, to avoid needing to call the Authorization Server on every API request:

async getKey(
        protectedHeader: JWSHeaderParameters,
        token: FlattenedJWSInput): Promise<Uint8Array | KeyLike>;

This required a custom cache class to wrap DynamoDB, some of whose code is shown below:

export class AwsCache implements Cache {

    private readonly _configuration: CacheConfiguration;
    private readonly _extraClaimsProvider: ExtraClaimsProvider;
    private readonly _database: DynamoDBClient;

    public constructor(configuration: CacheConfiguration, extraClaimsProvider: ExtraClaimsProvider) {

        try {

            this._configuration = configuration;
            this._extraClaimsProvider = extraClaimsProvider;
            this._database = new DynamoDBClient({region: configuration.region});

        } catch (e) {

            throw ErrorUtils.fromCacheError(BaseErrorCodes.cacheConnect, e);
        }
    }

    public async setJwksKeys(jwksText: string): Promise<void> {

        const params = {
            TableName: this._configuration.tableName,
            Item: {
                'CACHE_KEY' : {S: 'JWKS'},
                'CACHE_VALUE' : {S: jwksText},
                'TTL_VALUE': {N: `${this._getExpiry()}`},
            }
        };

        await this._putItem(params);
    }

    private async _putItem(params: PutItemInput): Promise<void> {

        try {

            const command = new PutItemCommand(params);
            await this._database.send(command);

        } catch (e: any) {

            throw ErrorUtils.fromCacheError(BaseErrorCodes.cacheWrite, e);
        }
    }
}

OAuth Middleware Customization

The API authorizes according to this blog’s Authorization Design. This involves looking up and caching the following extra claims when an access token is first received.

export class SampleExtraClaims extends ExtraClaims {
    private readonly _title: string;
    private readonly _regions: string[];
}

The earlier Updated API Code blog post described how this was implemented in Node.js. To cache extra authorization values not included in the access token, the AwsCache class is again used.

Although DynamoDB caching works well enough for my demo purposes, it would be suboptimal for a real company, and also adds to code complexity should be. The ability to easily cache data in-memory between requests is an important API behaviour.

Test Code

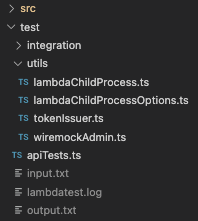
The API has some integration tests and utility classes to enable the API to be tested without an Authorization Server. During tests, the input.txt and output.txt data contain requests and responses in the lambda format:

The following test verifies authorization to data based on the domain specific ‘regions‘ array claim. The utility classes deal with boiler plate code such as running ‘sls invoke‘ as a child process:

it ('Get transactions returns 404 for companies that do not match the regions claim', async () => {

    const accessToken = await tokenIssuer.issueAccessToken(guestUserId);

    const mockUserInfo = {
        given_name: 'Guest',
        family_name: 'User',
        email: 'guestuser@mycompany.com',
    };
    await wiremockAdmin.registerUserInfo(JSON.stringify(mockUserInfo));

    const options = {
        httpMethod: 'GET',
        apiPath: '/investments/companies/3/transactions',
        lambdaFunction: 'getCompanyTransactions',
        accessToken,
        sessionId,
        pathParameters: {
            id: '3',
        }
    };
    const response = await LambdaChildProcess.invoke(options);

    assert.strictEqual(response.statusCode, 404, 'Unexpected HTTP status code');
    assert.strictEqual(response.body.code, 'company_not_found', 'Unexpected error code');

}).timeout(10000);

Lambda Code Debugging

On a developer PC, running ‘npm run build‘ produces Source Maps to enable debugging. The launch.json file can then point to a particular lambda to be debugged:

{
    "version":"0.2.0",
    "configurations":[
       {
          "type":"node",
          "request":"launch",
          "name":"Launch API",
          "program":"${workspaceFolder}/node_modules/serverless/bin/serverless",
          "args":[
             "invoke",
             "local",
             "-f",
             "getCompanyList",
             "-p",
             "test/input.txt"
          ]
       }
    ]
 }

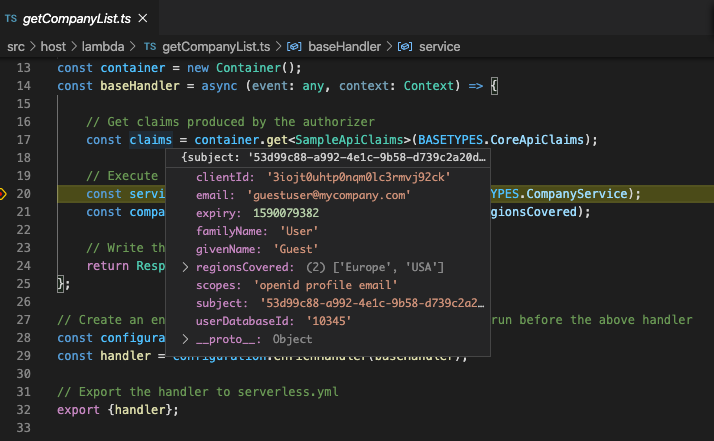
This enables the input.txt file produced from a mocha test to be used to debug a lambda, then step through the original lines of TypeScript code and view the state of variables, such as OAuth / claims fields:

Where Are We?

We have a productive setup for our cloud API, with modern techniques for coding, testing and deployment. This enables low cost cloud hosting, though earlier cloud native APIs had better API capabilities.

Next Steps

Serverless API Deployment

Background

Previously we provided an overview of the Serverless API and ran its operations locally. Next we will explain how this API is deployed to the AWS cloud, to run as lambda functions.

Serverless Deployment Stack

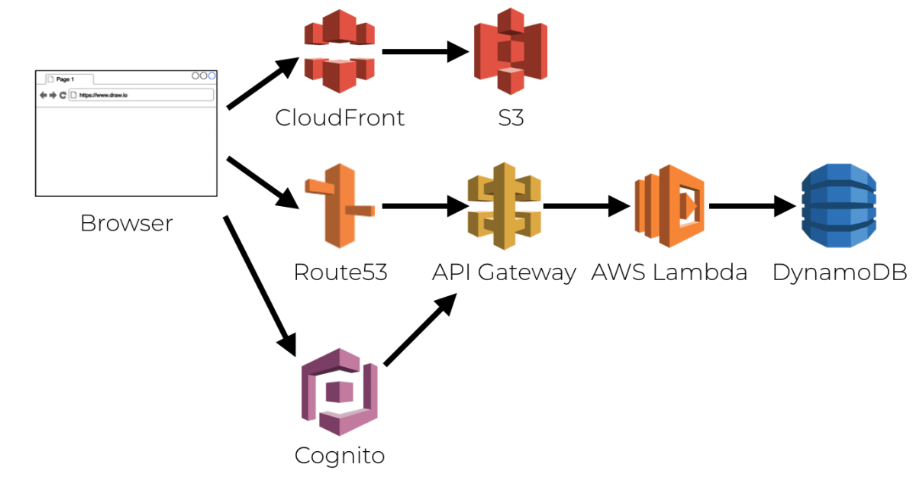
Our Cloud API is implemented using the Serverless Framework and lambda functions. In this post we will deploy the API to the AWS API Gateway, and our overall cloud architecture will then use the whole Serverless stack:

The Serverless API will provide data to SPA, mobile and desktop clients. Although the final Single Page Application uses secure cookies, the API will only need to deal with JWT access tokens, in all three cases.

Cloud API URLs

Previously we hosted our Final SPA at the below CloudFront URL:

Next the Serverless API will be deployed to this AWS API Gateway URL:

Prerequisite Setup

In earlier posts we ensured that prerequisites were in place, and these are needed in order for the below API deployment to work:

Deployment Overview

The API has a number of commands in its package.json file, which point to scripts that run Serverless Framework deployment commands:

{
  "scripts": {
    "lint": "npx eslint . --ext .ts,.tsx",
    "build": "rm -rf dist && tsc",
    "buildRelease": "rm -rf dist && tsc --sourceMap false",
    "start": "./start.sh",
    "test": "./start.sh",
    "deploy": "./deploy.sh",
    "remove": "sls remove --stage deployed"
  }
}

The deployment script first runs ‘sls package‘ to build a ZIP file, then runs ‘sls deploy‘ to push resources to the cloud. This creates lambda functions, configures AWS API Gateway endpoints, and enables Cloudwatch logging.

The Serverless.yml file points to a custom domain that needs to be precreated before the first deployment. The sample uses a single AWS deployment stage of ‘deployed‘, though there is also a ‘local‘ stage used when running lambdas locally:

service: serverlessapi

provider:
  name: aws
  runtime: nodejs20.x
  region: eu-west-2
  stage: ${self:custom.config.settings.stage}
  apiGateway:
    shouldStartNameWithService: true

custom:
  customDomain:
    domainName: ${self:custom.config.settings.apiHostName}
    certificateName: '*.${self:custom.config.settings.certificateDomainName}'
    basePath: investments
    stage: ${self:custom.config.settings.stage}
    endpointType: regional

API Configuration

The Serverless API uses the same JSON based approach to configuration as earlier APIs, and uses these settings when deployed to AWS:

{
    "api": {
        "useProxy": false,
        "proxyUrl": ""
    },
    "logging": {
        "apiName": "SampleApi",
        "prettyPrint": false,
        "performanceThresholdMilliseconds": 500
    },
    "oauth": {
        "issuer":           "https://cognito-idp.eu-west-2.amazonaws.com/eu-west-2_CuhLeqiE9",
        "audience":         "",
        "algorithm":        "RS256",
        "scope":            "https://api.authsamples.com/investments",
        "jwksEndpoint":     "https://cognito-idp.eu-west-2.amazonaws.com/eu-west-2_CuhLeqiE9/.well-known/jwks.json"
    },
    "cache": {
        "isActive": true,
        "region": "eu-west-2",
        "tableName": "OAUTH_CACHE",
        "claimsCacheTimeToLiveMinutes": 15
    }
}

Building Code

Our earlier Express API was run on a development computer using ts-node, then built to Javascript for release builds. Lambdas must always be built to Javascript, so tsc is always used, with the following tsconfig.json settings:

{
  "compilerOptions": {
    "strict": true,
    "target": "ES2022",
    "lib": ["ES2022"],
    "module":"ES2022",
    "moduleResolution": "Node",
    "allowSyntheticDefaultImports": true,
    "experimentalDecorators": true,
    "outDir": "dist",
    "sourceMap": true
  },
  "include": [
    "src/**/*.ts"
  ],
  "exclude": [
    "node_modules"
  ]
}

Deployment Package

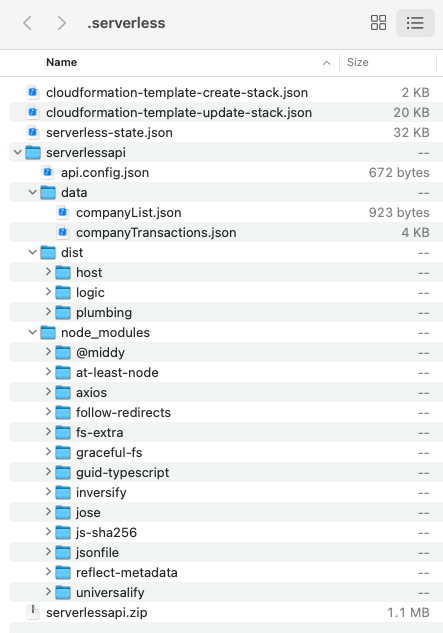
The deployment package is output to a .serverless folder, and files that should not be deployed are excluded via the Serverless.yml file. Only  production Node.js dependencies are included, and those in the package.json devDependencies section do not get uploaded to AWS:

The size of each lambda is around 1MB, including dependencies for JWT libraries and to make HTTP requests to the Authorization Server. Cloud Formation is also generated, to automate the creation of AWS resources.

Configure the API Subdomain

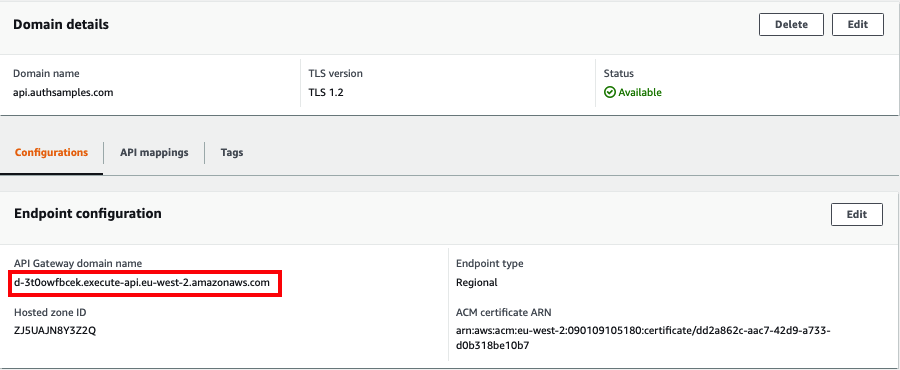
The main hosting domain of authsamples.com was created in the earlier Cloud Domain Setup. An API custom domain must also be pre-created in AWS API Gateway. This points to the wildcard certificate generated earlier, and is linked to the deployment stage under API Mappings:

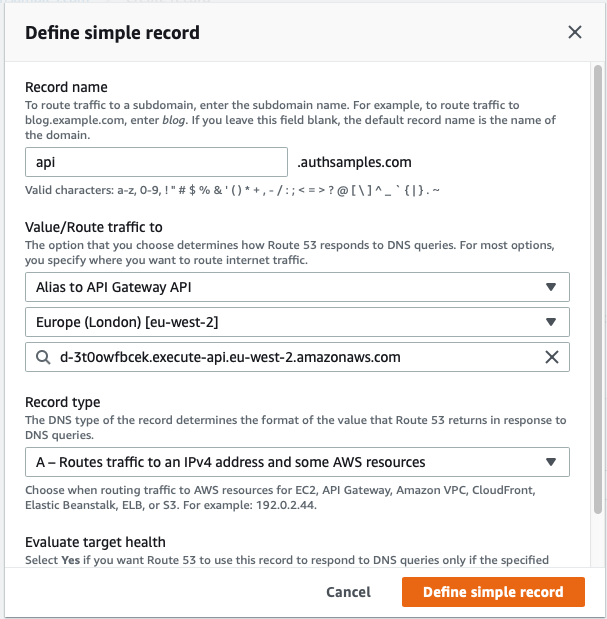
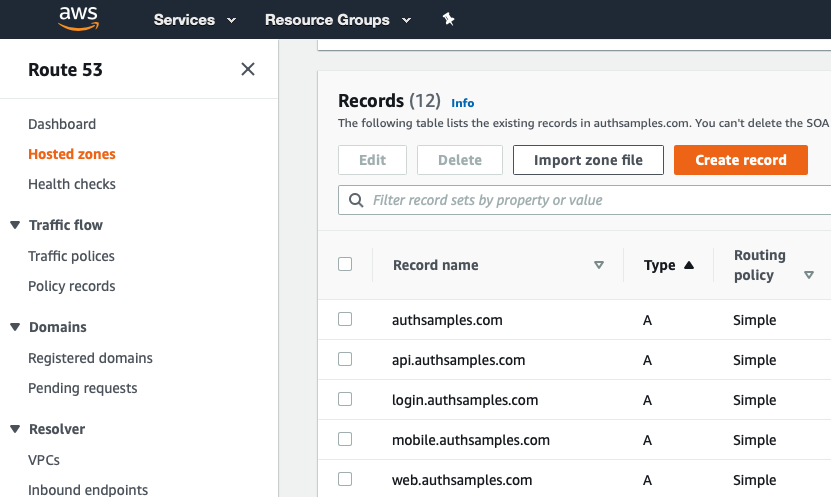
In Route 53 / Hosted Zones, the above API Gateway Domain Name must then be mapped to an A Record for the custom domain name, pointing to the generated value:

API Deployment

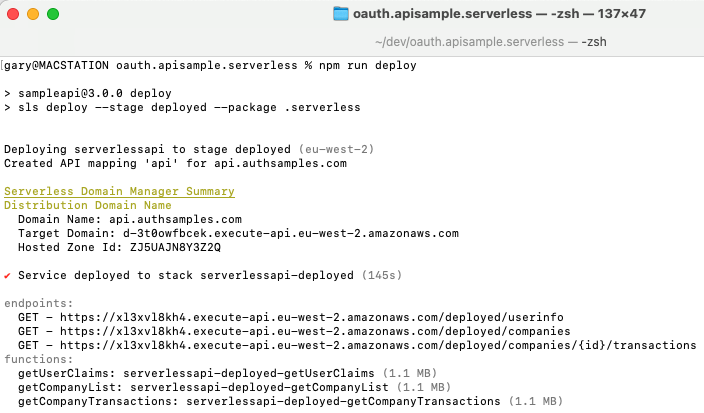
The deployment script then continues by deploying the ZIP file to AWS, which will create Cloud HTTPS Endpoints that route to the API’s lambda functions:

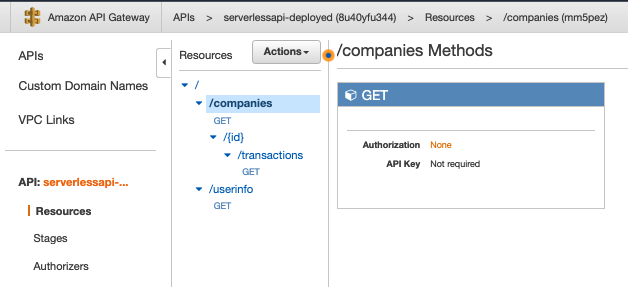
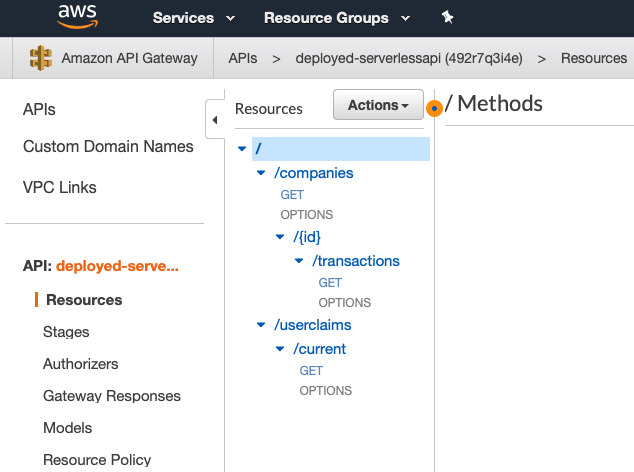
Once deployed our Sample API will be created in API Gateway, and we can view results in the AWS Console:

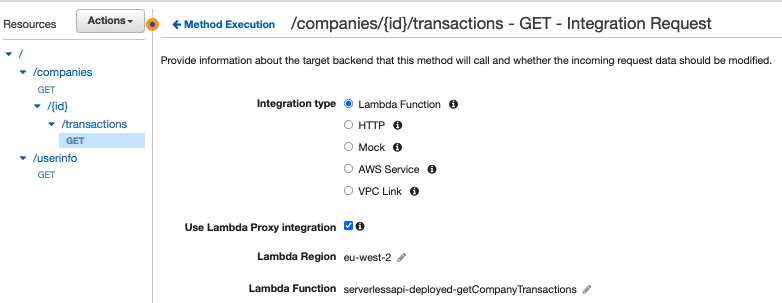
The deployment configures an Integration Request for each incoming HTTP request, to invoke the relevant lambda:

Our API has 3 simple endpoints that exist at the below internet URLs, and the third of these is parameterised via path segments:

The deployed API then provides data for all of this blog’s final UI code samples, as summarised in this blog’s Quickstart page.

Deployed Lambdas

In the AWS Console, I can then view the deployed lambda functions, which run in the London region:

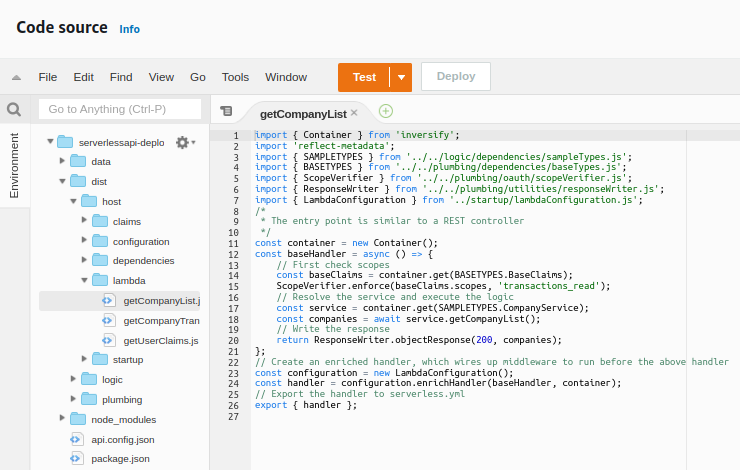
The compiled Javascript of each lambda can also be inspected. I actually deploy all API code for each individual lambda, since this is the simplest deployment model, and it enables code sharing.

Lambdas can be packaged individually if preferred, and it is possible to use Serverless Plugin Scripts to run custom packaging logic. This might involve excluding certain folders or dependencies for certain lambdas.

DynamoDB Resources

In order to perform OAuth related caching, the Serverless.yml file also creates some DynamoDB resources:

resources:
  Resources:

    CacheTable:
      Type: AWS::DynamoDB::Table
      Properties:
        TableName: OAUTH_CACHE
        AttributeDefinitions:
          - AttributeName: CACHE_KEY
            AttributeType: S
        KeySchema:
          - AttributeName: CACHE_KEY
            KeyType: HASH
        TimeToLiveSpecification:
          AttributeName: TTL_VALUE
          Enabled: true
        BillingMode: PAY_PER_REQUEST

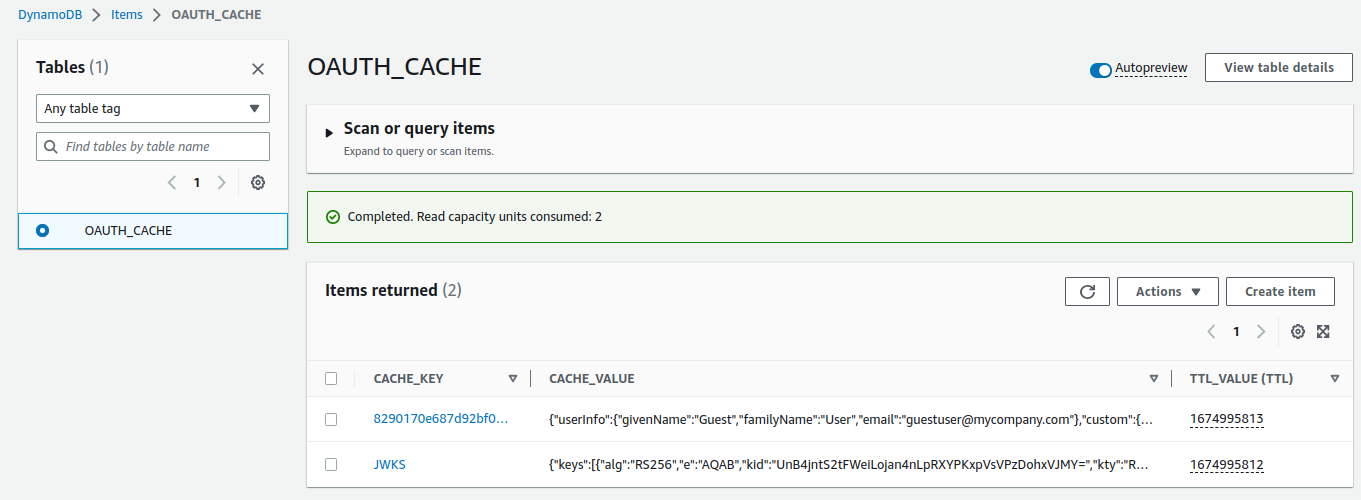
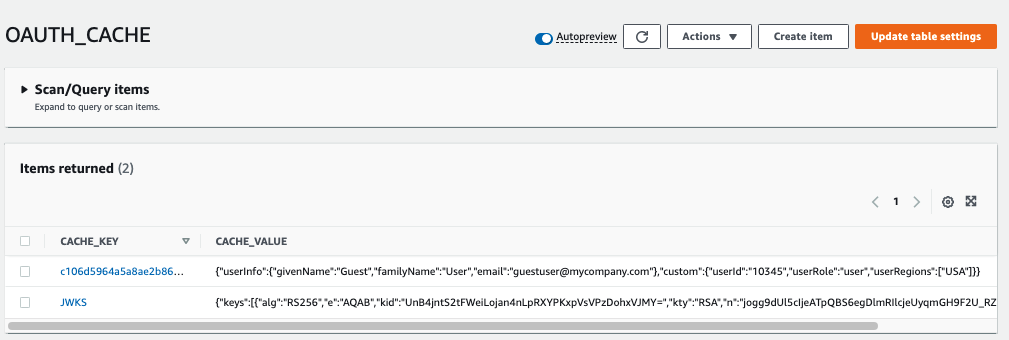
This creates a table that contains key value pairs, for both the JWKS data and custom claims, looked up when a Cognito access token is first received:

Although this works, it is less optimal than the in-memory caching used previously for cloud native APIs.

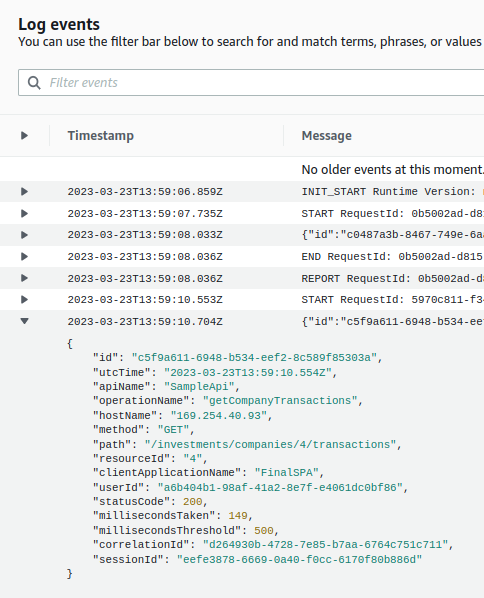
API Immediate Logs

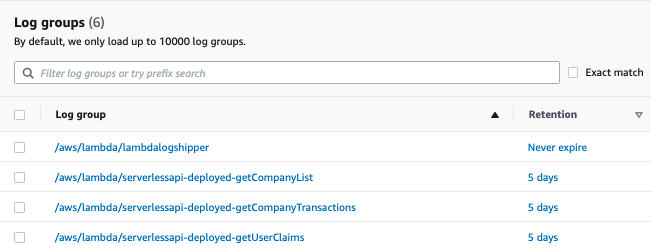
In Cloudwatch, log groups have been added for each of the lambdas, and log retention is configured to lasts only a few days. The role of these logs is similar to that of the immediate log files in our earlier Node.js APIs.

Log entries can be viewed in the AWS console, but Cloudwatch is only used for immediate logging. In a real company setup, logs would therefore need to be aggregated to a more powerful log analysis system.

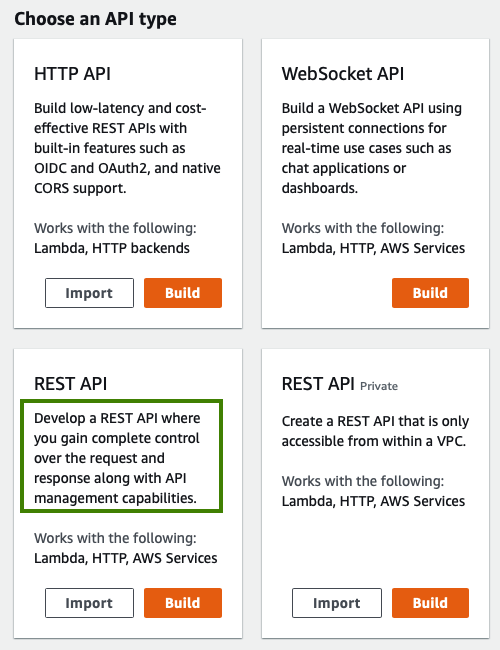
In order to perform the above logging, the API’s code needs access to the full request and response details. Therefore I would recommend always using the REST API option, since any API should have access to this data:

Troubleshooting Lambda Startup

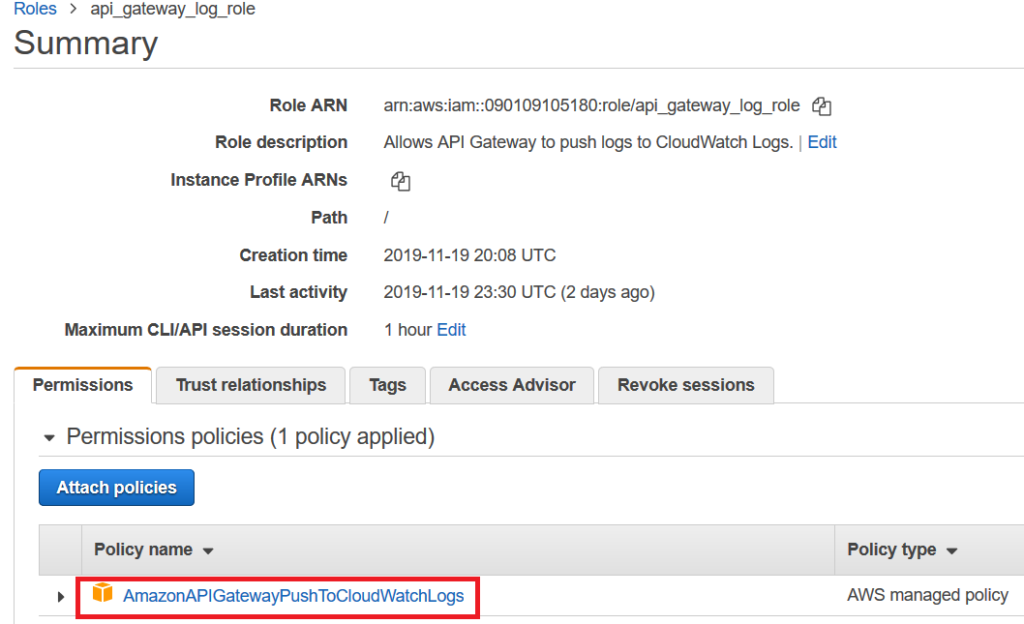
Errors that prevent AWS from calling the lambda entry point are not reported in Cloudwatch logs. Instead you must activate API Gateway Logging when needed. First define an IAM role with log permissions:

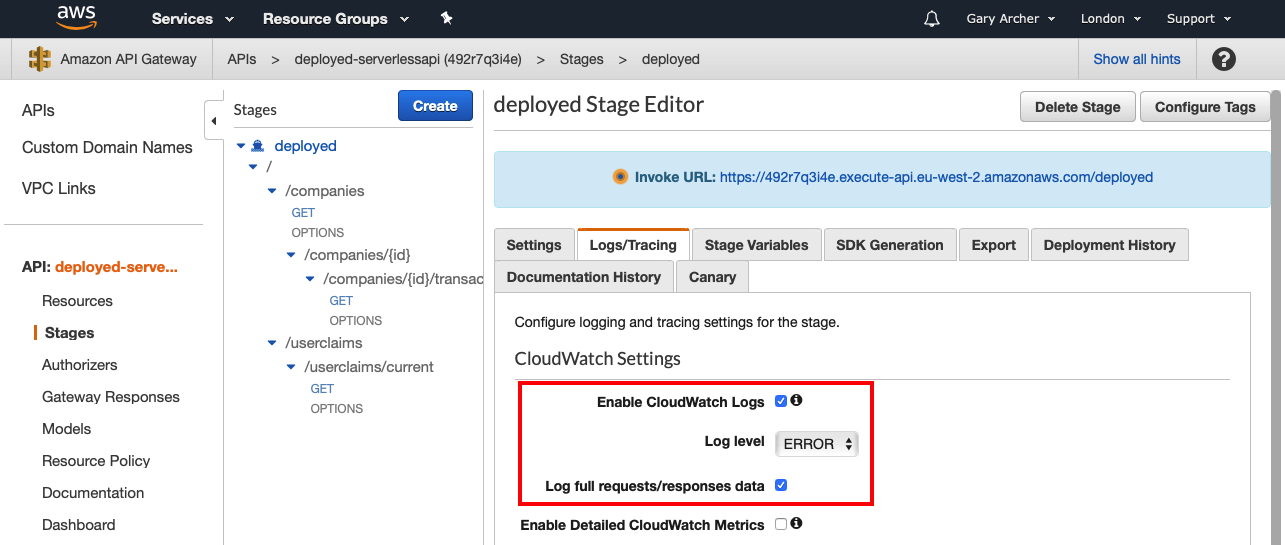
From API Gateway, the extra logging can then be temporarily activated when needed. An extra Cloud Watch Log Group is then available, with further info on the startup error

A common cause of this type of error is when a Node.js dependency is include in devDependencies when it should be in dependencies. In this case the dependency is not deployed and the lambda fails to start.

Where Are We?

We have ported our earlier Node.js API to run with low cost and zero maintenance in AWS. Serverless lambdas are interesting to know about, and in the next post we will explain more about the OAuth implementation.

Next Steps

Serverless API Overview

Background

Previously we explained this blog’s Web Content Delivery to AWS. Next we will provide an overview of our Serverless API, and show how to run it s lambda functions locally.

API Features

The main behaviour is summarised below, and is identical to that of our earlier Node.js API, which was hosted by the Express HTTP server:

Aspect Description
Zero Trust Our API will perform JWT Access Token Validation on every request, via a JOSE security library
Extensible Claims Our API will be in full control of claims as described in the API Authorization Design
Supportable Our API will use this blog’s designs for Logging and Error Handling to ensure good technical support qualities
Scalable The same coding techniques, and any common code, can be used for many APIs in a software platform
Productive Our API coding model will be modern and portable across mainstream languages

Preferred Local Setup

Ideally we would like an equivalent setup to our earlier Node.js API, where we listen for HTTP requests on a Developer PC, and can run a UI Client against the API:

Technologies such as Serverless Offline do not yet support this reliably though, so we are limited to local execution of lambda functions and will only be able to run an integrated setup after deployment to AWS.

Get the API

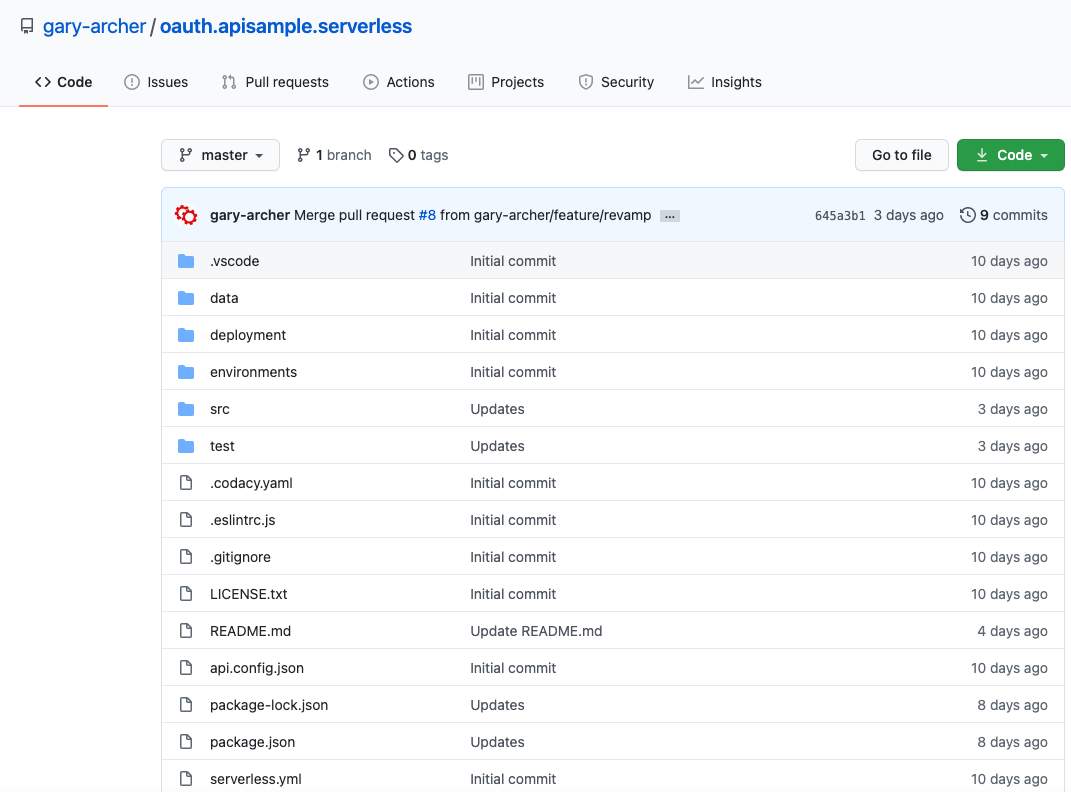
The Serverless API project is available here and can be downloaded / cloned to your local PC with this command:

git clone https://github.com/gary-archer/oauth.apisample.serverless

View the Code

We will take a closer look at the code in a couple of posts time, but for now, notice that the code structure matches that used in all of this blog’s earlier APIs, for Node.js, .NET and Java:

The Serverless.yml file lists the API’s operations, and the entry point are lambda functions, which have the same role as an API controller operation.

functions:
  
  getUserClaims:
    handler: dist/host/lambda/getUserInfo.handler
    events:
      - http: 
          path: /userinfo
          method: get

  getCompanyList:
    handler: dist/host/lambda/getCompanyList.handler
    events:
      - http: 
          path: /companies
          method: get

  getCompanyTransactions:
    handler: dist/host/lambda/getCompanyTransactions.handler
    events:
      - http: 
          path: /companies/{id}/transactions
          method: get
          request: 
            parameters: 
              paths: 
                id: true

In Serverless, these are run on a development computer using the ‘sls invoke‘ command. This requires input and output payloads that use a lambda specific format. Once the API is deployed, real clients will instead just use HTTP requests.

Test the API

Our earlier page on OAuth API Testing covered some techniques for testing OAuth secured APIs. Providing the input for an API request is tricky, since a user level access token is required, containing a subject claim.

The Serverless API tests use a technique of mocking the Authorization Server. The same mocha based integration tests as the earlier Node.js API are used, with some code to wire up ‘sls invoke‘ with request and response payloads. This enables the API to be tested productively.

To run the tests, ensure that a Docker engine is installed in addition to an up to date version of Node.js, then run this command:

./start.sh

Tests create a keypair and expose the token signing public key at a JWKS URI provided by Wiremock in Docker. The API is then pointed to this URL.  Integration tests use a JWT library and the corresponding private key  to issue access tokens for tests, to send to the API.

This enables the API’s OAuth security code paths to be tested productively, though local lambda execution is a little slow.

Zero Trust API Security

In AWS it is common to see online solutions that use Lambda Authorizers to validate JWT access tokens. Secure values such as claims are then simply forwarded to lambdas in header, over a trusted connection.

A more cutting edge security option in line with OAuth best practices is for each lambda to receive and validate the incoming JWT. This also helps to keep the API’s code closer to OAuth standards.

API Authorization

The overall authorization used by the Serverless API was summarised earlier in our API Authorization Design. The API collects both token claims and extra claims into a claims principal, then caches extra claims for future requests with the same access token:

The claims principal is then injected into service logic classes, which have all of the values needed, to apply authorization with simple code.

Lambdas and In Memory Caching

JWT validation requires in-memory caching of token signing public keys, and the above authorization uses in-memory caching of extra claims. Yet with lambda technology this is not possible, since a new lambda instance is spun up on every request.

To resolve this problem we need to use a distributed cache. The best-fit Serverless option is to use DynamoDB, which supports saving data with a time to live, similar to the in-process caches used by earlier APIs:

This is awkward though, since the code becomes more complex, and the Serverless API requires more out of process calls than it should, so performance is also not optimal.

Client Specific Security Differences

The API serves this blog’s final SPA, Desktop App, Android App and iOS App, all of which follow their own client side best practices. The SPA must therefore only send the latest HTTP only secure cookies when calling the Serverless API.

The Serverless API does not contain any cookie logic though, so that its usage is identical for web and native clients. Instead, cookies during API requests are dealt with by an OAuth Proxy component. Usage was summarised in the earlier post on SPA Backend for Frontend Design.

API Request Logging

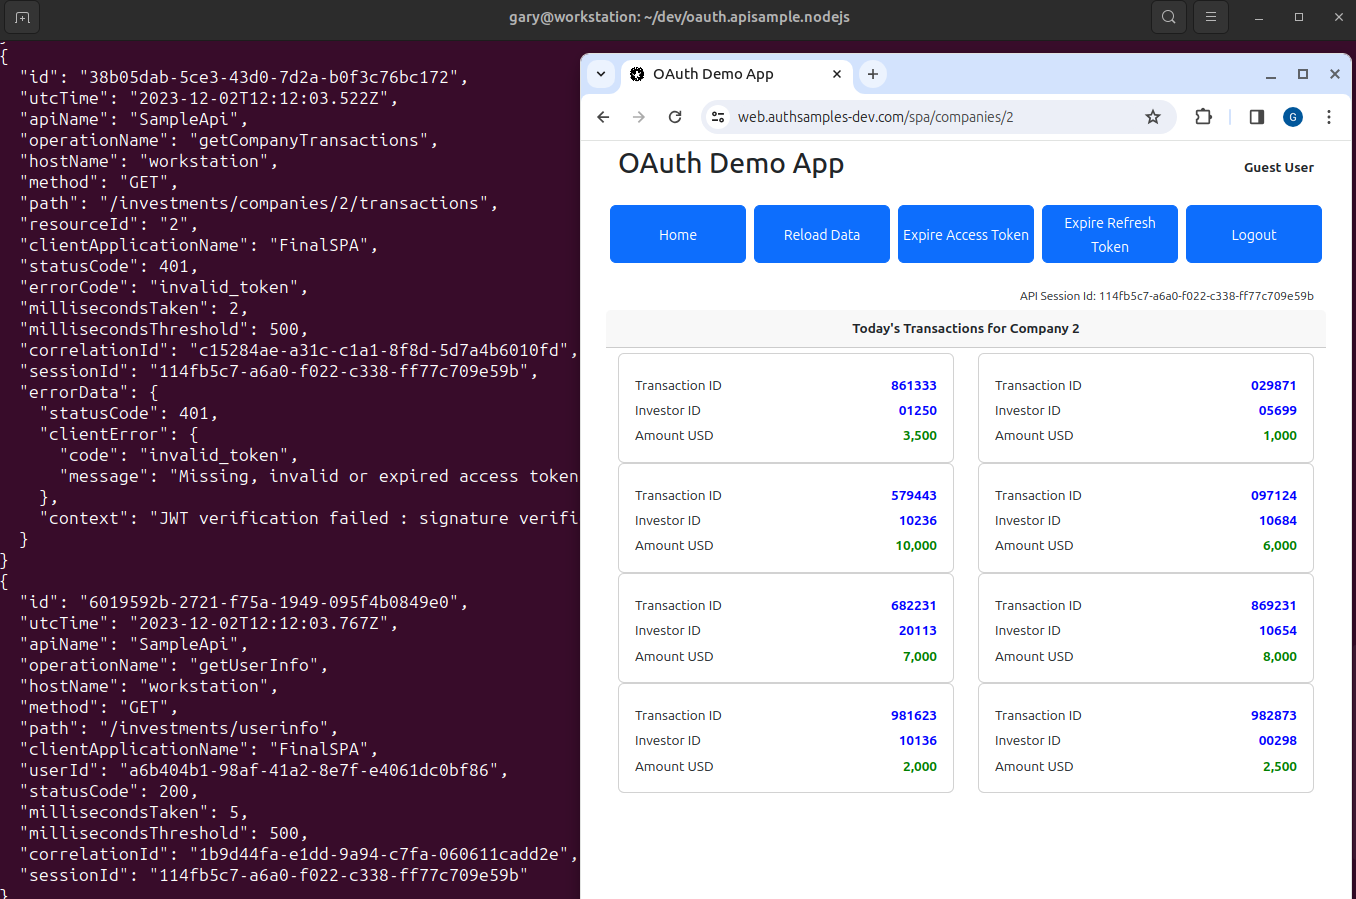
The API uses our Effective API Logging design, and writes JSON logs that are shipped to Elasticsearch. When tests are run, the logging output is redirected to a lambdatest.log file:

{
  "id": "14d694e1-d7dd-fa46-7fd5-7cef812e4a6a",
  "utcTime": "2023-03-20T18:19:55.674Z",
  "apiName": "SampleApi",
  "operationName": "getCompanyTransactions",
  "hostName": "WORK",
  "method": "GET",
  "path": "/investments/companies/2/transactions",
  "resourceId": "2",
  "clientApplicationName": "ServerlessTest",
  "userId": "a6b404b1-98af-41a2-8e7f-e4061dc0bf86",
  "statusCode": 200,
  "millisecondsTaken": 21,
  "millisecondsThreshold": 500,
  "correlationId": "88686b82-f578-2e64-d716-9e1f35c6e1f0",
  "sessionId": "931f42c1-9060-786e-2c9a-d4f07335814e"
}

In AWS these log entries are first output to Cloudwatch, then could be aggregated to a cloud Log Aggregation system, to enable Technical Support Queries on the log data.

API Supportability

As for other APIs, we also implement this blog’s Error Handling and Supportability design. One interesting behaviour is the ability to perform error rehearsal, by sending in a custom header that allows testers to ‘choose an API to break‘.

The final test exercises this behaviour, and results in the following log entry. The error returned to the API client includes a ‘fairly unique error identifier‘. This enables fast lookup of API logs, to reduce problem resolution times:

{
  "id": "faa151ac-6006-8b4d-4c11-8a2e0b6a4aa8",
  "utcTime": "2023-03-20T18:19:58.376Z",
  "apiName": "SampleApi",
  "operationName": "getCompanyTransactions",
  "hostName": "WORK",
  "method": "GET",
  "path": "/investments/companies/4/transactions",
  "resourceId": "4",
  "clientApplicationName": "ServerlessTest",
  "userId": "a6b404b1-98af-41a2-8e7f-e4061dc0bf86",
  "statusCode": 500,
  "errorCode": "exception_simulation",
  "errorId": 28603,
  "millisecondsTaken": 19,
  "millisecondsThreshold": 500,
  "correlationId": "1fe8296d-37a1-943a-c33e-3464191d1a79",
  "sessionId": "931f42c1-9060-786e-2c9a-d4f07335814e",
  "performance": {
    "name": "total",
    "millisecondsTaken": 19,
    "children": [
      {
        "name": "validateToken",
        "millisecondsTaken": 14
      },
      {
        "name": "userInfoLookup",
        "millisecondsTaken": 3
      }
    ]
  },
  "errorData": {
    "statusCode": 500,
    "clientError": {
      "code": "exception_simulation",
      "message": "An exception was simulated in the API",
      "id": 28603,
      "area": "SampleApi",
      "utcTime": "2023-03-20T18:19:58.395Z"
    },
    "serviceError": {
      "details": "",
      "stack": [
        "Error: An exception was simulated in the API",
        "at ErrorFactory.createServerError (file:///home/gary/dev/oauth.apisample.serverless/dist/plumbing/errors/errorFactory.js:12:16)",
        "at CustomHeaderMiddleware.before (file:///home/gary/dev/oauth.apisample.serverless/dist/plumbing/middleware/customHeaderMiddleware.js:21:40)",
        "at runMiddlewares (file:///home/gary/dev/oauth.apisample.serverless/node_modules/@middy/core/index.js:119:27)",
        "at process.processTicksAndRejections (node:internal/process/task_queues:95:5)",
        "at async runRequest (file:///home/gary/dev/oauth.apisample.serverless/node_modules/@middy/core/index.js:79:9)"
      ]
    }
  }
}

API Architecture

Our Serverless API has reduced vendor lock-in as much as possible, by implementing non functional areas using portable code. OAuth processing is managed securely, and code is extensible in the important places.

We have also seen that the Platform as a Service model for APIs has some downsides. These include an inability to run a fully integrated setup locally, or to use in-memory caching between requests.

Where Are We?

We have explained the Serverless API’s key behaviour, which follows the same portable concepts as earlier APIs. Next we will describe how the Serverless lambdas are deployed to AWS and called via its API Gateway.

Next Steps

Web Content Delivery

Background

Previously we finalized the Managed Authorization Server Setup, using AWS Cognito. In this post we will apply finishing touches to the Modern Web Technology Setup, to complete the web architecture by deploying static content to a content delivery network.

Global Web Performance

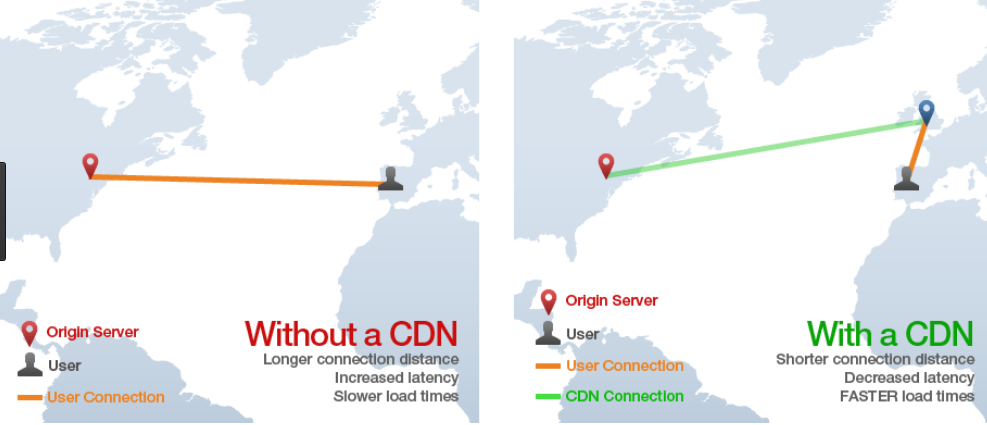
In this post we will meet performance requirements discussed earlier in Web Architecture Goals. AWS CloudFront is a content delivery network  that provides optimised web hosting:

To deploy the SPA we will simply upload web assets to S3, after which Cloudfront will distribute them to many global ‘edge‘ locations, so that all users receive roughly equal performance.

CloudFront Domains

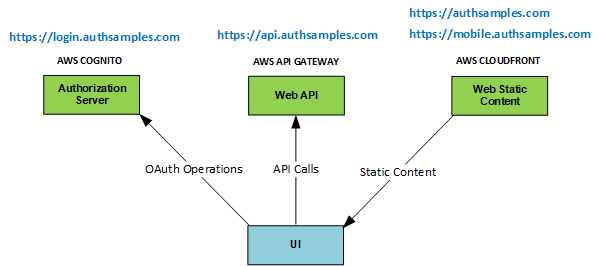
In total we will use the following domains for web content and will create S3 buckets and CloudFront distributions for each of them:

Domain Usage
web.authsamples.com Serving web content for an online SPA that connects to Serverless APIs
web.authsamples-k8s.com Serving web content for an online SPA that connects to Kubernetes APIs
mobile.authsamples.com Assets for enabling mobile logins and deep linking
authsamples.com The root domain will host ‘interstitial’ web pages used during native app logins

This post covers the details for the first domain, and the steps for other domains are equivalent. First though we will briefly summarise some build related steps that help to enable a good deployment architecture.

Automated Deployment

Details on how to run the final SPA locally were covered in this earlier post. CloudFront deployment is then managed via the following commands, though this only works if you have access to my AWS account:

  • git clone https://github.com/gary-archer/oauth.websample.final
  • cd oauth.websample.final/deployment/cloudfront
  • ./build.sh
  • ./deploy.sh

SPA Release Builds

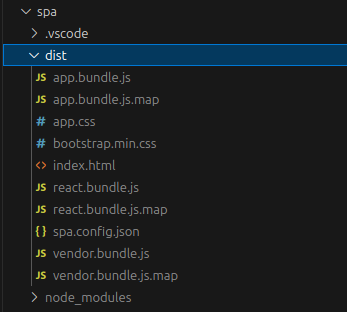
The build script for the SPA produces a ‘dist‘ folder containing files to deploy. Release builds of webpack produce minified JavaScript bundles. This includes source map files that are not deployed but could be used to resolve production stack traces. Bootstrap CSS is also minified, using the purgecss command line tool.

A final index.html file is then produced, adding cache busting timestamps to asset references, to ensure that the browser’s cache never serves old files after an upgrade.

I also apply subresource integrity attributes, to bind each resource to the HTML file. This does not solve any real security problems for my web deployment, but is a personal preference, to assert the correctness of assets shipped together.

<!DOCTYPE html>
<html lang='en'>
    <head>
        <meta charset='utf-8'>
        <meta name='viewport' content='width=device-width, initial-scale=1, shrink-to-fit=no'>

        <base href='/spa/' />
        <title>OAuth Demo App</title>

        <link rel='stylesheet' href='bootstrap.min.css?t=1650271813125' integrity='sha256-YvdLHPgkqJ8DVUxjjnGVlMMJtNimJ6dYkowFFvp4kKs='>
        <link rel='stylesheet' href='app.css?t=1650271813125' integrity='sha256-B7pu+gcFspulW4zXfgczVtPcEuZ81tZRFYeRciEzWro='>
    <body>
        <div id='root' class='container'></div>

        <script type='module' src='vendor.bundle.js?t=1650271813125' integrity='sha256-yLQJi00XkopJDWGmjFgY/bNE72PBzwohkjbEoOfOjY0='></script>
        <script type='module' src='react.bundle.js?t=1650271813125' integrity='sha256-hdh2E1CmilnpzH/kcBRSVEnQrt/lIKnwOG5nLgFdiNk='></script>
        <script type='module' src='app.bundle.js?t=1650271813125' integrity='sha256-tYOvvC8IVdWFcxu2lXP89v1hsVTXL0Lt4kZnOKzqguk='></script>
    </body>
</html>

A script called rewriteIndexHtml.ts is responsible for producing the final HTML file, and ensuring that it remains readable. This script also removes the below line from release bundle files, to prevent production users ever seeing messages about missing source maps in the browser console:

//# sourceMappingURL=app.bundle.js.map

SPA Deployed Configuration

In development, the SPA downloads an spa.config.json file, containing the following values. These would vary depending on the stage of a company’s deployment pipeline:

{
    "apiBaseUrl": "https://api.authsamples-dev.com/tokenhandler/investments",
    "oauthAgentBaseUrl": "https://api.authsamples-dev.com/tokenhandler/oauth-agent"
}

This provides a mechanism where binaries are built once then promoted down a pipeline. Code never then needs changing, if for example a completely new test environment needs to be created.

Production configurations are instead hard coded, to avoid the need for configuration downloads, and because JSON files do not have subresource integrity protection. The SPA does so by checking its web origin to see if it is running in a production domain:

if (location.origin.toLowerCase() === productionConfiguration.app.webOrigin.toLowerCase()) {
    return productionConfiguration;
}

return this._download();

If so then a hard coded configuration object is used instead:

export const productionConfiguration = {

    apiBaseUrl: 'https://api.authsamples.com/tokenhandler/investments', oauthAgentBaseUrl: 'https://api.authsamples.com/tokenhandler/oauth-agent' } as Configuration; 

Web Content Uploads

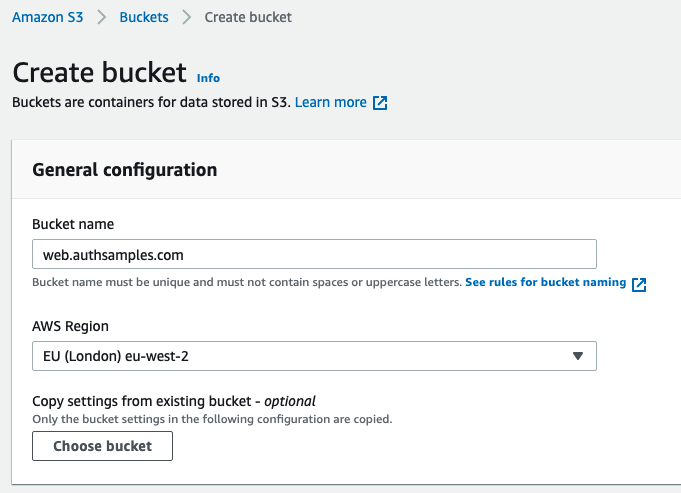
Now that the app is built in the preferred way we can focus on the actual cloud deployment, which starts with creating an S3 bucket. I followed the AWS wizard and used a subdomain of web.authsamples.com:

I then activated Static Website Hosting and chose index.html as the default document. In this initial state, the web static content is not yet publicly accessible.

When the deploy.sh script is run, it simply invokes aws s3 cp to copy the ‘dist‘ folder containing HTML assets up to AWS:

upload: .package/favicon.ico to s3://web.authsamples.com/favicon.ico
upload: .package/spa/app.css to s3://web.authsamples.com/spa/app.css
upload: .package/spa/index.html to s3://web.authsamples.com/spa/index.html
upload: .package/spa/bootstrap.min.css to s3://web.authsamples.com/spa/bootstrap.min.css
upload: .package/spa/app.bundle.js to s3://web.authsamples.com/spa/app.bundle.js
upload: .package/spa/react.bundle.js to s3://web.authsamples.com/spa/react.bundle.js
upload: .package/spa/vendor.bundle.js to s3://web.authsamples.com/spa/vendor.bundle.js

Once the upload completes a number of files exist in the S3 bucket, where the SPA files are located in an spa  folder. Other micro-frontends could be hosted alongside these as the web architecture grows.

Our SPA’s default URL has this generated HTTP URL:

If we try to browse to the SPA we get an access denied error, since only AWS CloudFront will be authorized to access S3 resources directly:

Web SSL Certificates

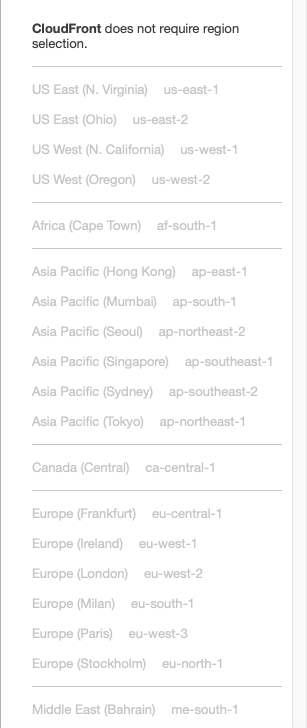
Next I provisioned SSL certificates for the web domain. CloudFront has a prerequisite of requiring SSL Certificates to be configured in the master us-east-1 (North Virginia) region. So the managed certificate creation described in the domain setup needed repeating for this region:

CloudFront Distribution

Next I created a CloudFront distribution and selected the S3 bucket:

I used the most standard and up to date options for the web bucket:

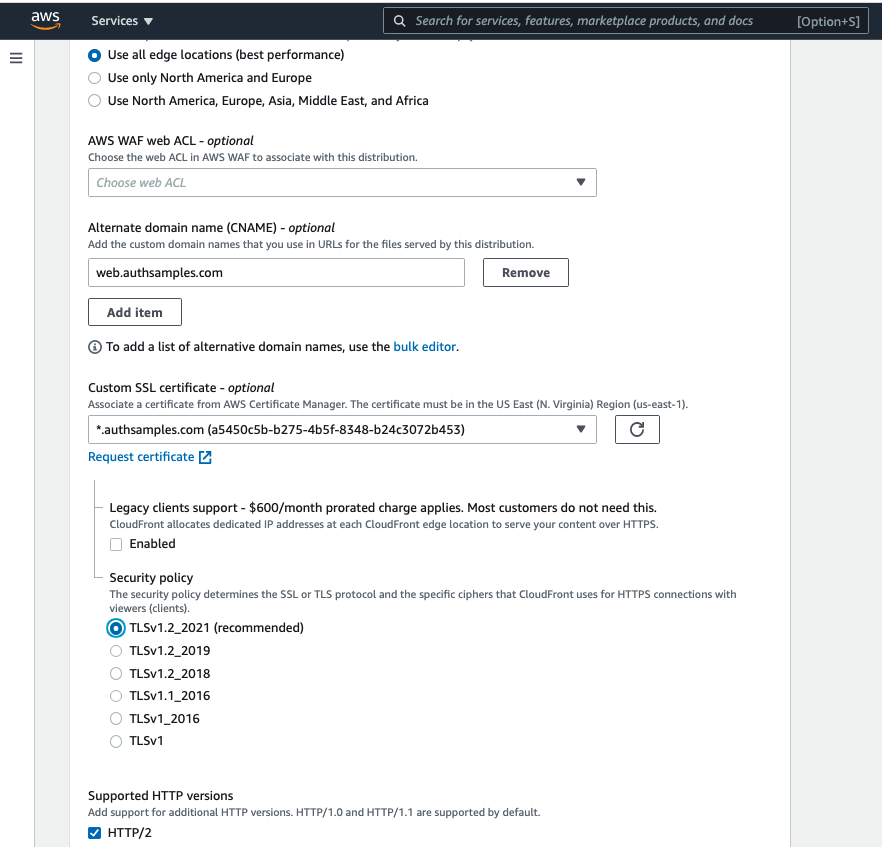
I then added web.authsamples.com as an alternative name and assigned the certificate created earlier:

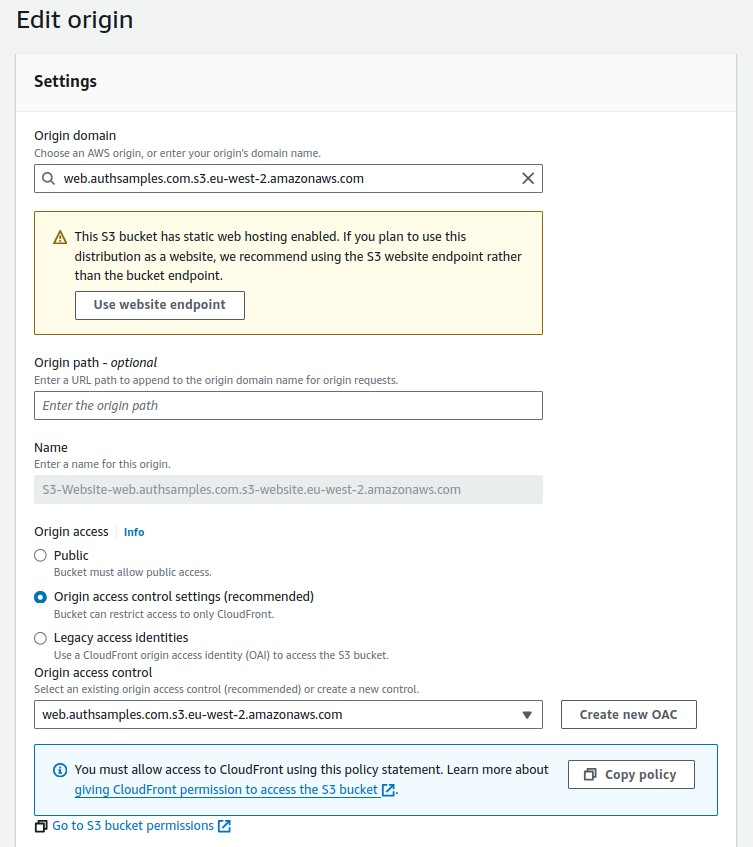
Next I selected the distribution and edited its Origin Settings to apply the following settings. I used the Create New OAC option to create a policy that grants the Cloudfront distribution access to the S3 bucket:

I then selected Copy Policy and pasted the following JSON data into the permissions for the S3 bucket:

{
    "Version": "2008-10-17",
    "Id": "PolicyForCloudFrontPrivateContent",
    "Statement": [
        {
            "Sid": "AllowCloudFrontServicePrincipal",
            "Effect": "Allow",
            "Principal": {
                "Service": "cloudfront.amazonaws.com"
            },
            "Action": "s3:GetObject",
            "Resource": "arn:aws:s3:::web.authsamples.com/*",
            "Condition": {
                "StringEquals": {
                    "AWS:SourceArn": "arn:aws:cloudfront::090109105180:distribution/E1P4XPOL1PNE6Z"
                }
            }
        }
    ]
}

Web External URL

Once all CloudFront distributions are created, the web assets are available over generated domain names shown in the Origins column:

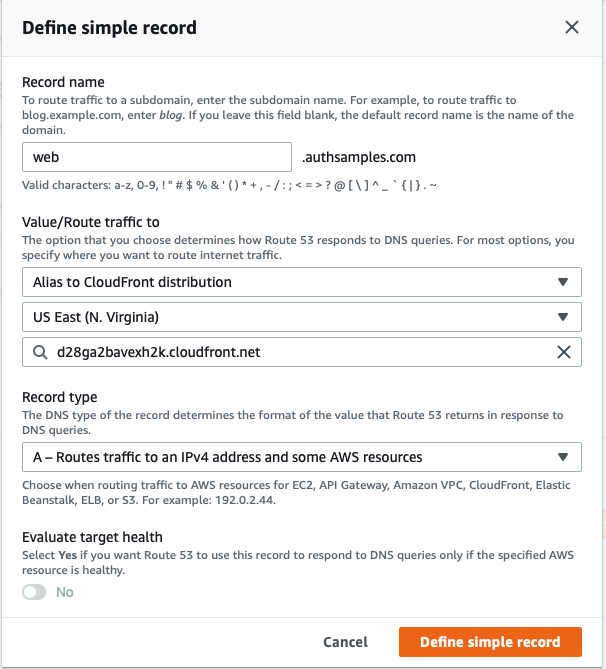
To use the friendly domain named I returned to Route 53 and added an A Record for the CloudFront generated URL:

Initial SPA Usage

The deployed SPA is then available at this cloud URL:

By default though, navigating to React paths will lead to 404 Not Found errors. To resolve this, a small amount of ‘web back end code‘ needs to run in the CDN as one of its behaviours.

CDN Behaviors

There are four essential behaviors that the CDN host needs to provide, summarized in the following table:

Behaviour Description
Compression Web resources should be compressed by default to improve performance
Security Headers Security headers should be set to provide a security policy to the browser
Performance Headers The cache-control header should be set to prevent redundant requests from the browser to the CDN
Document Serving Serve the index.html, static resources like JavaScript bundles and handle invalid paths

These are configured under the Behaviours settings of the Cloudfront distribution. Compression is simply a setting that you can enable. The security headers is mostly visual:

The most interesting setting is the Content Security Policy which I set to this string to protect against common threats and to only allow the SPA’s JavaScript to make remote calls for its web origin and API endpoints:

default-src 'none';
script-src 'self';
connect-src 'self' https://api.authsamples.com;
child-src 'self';
img-src 'self';
style-src 'self';
object-src 'none';
frame-ancestors 'none';
base-uri 'self';
form-action 'self'

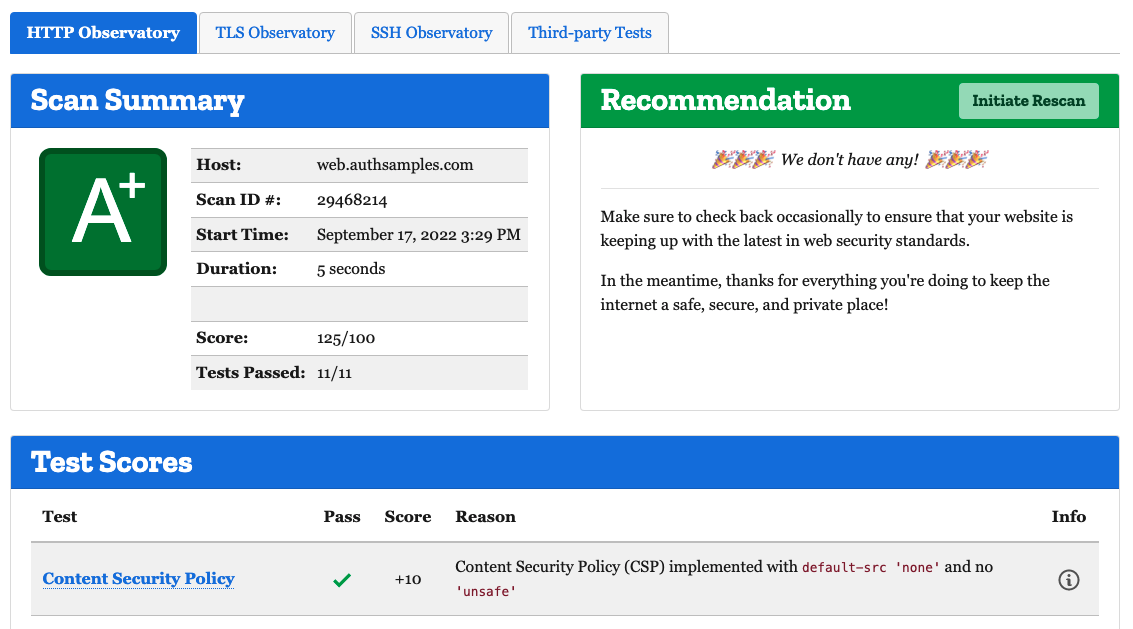
This protects against certain web security vulnerabilities, and also ensures a good security score on online sites such as Mozilla Observatory:

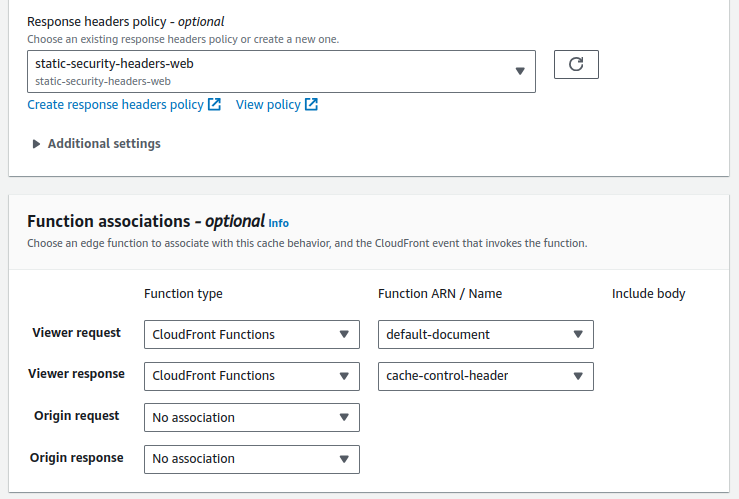
I implemented the final two behaviours using Cloudfront Functions. The cache-control header is set using a Viewer Response function. This instructs the browser to perform local caching of all web static content files except  the index.html file.

function handler(event) {
    
    const request = event.request;
    const response = event.response;
    const headers = response.headers;

    if (request.uri.match(/^.*(\.jpg|\.ico|\.js|\.css)$/)) {
        
        headers["cache-control"] = {
            value: "public, max-age=31536000, immutable",
        };
    } else {

        headers["cache-control"] = {
            value: "no-cache, must-revalidate",
        };
    }

    return response;
}

Document serving uses a Viewer Request function with the following logic to serve the index.html file for all React routes, so that React works correctly in the browser. This function also handles paths outside the React app by redirecting to the web domain’s default location:

function handler(event) {
    
    const request = event.request;
    const requestUri = request.uri.toLowerCase();
    
    if (requestUri === '/favicon.ico') {
        return request;
    }

    const spaBasePath = '/spa/';
    if (!requestUri.startsWith(spaBasePath)) {

        return {
            statusCode: 302,
            statusDescription: 'Found',
            headers: {
                'location': {
                  value: spaBasePath,
                },
            },
        };
    }

    const extensions = [
        '.html',
        '.js',
        '.css'
    ];

    const knownExtension = extensions.find((ext) => {
        return requestUri.endsWith(`${ext}`);
    });

    if (!knownExtension) {
        request.uri = `${spaBasePath}index.html`;
    }
    
    return request;
}

The code running within a CDN only manages web concerns. I avoid activities such as calling APIs, since CDNs may impose short code timeouts and small HTTP message sizes.

The behavior settings for the Final SPA are configured in the AWS console as follows, to apply the finishing touches to the SPA’s web architecture:

Upgrading the SPA

When new HTML assets are uploaded, they are not by default deployed to all of the global edge locations, and users will receive old content. To force edge locations to pull updated content from the S3 origin, a CloudFront invalidation must be issued.

The deploy.sh script performs a full invalidation of all web resources on every deployment. In larger deployments you would instead only invalidate modified resources:

{
    "Location": "https://cloudfront.amazonaws.com/2020-05-31/distribution/E1P4XPOL1PNE6Z/invalidation/I1VQ0HEEHE6JU4",
    "Invalidation": {
        "Id": "I1VQ0HEEHE6JU4",
        "Status": "InProgress",
        "CreateTime": "2022-09-17T14:02:01.301000+00:00",
        "InvalidationBatch": {
            "Paths": {
                "Quantity": 1,
                "Items": [
                    "/*"
                ]
            },
            "CallerReference": "cli-1663423320-228138"
        }
    }
}

The index.html file must always be invalidated. This is requested every time the browser reloads and most commonly results in a 304 response from the server. When it is upgraded a new download is triggered, which in turn  triggers downloads of other static resources that the HTML file references.

While edge locations are being updated, the AWS Console UI shows an In Progress status for a few minutes:

Where Are We?

We have implemented our SPA’s global deployment, to achieve good global performance in a low cost and easy to manage way.

Next Steps

Managed Authorization Server Setup

Background

Previously we started configuring our Cloud Domains and next we will describe the more advanced configuration of AWS Cognito as a managed authorization server.

Create the Authorization Server

In this blog I only use the standards-based authorization server role. In AWS terms this means I am using a User Pool with a Hosted UI. I started by navigating to Cognito in the AWS Console and created a user pool:

The basic configuration was described in the earlier post on choosing an Initial Authorization Server. This included creating a user schema with some custom fields to use for authorization.

Create a Custom Domain

For this blog, I wanted the authorization server to run at an internet URL of https://login.authsamples.com. For this to work in AWS, the root domain,  located at https://authsamples.com, has to be contactable. To enable this I first created an S3 Bucket as a source for HTTP requests:

I then created a Cloudfront Distribution for the root domain. We will cover further details of configuring S3 and Cloudfront in the following post on SPA deployment.

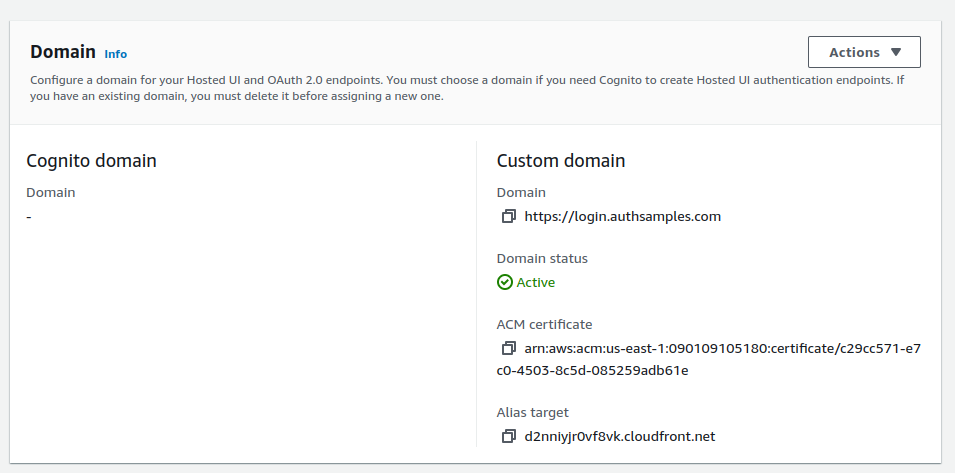
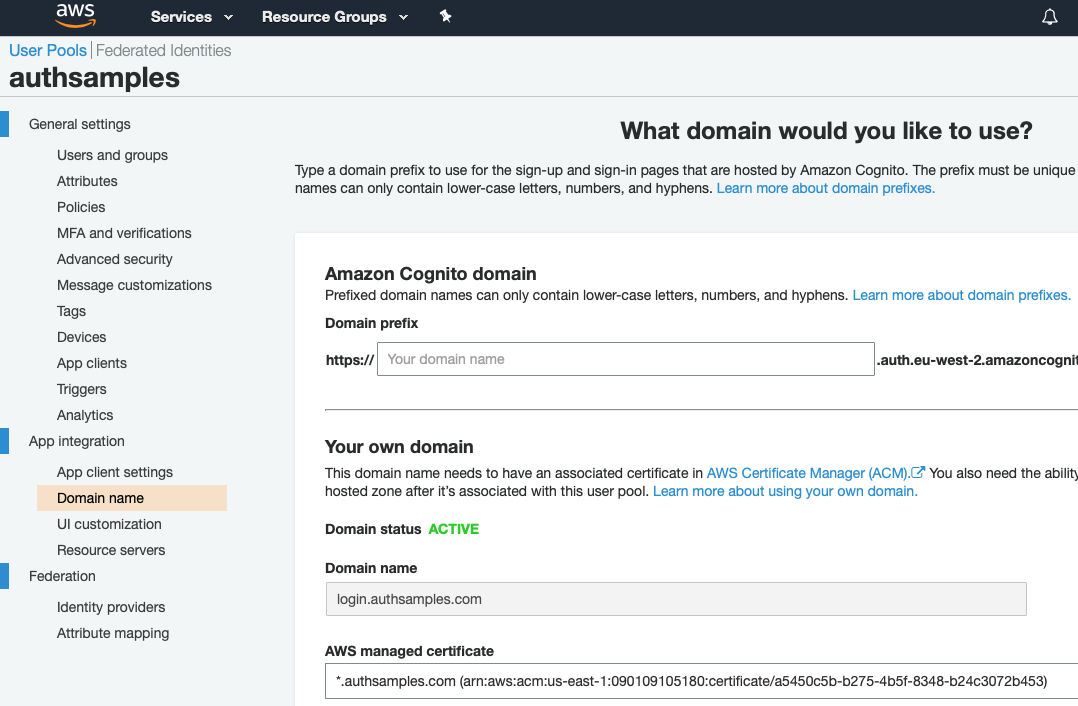
Next I updated the user pool with the Custom Login Sub Domain we defined in the previous post, and also referenced the AWS Managed SSL Certificate:

I then returned to Route 53 and added an A Record to associate the Login Sub Domain to the above Alias Target. AWS then takes 15 minutes or so to make the domain available.

Activate Advanced Features

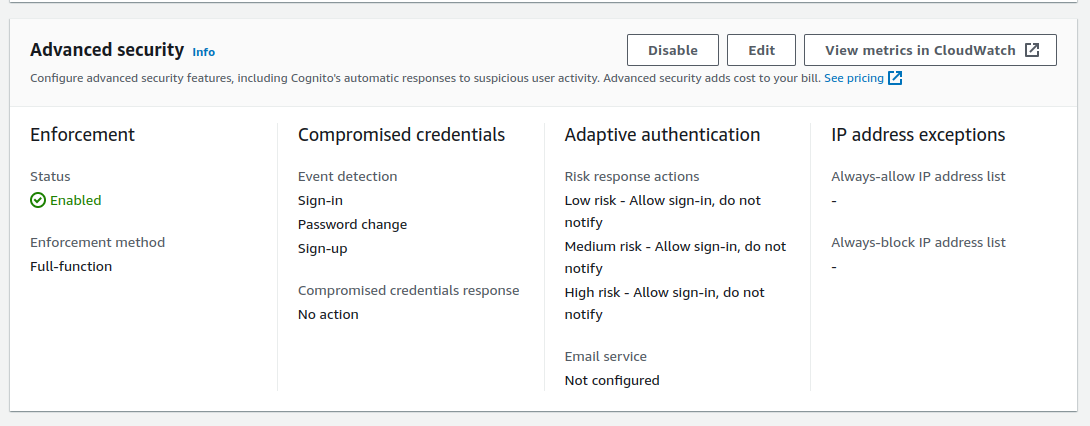
Cognito advanced features increase AWS costs a little, and I chose the following options.

My only motivation for activating advanced features is to enable access token customization, so that fields from the user schema can be issued as claims. This is an essential OAuth behavior for protecting data in APIs.

Define Custom API Scopes

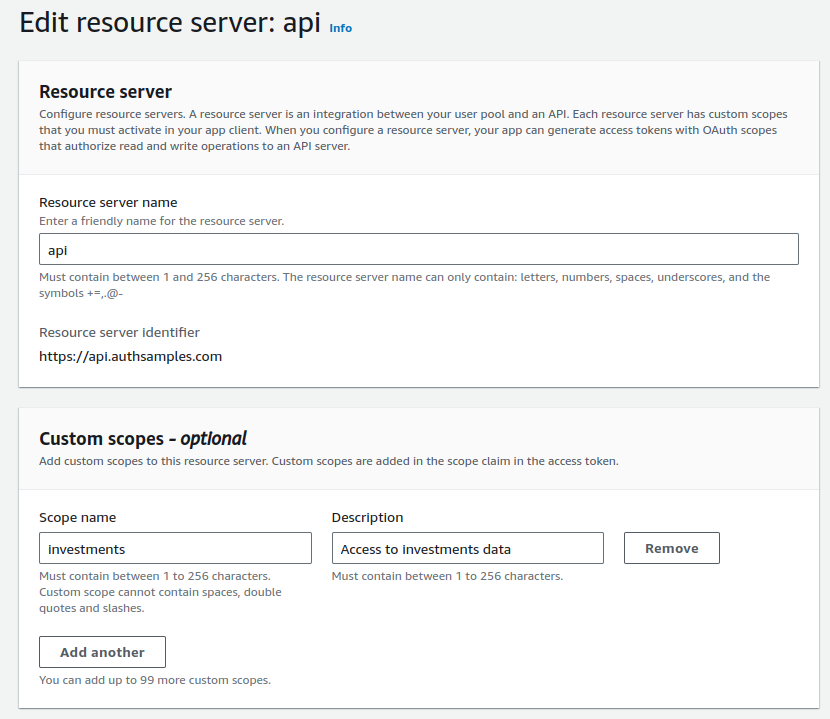
To define custom API scopes in AWS Cognito you must configure a ‘Resource Server‘. In this blog’s code samples I use the identifier to as a base URL to represent a set of related APIs.

Each scope then represents high level access to a business area. Only clients that work with investments data would be assigned the investments scope and be able to successfully call this blog’s example APIs.

Configure Token Customization

I then created a Pre-Token-Generation Lambda Trigger, using the version 2 schema that supports access token customization:

I added a lambda function with the following code:

export const handler = function(event, context) {
  
  const response = {
    claimsAndScopeOverrideDetails: {
      idTokenGeneration: {
        claimsToSuppress: [
          'email',
          'email_verified',
          'given_name',
          'family_name',
          'custom:manager_id',
          'custom:role',
    	 ]
      },
      accessTokenGeneration: {
        claimsToAddOrOverride: {
    	 }
      }
    }
  };
  
  if (event.request.scopes.indexOf('https://api.authsamples.com/investments') !== -1) {
    const customClaims = response.claimsAndScopeOverrideDetails.accessTokenGeneration.claimsToAddOrOverride;
    customClaims.manager_id = event.request.userAttributes['custom:manager_id'];
    customClaims.role = event.request.userAttributes['custom:role'];
  }

  event.response = response;
  context.done(null, event);
};

The claimsToSuppress section is used to remove personal data from ID tokens, since my code samples instead get personal data from the Cognito user info endpoint.

The claimsToAddOrOverride section is used to customize access tokens. Claims are issued differently ‘per scope‘ so that different custom claims can be issued to different clients. In this blog’s code samples, the custom fields in the user schema are issued to clients using an investments scope.

These claims provide convenient fields for APIs and produce a more complete access token. In many cases this helps to lock down the access token and reduce its privileges. This blog’s use of claims is further explained in the blog post on API authorization behavior.

Where Are We?

We have completed the configuration of a low maintenance Cloud Authorization Server and activated some advanced but essential features. Next we will describe how the SPA’s static content is deployed globally.

Next Steps

Cloud Domain Setup

Background

Previously we described a Cloud Hosting Overview, to summarise what we were aiming to achieve. Next we will focus on an initial AWS Developer Cloud Setup, including purchasing an Internet Domain.

Create an AWS Developer Account

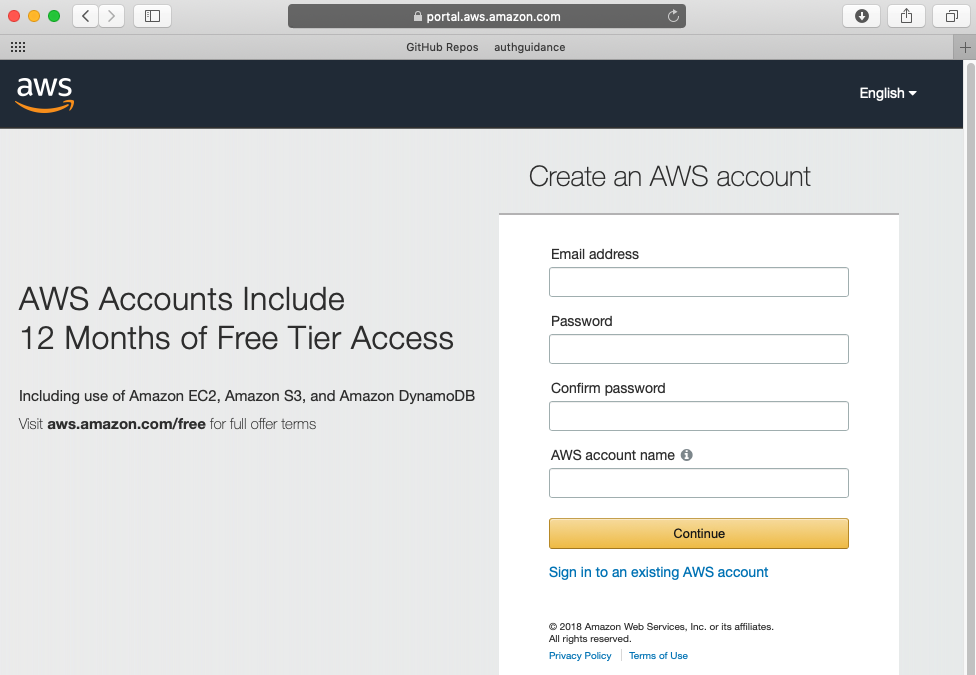
Go to https://aws.amazon.com/free and click the Create Free Account option:

Submit registration details and then process the confirmation email.

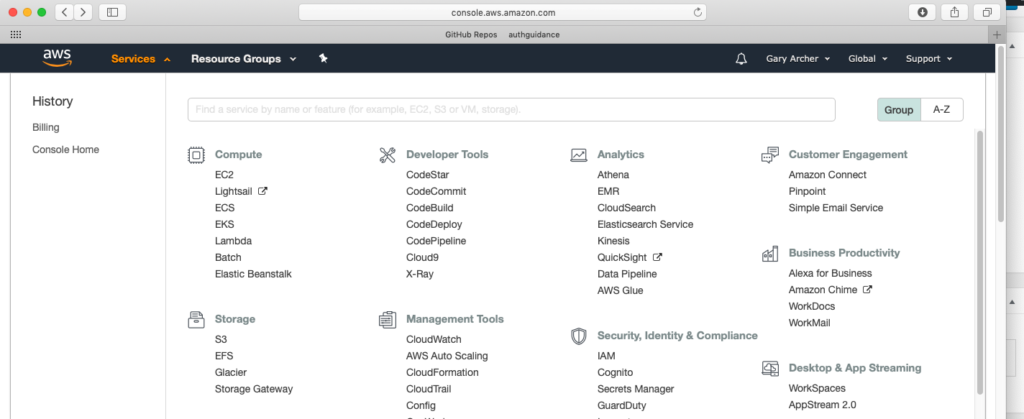
Log in to the AWS Console

Next log in to the AWS Developer Console and start using features:

Create a Custom Domain

Select Route 53 in the Developer Console and request a domain, which of course must not already exist on the internet:

After confirmation the domain will first show up under Pending Requests while the Internet DNS details are being registered. Once complete, the domain will show up under Registered Domains.

If we then look at Hosted Zones we will see that some initial Name Server and Start of Address networking details have been created.

After a few minutes you can issue the following command to query DNS details:

whois authsamples.com

   Domain Name: AUTHSAMPLES.COM
   Registry Domain ID: 2550276719_DOMAIN_COM-VRSN
   Registrar WHOIS Server: whois.registrar.amazon.com
   Registrar URL: http://registrar.amazon.com
   Updated Date: 2023-01-07T17:13:55Z
   Creation Date: 2020-08-02T10:42:26Z
   Registry Expiry Date: 2023-08-02T10:42:26Z
   Registrar: Amazon Registrar, Inc.
   Registrar IANA ID: 468
   Registrar Abuse Contact Email: abuse@amazonaws.com
   Registrar Abuse Contact Phone: +1.2067406200
   Domain Status: ok https://icann.org/epp#ok
   Name Server: NS-1473.AWSDNS-56.ORG
   Name Server: NS-1848.AWSDNS-39.CO.UK
   Name Server: NS-385.AWSDNS-48.COM
   Name Server: NS-543.AWSDNS-03.NET
   DNSSEC: unsigned
   URL of the ICANN Whois Inaccuracy Complaint Form: https://www.icann.org/wicf/

Create Sub Domains

On this blog we will use custom subdomains as follows, and getting each of these working will be covered in subsequent posts:

Domain Points To Usage
login.authsamples.com Cognito URL Authorization Server
web.authsamples.com CloudFront URL Web Content Delivery
api.authsamples.com API Gateway URL API Hosting
mobile.authsamples.com CloudFront URL Mobile Logins and Deep Linking
authsamples.com CloudFront URL Parent Domain

Create a Wildcard SSL Certificate

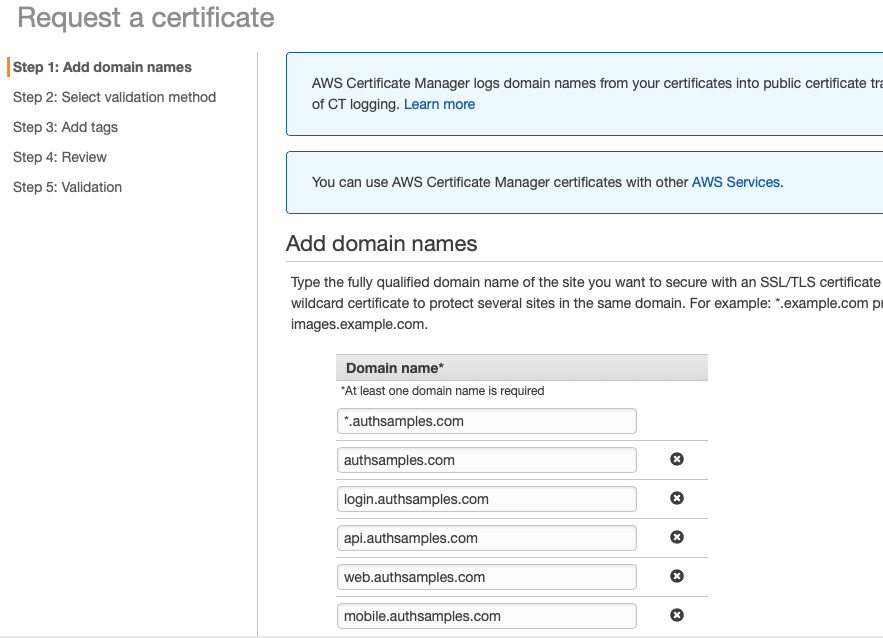
Next go to AWS Certificate Manager for your region, then select the Request a Public Certificate option:

Select the Add another name to this certificate option and then enter a wildcard domain, followed by the parent domain, followed by subdomains:

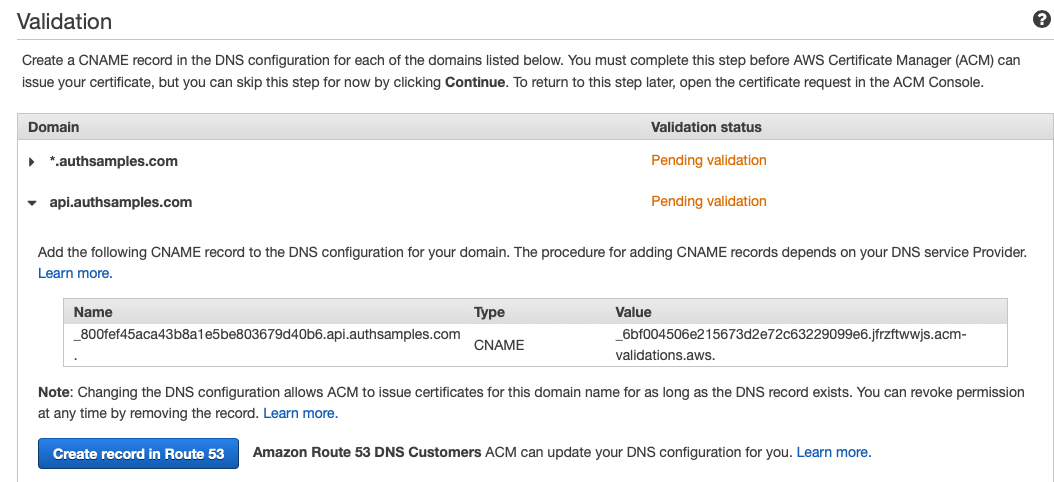
For each of the domain names, select Create Record in Route 53, which is needed for certification validation checks to pass:

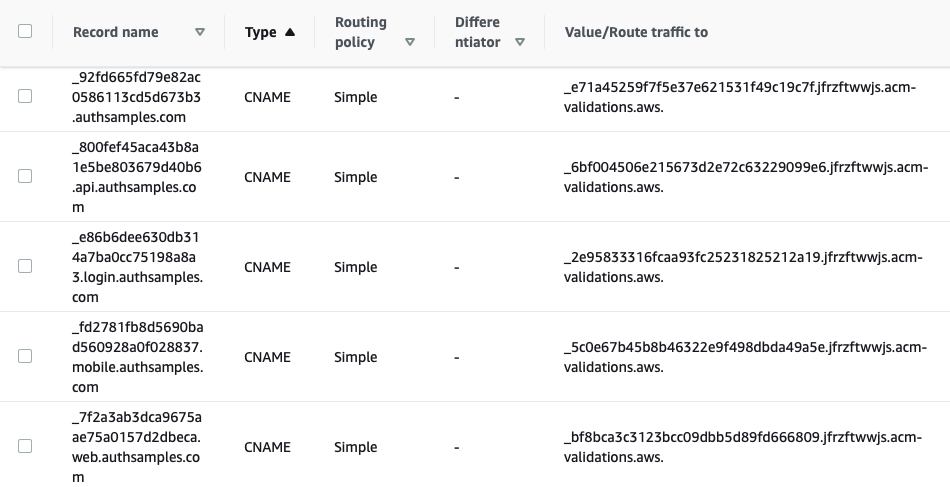
If we now return to Route 53 Hosted Zones we will see the following details:

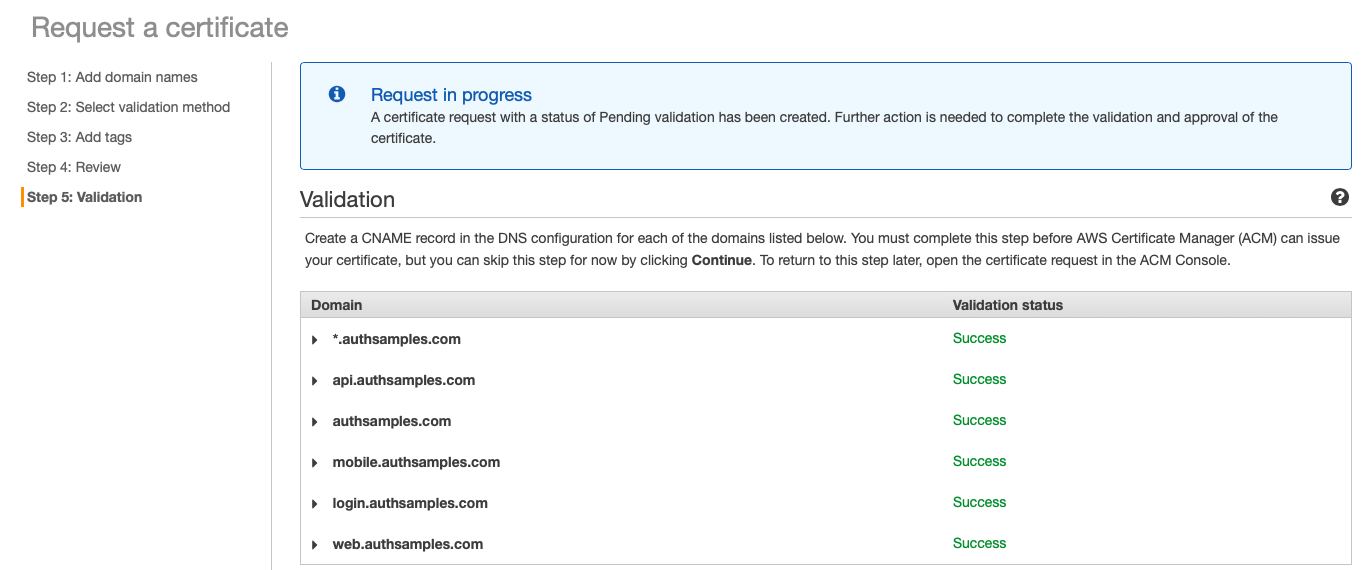
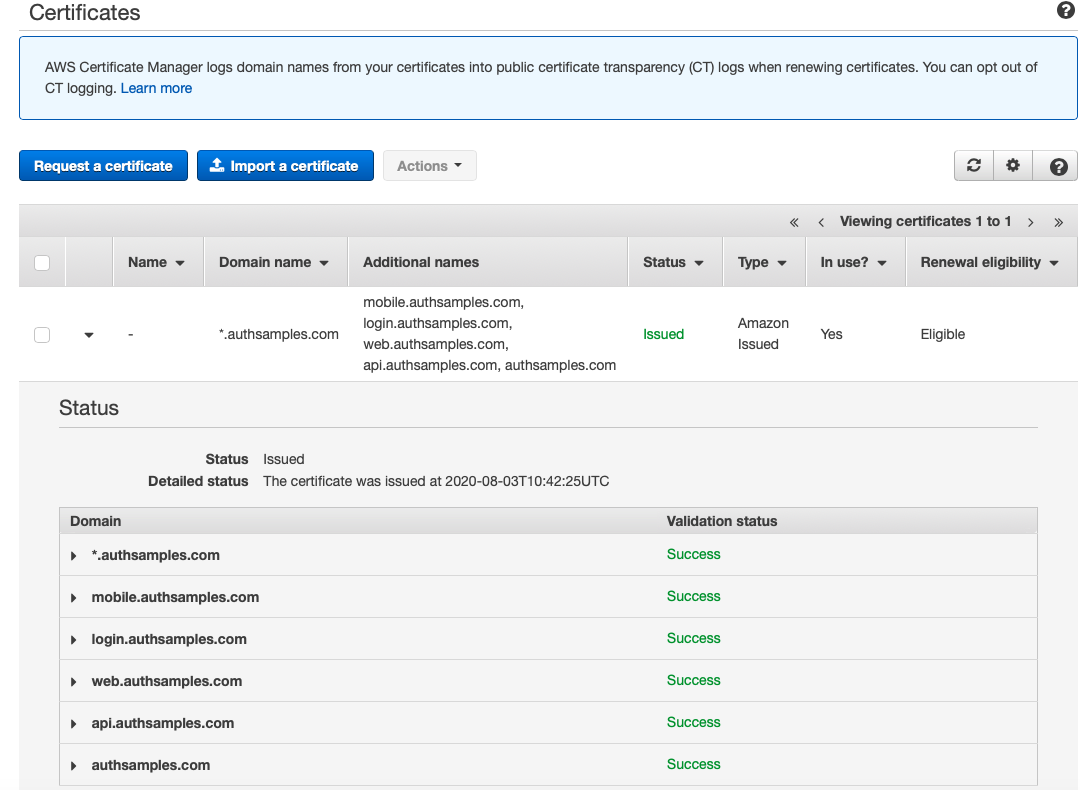
The Certificate Validation should now succeed, so that we have a single Multi Domain SSL Certificate ready to use:

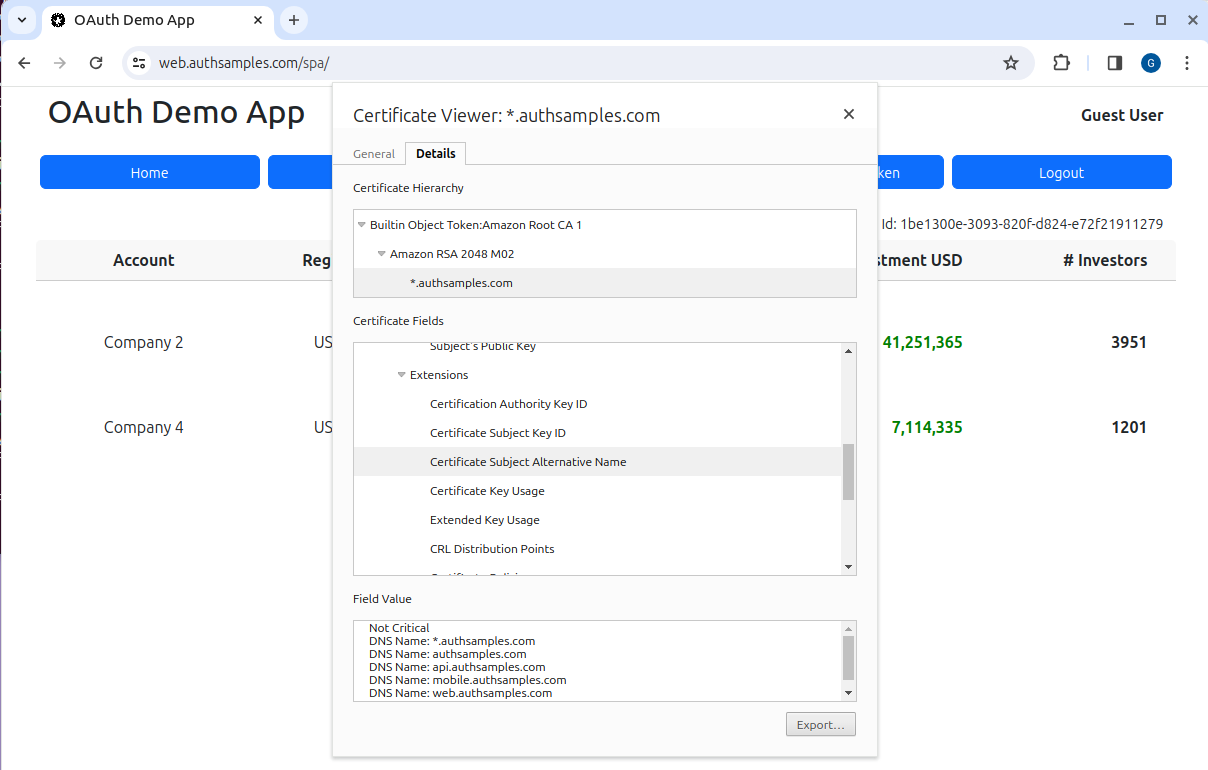
Later, when we use the certificate in a browser, it will be Internet Trusted for all of our application domains, as illustrated below:

AWS automatically renews the certificate when it is close to expiry, so that there is no certificate infrastructure to manage.

Enable AWS Uploads

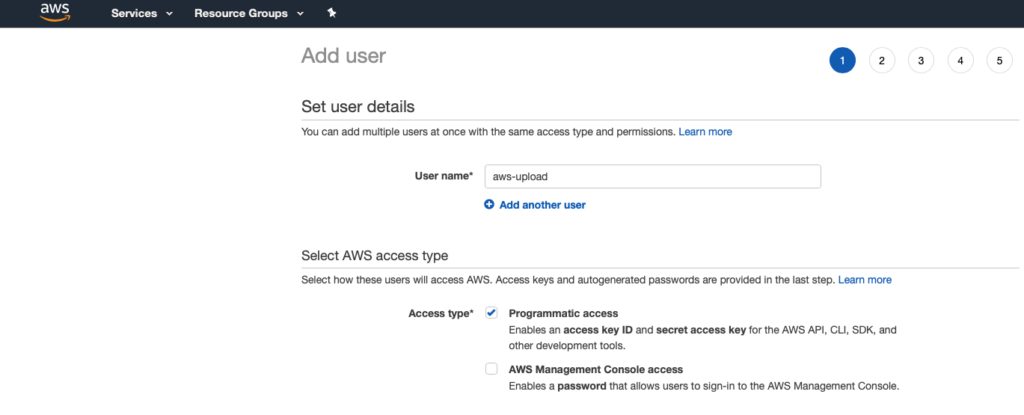
From the AWS Console navigate to IAM / Users and create a user called aws-upload, which this blog uses use for uploading assets to AWS:

In order to keep things simple initially, I assigned administrator privileges to the upload user. When using company AWS accounts, you should instead grant only the permissions needed, and run with least privilege:

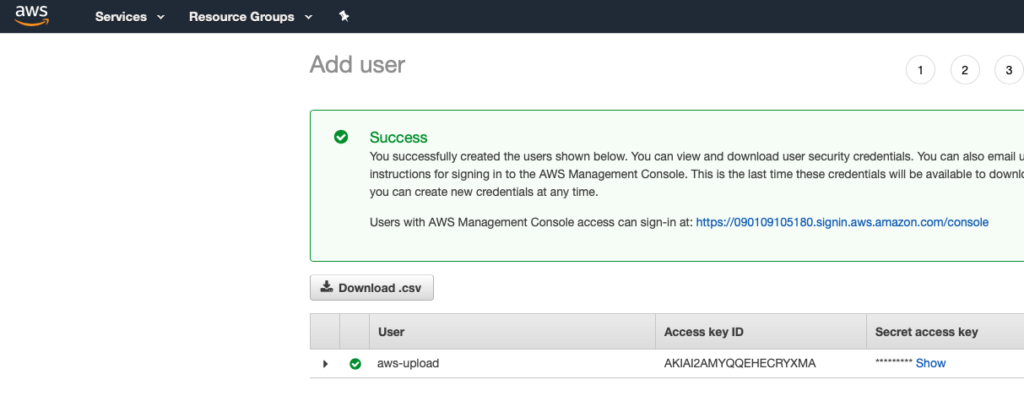
Make a note of the Access Key ID and Secret Access Key values:

Install the AWS CLI

To complete our setup, we will ensure that we can automatically push built code to the above domains. Follow the Amazon Instructions so that you can run the following command successfully:

aws --version

aws-cli/2.9.4 Python/3.9.11 Linux/5.19.0-29-generic exe/x86_64.ubuntu.22 prompt/off

Next configure the CLI and type in details when prompted. Results are saved to your profile directory, which will be located at ~/.aws/credentials.

aws configure

AWS Access Key ID [****************QXLM]: 
AWS Secret Access Key [****************XLQg]: 
Default region name [eu-west-2]: 
Default output format [None]:

Where Are We?

We have configured subdomains to enable Real World Internet URLs for our demo apps, and the local computer is prepared for uploading applications.

Next Steps

Cloud Hosting Overview

Background

Previously we completed our mobile theme by discussing Coding Key Points for the iOS app. Next we will begin a theme on modern deployment, and describe how the corresponding cloud infrastructure was created.

URL Design

Hosting should start with a URL design, and this blog uses a subdomain approach, to represent component separation on a small scale:

Domain Description
https://web.authsamples.com The Base URL for Single Page Apps
https://api.authsamples.com The API Gateway Base URL
https://login.authsamples.com The Authorization Server Base URL
https://mobile.authsamples.com Hosts assets for Mobile Apps

Each subdomain can be a Serverless or Cloud Native endpoint. This blog will mix and match, depending on which option best meets our requirements.

DNS Setup

The AWS cloud is used, which starts with registering a parent domain of authsamples.com in Route 53:

Multiple internet accessible subdomains can then be registered as ‘A records’ under a Hosted Zone:

If you have your own cloud domain and subdomains, you could reconfigure this blog’s samples and deploy them there, with the same technical steps.

Managed Internet SSL Certificates

AWS Certificate Manager will issue TLS 1.3 certificates to our subdomains, using the same wildcard concept we’ve used on a local PC in earlier posts:

We will only have a single certificate to manage, and AWS will automatically renew it when it gets close to expiry.

Web and API Separation

The API base URLs support multiple microservices hosted behind the same API gateway:

The web base URL supports hosting multiple micro-frontends for the same business area:

SPA Deployment

The SPA deployment model will continue to be just static content, and we will just deploy our web resources to the web.authsamples.com S3 bucket:

We will then use AWS CloudFront as a Content Delivery Network:

Cloudfront pushes web content to many locations, to enable globally equal web performance, in a technically simple manner:

Serverless APIs

Initial cloud API endpoints will use the Serverless Framework. This enables us to host APIs at low cost, with minimal infrastructure to manage:

The AWS API Gateway will be the entry point for Serverless APIs:

Initial Cloud Authorization Server

Earlier in this blog we described  AWS Cognito as an initial low cost authorization server. We will explain the AWS setup shortly:

Cloud Connected Code Samples

Use of cloud hosting enables any reader of this blog to run this blog’s OAuth code samples. Deployed endpoints are especially useful for mobile apps:

The Code Samples Quick Start page provides details of online URLs and guest credentials for running the demo apps.

Centralized API Logs

APIs will use this blog’s Effective API Logging design to write immediate log data to AWS Cloudwatch. These logs could then be aggregated to a managed Elasticsearch service. The Kibana tool would then be used to Analyse API Activity:

Serverless Costs

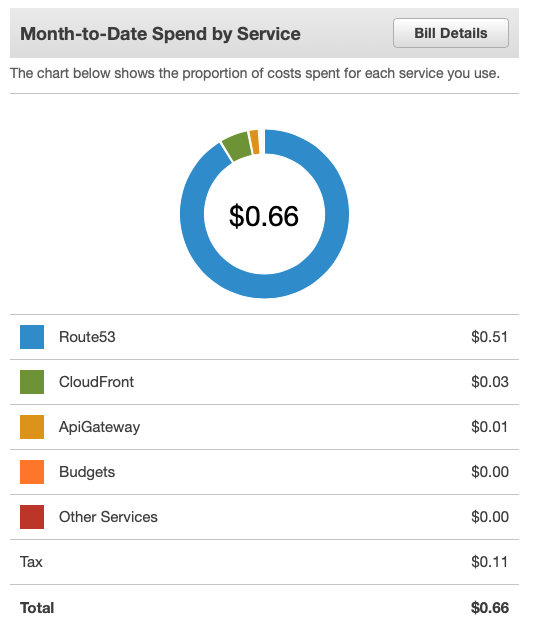
The AWS costs for the above setup (excluding Elasticsearch) are around 13 USD per year to register the base domain, along with a further 0.60 USD per month. This is an attractive option when getting started with cloud hosting:

Kubernetes Deployment

The API side of the architecture can also run in a Kubernetes environment. In AWS this would be managed by spinning up an EKS cluster, that hosts this blog’s final APIs, along with any suppporting components.

Where Are We?

We have defined our desired behaviour, and the following blog posts will describe some implementation details. In all cases our application code will remain portable so that it could easily be hosted elsewhere.

Next Steps

iOS Code Sample – Coding Key Points

Background

Previously we described our iOS  Infrastructure Setup and we will now look at some key areas of our sample’s code. See also the Client Side API Journey to understand the background and the requirements being met.

Goal: Portable Coding Model

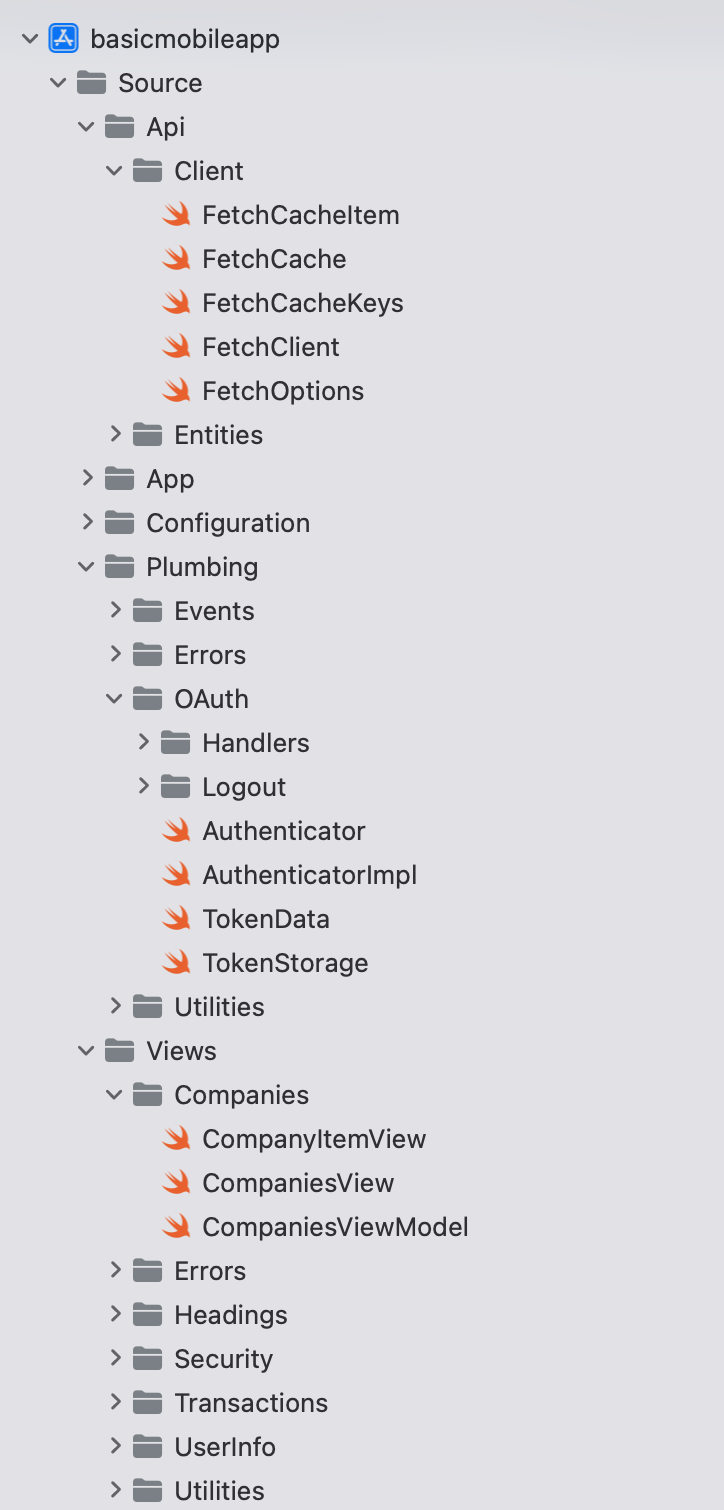
One of this blog’s coding goals is to use the same classes across multiple platforms. Our iOS App uses the same logical separation of responsibilities into classes as the earlier React SPA:
Goal: Unobtrusive OAuth Integration

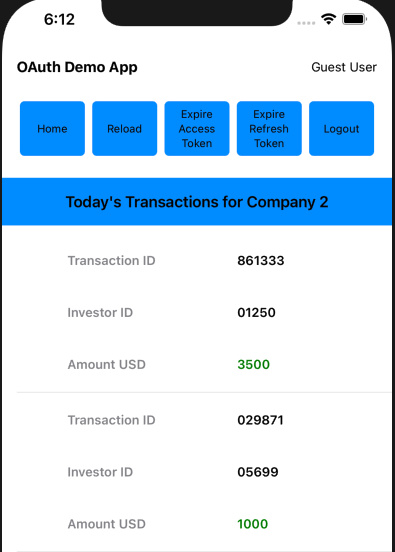
The view and view model classes below call our OAuth Secured API, and need to deal with triggering login redirects and renewing tokens. This can also involve concurrency, which we will explore shortly.
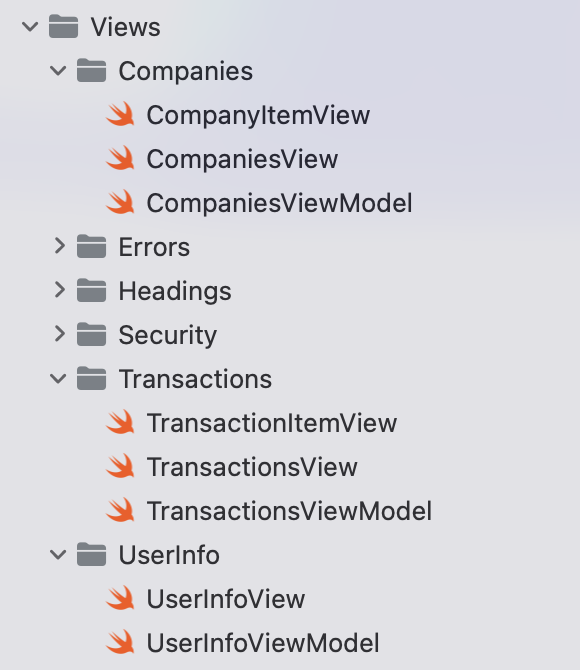
Companies will want to complete the tricky plumbing code once, then focus on business value, by growing the UI and API code.

Project Creation

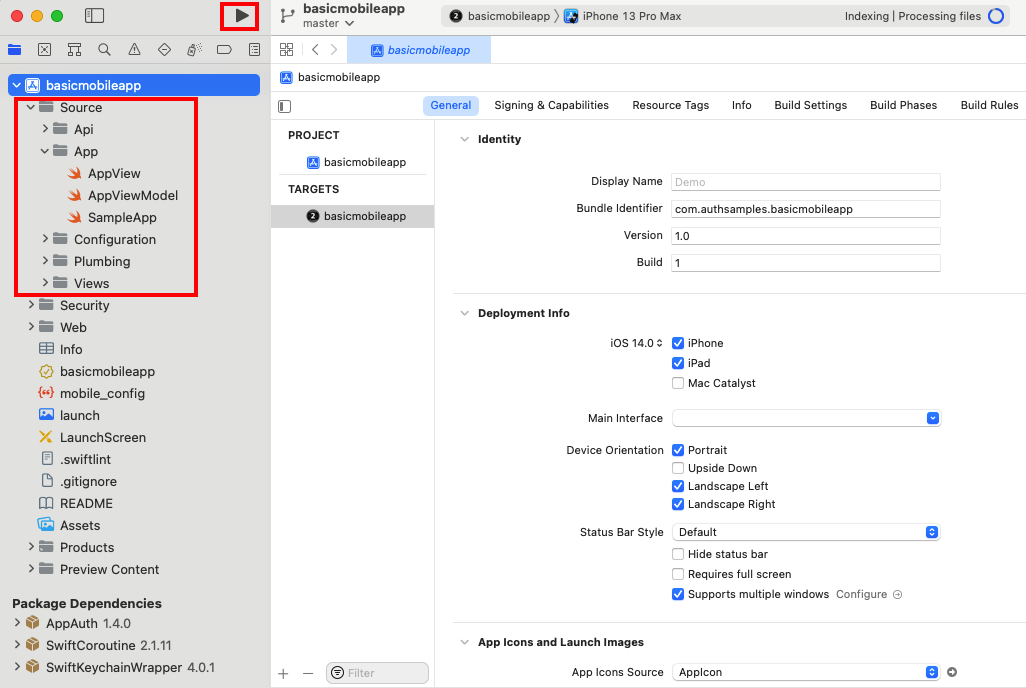
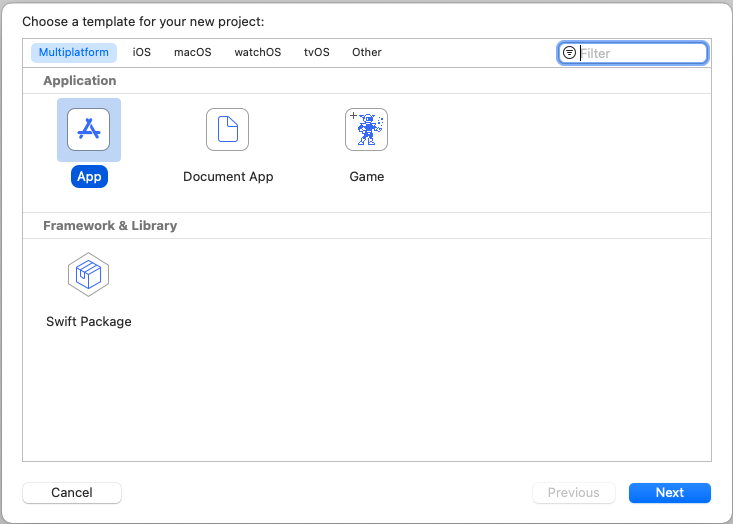
The project was initially created via the below App Template, after which I began developing SwiftUI Views that use Swift Classes.
App Entry Point

Our application entry point begins with the SampleApp class, which creates the main AppView along with view model objects and some environment objects that are shared among views:

import Foundation
import SwiftUI

@main
struct SampleApp: App {

    private let model: AppViewModel
    private let eventBus: EventBus
    private let orientationHandler: OrientationHandler
    private let viewRouter: ViewRouter

    init() {

        self.eventBus = EventBus()
        self.orientationHandler = OrientationHandler()

        self.model = AppViewModel(eventBus: self.eventBus)
        self.viewRouter = ViewRouter(eventBus: self.eventBus)
    }

    var body: some Scene {

        WindowGroup {
            AppView(model: self.model, viewRouter: self.viewRouter)
                .environmentObject(self.orientationHandler)
                .environmentObject(self.eventBus)
                .onOpenURL(perform: { url in

                    if self.authenticator.isOAuthResponse(responseUrl: url) {

                        self.model.resumeOAuthResponse(url: url)

                    } else {

                        self.viewRouter.handleDeepLink(url: url)
                    }
                })
                .onReceive(NotificationCenter.default.publisher(for: UIDevice.orientationDidChangeNotification)) { _ in

                    self.orientationHandler.isLandscape = UIDevice.current.orientation.isLandscape
                }
        }
    }
}

The AppView source file renders a tree of views in a similar manner to the SPA’s application view:

var body: some View {

    return VStack {

        TitleView(userInfoViewModel: self.model.getUserInfoViewModel())

        HeaderButtonsView(
            onHome: self.onHome,
            onReloadData: self.onReloadData,
            onExpireAccessToken: self.model.onExpireAccessToken,
            onExpireRefreshToken: self.model.onExpireRefreshToken,
            onLogout: self.onLogout)

        if self.model.error != nil {
            ErrorSummaryView(
            error: self.model.error!,
            hyperlinkText: "Application Problem Encountered",
            dialogTitle: "Application Error",
            padding: EdgeInsets(top: 0, leading: 0, bottom: 10, trailing: 0))
        }

        SessionView(sessionId: self.model.getSessionId())

        MainView(
            viewRouter: self.viewRouter,
            companiesViewModel: self.model.getCompaniesViewModel(),
            transactionsViewModel: self.model.getTransactionsViewModel(),
            isDeviceSecured: self.model.isDeviceSecured)

        Spacer()
    }
    .onAppear(perform: self.model.initialize)
    .onReceive(self.eventBus.loginRequiredTopic, perform: {_ in
        self.onLoginRequired()
    })

Views can be recreated at any time, whereas the AppViewModel is only created once. When it is constructed it reads settings from the JSON configuration file embedded in the app, then creates global objects used for OAuth and API operations:

init(eventBus: EventBus) {

    self.fetchCache = FetchCache()
    self.eventBus = eventBus

    self.configuration = try! ConfigurationLoader.load()
    self.authenticator = AuthenticatorImpl(configuration: self.configuration.oauth)
    self.fetchClient = try! FetchClient(configuration: self.configuration, fetchCache: self.fetchCache, authenticator: self.authenticator)
    self.viewModelCoordinator = ViewModelCoordinator(eventBus: eventBus, fetchCache: self.fetchCache, authenticator: self.authenticator)

    self.isLoaded = false
    self.isDeviceSecured = DeviceSecurity.isDeviceSecured()
    self.error = nil
}

View Layout and Composition

The MainView is swapped out as the user navigates, in a similar way to the main area of an SPA:

var body: some View {

    return VStack {

        if self.viewRouter.currentViewType == BlankView.Type.self {

            BlankView()
                
        } else if !self.isDeviceSecured {

            DeviceNotSecuredView()

        } else if self.viewRouter.currentViewType == TransactionsView.Type.self {

            TransactionsView(model: self.transactionsViewModel, viewRouter: self.viewRouter)

        } else if self.viewRouter.currentViewType == LoginRequiredView.Type.self {

            LoginRequiredView()

        } else {

            CompaniesView(model: self.companiesViewModel, viewRouter: self.viewRouter)
        }
    }
}

Each main view is composed of smaller views,  so for example the CompaniesView renders a collection of CompanyItemView child elements:

var body: some View {

    let deviceWidth = UIScreen.main.bounds.size.width
    return VStack {

        Text("Company List")
            .font(.headline)
            .frame(width: deviceWidth)
            .padding()
            .background(Colors.lightBlue)

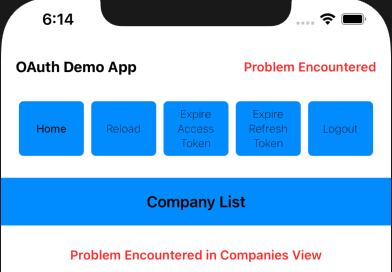
        if self.model.error != nil {
            ErrorSummaryView(
                error: self.model.error!,
                hyperlinkText: "Problem Encountered in Companies View",
                dialogTitle: "Companies View Error",
                padding: EdgeInsets(top: 10, leading: 0, bottom: 0, trailing: 0))
        }

        if self.model.companies.count > 0 {
            List(self.model.companies, id: \.id) { item in
                CompanyItemView(viewRouter: self.viewRouter, company: item)
            }
            .listStyle(.plain)
        }
    }
    .onAppear(perform: self.initialLoad)
    .onReceive(self.eventBus.reloadDataTopic, perform: {data in
        self.handleReloadData(event: data)
    })

Data Binding and View Models

We use SwiftUI data binding in a limited manner, in order to reduce code. Views that perform OAuth or API operations delegate the processing to their view model class, which then ‘publishes‘ results back to the view:

class CompaniesViewModel: ObservableObject {

    private let fetchClient: FetchClient
    private let viewModelCoordinator: ViewModelCoordinator

    @Published var companies = [Company]()
    @Published var error: UIError?
}

Views and Web API Calls

The most interesting view models are those that get data from our OAuth Secured API. As is standard in UIs, this involves switching to an I/O worker thread, then switching back to the UI thread once complete:

func callApi(options: ViewLoadOptions? = nil) {

    let fetchOptions = FetchOptions(
        cacheKey: FetchCacheKeys.Companies,
        forceReload: options?.forceReload ?? false,
        causeError: options?.causeError ?? false)

    self.viewModelCoordinator.onMainViewModelLoading()
    self.error = nil

    Task {

        do {

            let companies = try await self.fetchClient.getCompanies(options: fetchOptions)
            await MainActor.run {

                if companies != nil {
                    self.companies = companies!
                }
                self.viewModelCoordinator.onMainViewModelLoaded(cacheKey: fetchOptions.cacheKey)
            }

        } catch {

            await MainActor.run {

                self.companies = [Company]()
                self.error = ErrorFactory.fromException(error: error)
                self.viewModelCoordinator.onMainViewModelLoaded(cacheKey: fetchOptions.cacheKey)
            }
        }
    }
}

Use of up to date Swift syntax  provides a readable async await coding model where we write simple promise based functions to do the work.

API Call Details

The FetchClient class does the lower level work and uses iOS Async URL Sessions. Each API call uses a shared method to deal with supplying OAuth access tokens and managing retries.

We implement the same OAuth client side behaviour that we have used in all of other UI code samples, by getting a new token and retrying the request once if the API returns a 401 status code. The basic API code, with caching omitted, looks like this:

private func getDataFromApi(url: URL, options: FetchOptions) async throws -> Data? {

    var accessToken = authenticator.getAccessToken()
    if accessToken == nil {
        throw loginRequiredError
    }

    do {
        return try await self.callApiWithToken(
            method: "GET",
            url: url,
            jsonData: nil,
            accessToken: accessToken!,
            options: options)

    } catch {

        let error = ErrorFactory.fromException(error: error)
        if error.statusCode != 401 {
            throw error
        }

        accessToken = try await authenticator.synchronizedRefreshAccessToken()
        return try await self.callApiWithToken(
            method: "GET",
            url: url,
            jsonData: nil,
            accessToken: accessToken!,
            options: options) 
    } 
}

Authenticator Interface

The ApiClient uses an Authenticator reference and calls getAccessToken in order to retrieve a message credential for API calls:

protocol Authenticator {

    func initialize() async throws

    func getAccessToken() async throws -> String

    func synchronizedRefreshAccessToken() async throws -> String

    func startLoginRedirect(viewController: UIViewController) throws

    func handleLoginResponse() async throws -> OIDAuthorizationResponse

    func finishLogin(authResponse: OIDAuthorizationResponse) async throws

    func startLogoutRedirect(viewController: UIViewController) throws

    func handleLogoutResponse() async throws -> OIDEndSessionResponse

    func isOAuthResponse(responseUrl: URL) -> Bool

    func resumeOperation(responseUrl: URL)

    func clearLoginState()

    func expireAccessToken()

    func expireRefreshToken()
}

Triggering Login Redirects

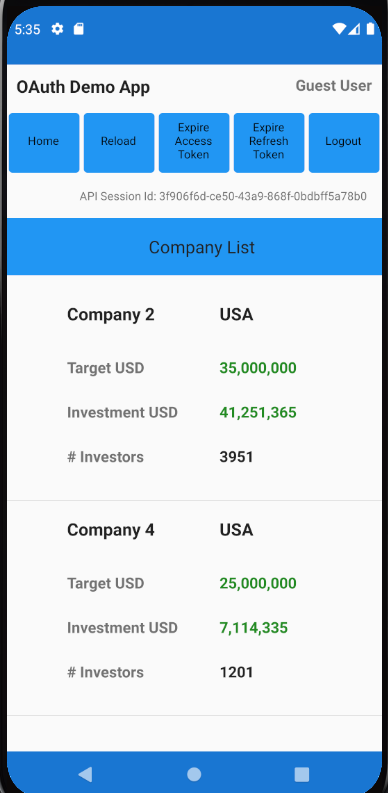
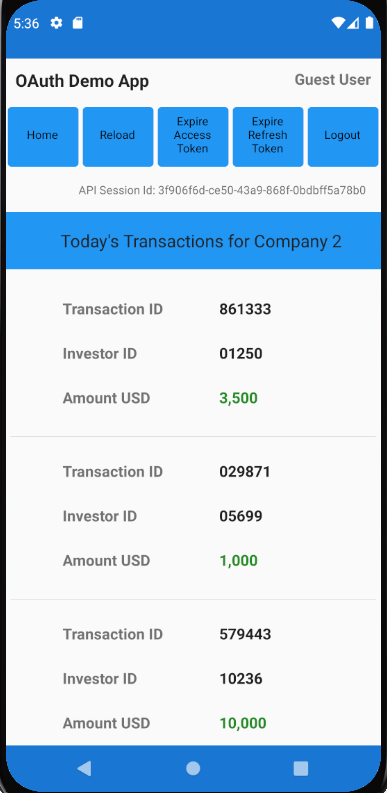
Our App has 2 fragments that load concurrently, both of which call the API, to get the main view’s data and also to get user info:
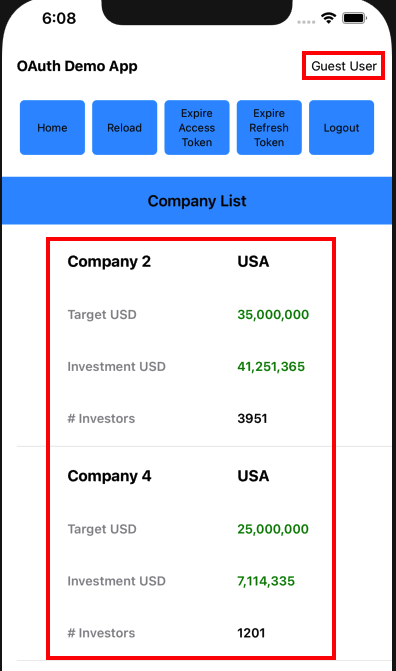
An ApiViewEvents class is used to wait for all views to load. In the event of any view receiving a permanent 401 response from the API, a single OAuth redirect is triggered by the main view:

private func handleErrorsAfterLoad() {

    if self.loadedCount == self.loadingCount {

        let errors = self.getLoadErrors()

        let loginRequired = errors.first { error in
                error.errorCode == ErrorCodes.loginRequired
        }
        if loginRequired != nil {
            self.eventBus.sendLoginRequiredEvent()
            return
        }

        let oauthConfigurationError = errors.first { error in
                (error.statusCode == 401 && error.errorCode == ErrorCodes.invalidToken) ||
                (error.statusCode == 403 && error.errorCode == ErrorCodes.insufficientScope)
        }

        if oauthConfigurationError != nil {
            self.authenticator.clearLoginState()
        }
    }
}

The ViewModelCoordinator class also deals with invalid token errors, such as incorrect scope, claims or audience configurations. For these errors, the app clears its login state to enable retries where the OAuth configuration has been fixed. The app then receives new tokens and the user can recover.

AppAuth Library – Login Requests

Our implementation uses AppAuth iOS classes to implement standards based OpenID Connect behaviour.

func startLoginRedirect(viewController: UIViewController) throws {

    do {

        let redirectUri = self.getLoginRedirectUri()
        guard let loginRedirectUri = URL(string: redirectUri) else {
            let message = "Error creating URL for : \(redirectUri)"
            throw ErrorFactory.fromMessage(message: message)
        }

        let additionalParameters = [String: String]()

        let scopesArray = self.configuration.scope.components(separatedBy: " ")
        let request = OIDAuthorizationRequest(
            configuration: self.metadata!,
            clientId: self.configuration.clientId,
            clientSecret: nil,
            scopes: scopesArray,
            redirectURL: loginRedirectUri,
            responseType: OIDResponseTypeCode,
            additionalParameters: additionalParameters)

        self.currentOAuthSession = OIDAuthorizationService.present(
            request,
            presenting: viewController,
            callback: self.loginResponseHandler.callback)

    } catch {

        self.currentOAuthSession = nil
        throw ErrorFactory.fromLoginRequestError(error: error)
    }
}

At runtime the properties of AppAuth objects are set based on our OAuth configuration settings:

{
  "app": {
    "apiBaseUrl":             "https://api.authsamples.com/investments"
  },
  "oauth": {
    "authority":              "https://cognito-idp.eu-west-2.amazonaws.com/eu-west-2_CuhLeqiE9",
    "userInfoEndpoint":       "https://login.authsamples.com/oauth2/userInfo",
    "clientId":               "2vshs4gidsbpnjmsprhh607ege",
    "webBaseUrl":             "https://authsamples.com",
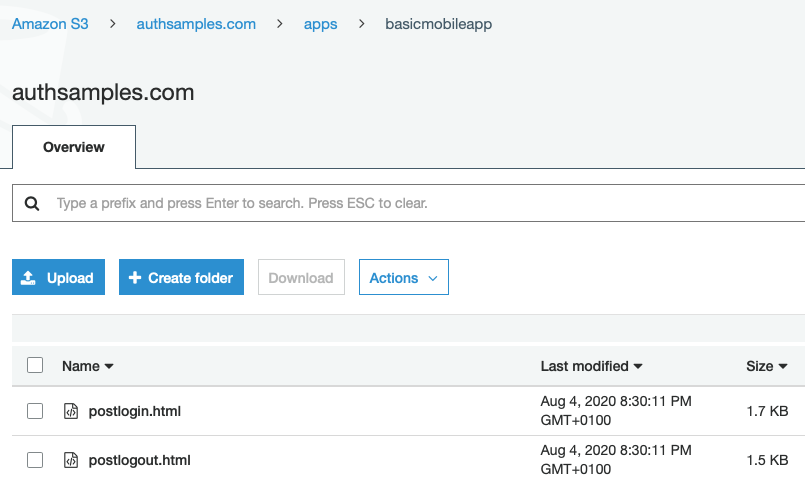
    "loginRedirectPath":      "/apps/basicmobileapp/postlogin.html",
    "postLogoutRedirectPath": "/apps/basicmobileapp/postlogout.html",
    "deepLinkBaseUrl":        "https://mobile.authsamples.com",
    "loginActivatePath":      "/basicmobileapp/oauth/callback",
    "postLogoutActivatePath": "/basicmobileapp/oauth/logoutcallback",
    "scope":                  "openid profile email https://api.authsamples.com/investments",
    "customLogoutEndpoint":   "https://login.authsamples.com/logout"
  }
}

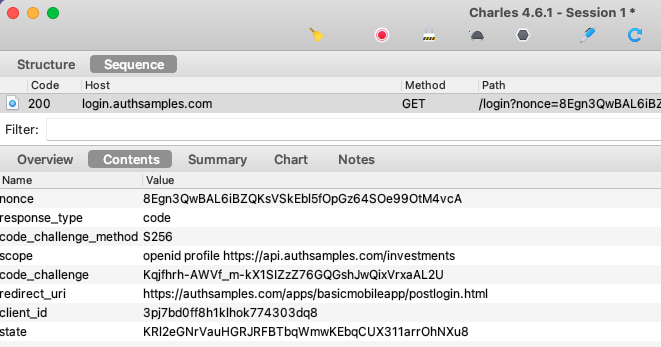
AppAuth libraries produce outgoing Authorization Code Flow (PKCE) request messages and then handle incoming response messages:
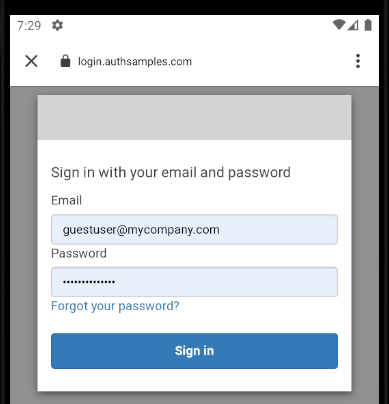
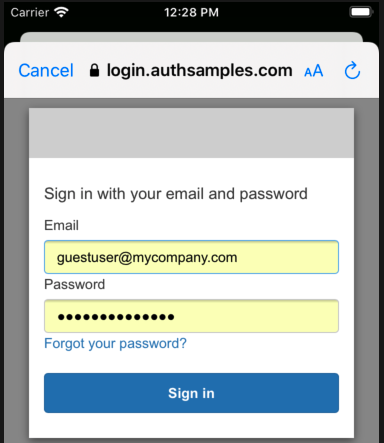
The libraries also select the type of login window, and the default option is to use an ASWebAuthenticationSession:
AppAuth Library – Login Responses

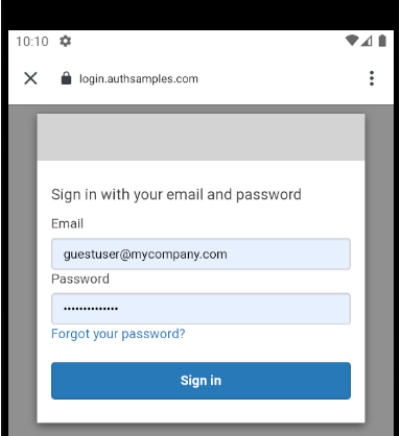
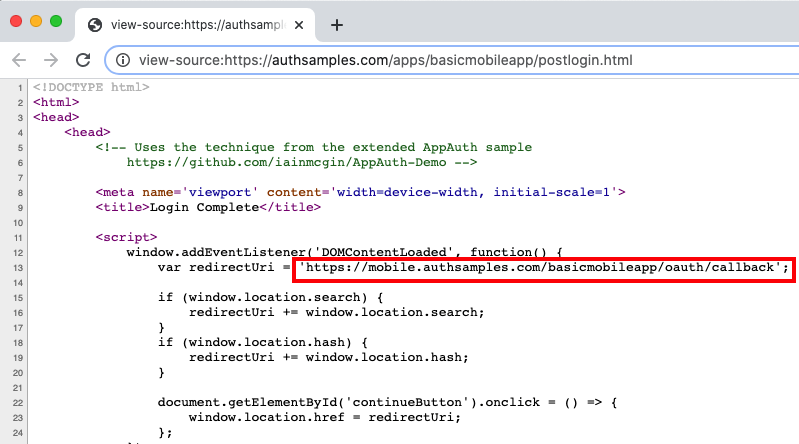
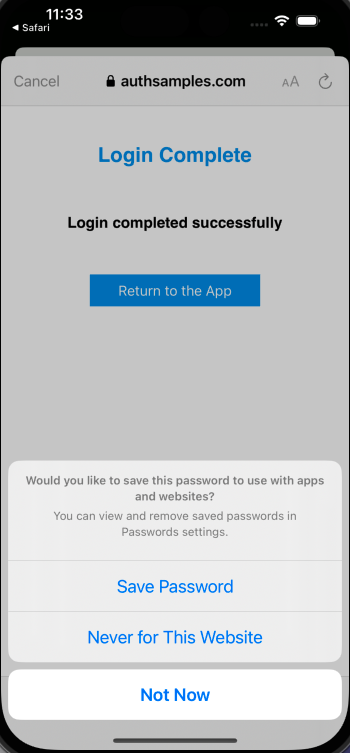
Upon return from login we present the below Web Hosted Post Login Page in the system browser window. This screen receives the authorization code in a response query parameter.
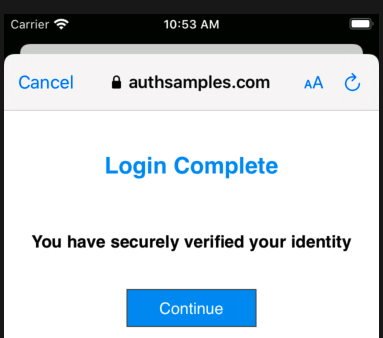
Javascript code in the web page invokes the login receiver activity when the continue button is pressed. This forwards any received query parameters, including the Authorization Code, to the app:

<script>
    window.addEventListener('DOMContentLoaded', function() {
        var redirectUri = 'https://mobile.authsamples.com/basicmobileapp/oauth/callback';

        if (window.location.search) {
            redirectUri += window.location.search;
        }
        if (window.location.hash) {
            redirectUri += window.location.hash;
        }

        document.getElementById('continueButton').onclick = () => {
            window.location.href = redirectUri;
        };
    });
</script>

For Claimed HTTPS Scheme based logins the response is then received as a deep link in the SampleApp class, then forwarded to the authenticator class, which resumes the AppAuth session:

func resumeOperation(responseUrl: URL) {

    if self.currentOAuthSession != nil {

        var resumeUrl: String = self.getResumeUrl()
        if resumeUrl != nil {
            self.currentOAuthSession!.resumeExternalUserAgentFlow(
                with: URL(string: resumeUrl!)!)
        }
    }
}

AppAuth Library – Cancelled Logins

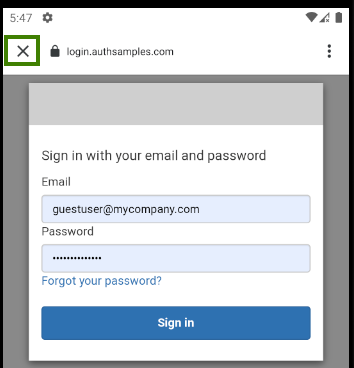
It is possible for users to quit the login attempt if they are having trouble signing in, via the Cancel button in the top left:

AppAuth libraries are well designed and provide error codes that we can use to determine cancellation and other conditions:

private func isCancelledError(error: Error) -> Bool {

    let authError = error as NSError
    return self.matchesAppAuthError(
        error: error,
        domain: OIDGeneralErrorDomain,
        code: OIDErrorCode.userCanceledAuthorizationFlow.rawValue))
}

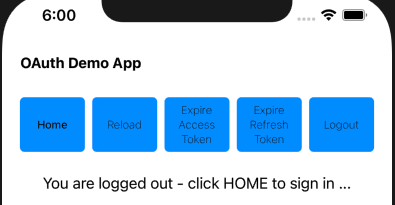
For cancelled logins we return the user to the Login Required view so that they can retry the operation:
AppAuth Library – Authorization Code Grant

After successfully receiving the login response, the Authorization Code Flow continues by swapping the received code for tokens:

func finishLogin(authResponse: OIDAuthorizationResponse) async throws {

    self.currentOAuthSession = nil
    let request = authResponse.tokenExchangeRequest()

    return try await withCheckedThrowingContinuation { continuation in

        OIDAuthorizationService.perform(
            request!,
            originalAuthorizationResponse: authResponse) { tokenResponse, error in

                if error != nil {

                    let uiError = ErrorFactory.fromTokenError(
                        error: error!,
                        errorCode: ErrorCodes.authorizationCodeGrantFailed)
                    continuation.resume(throwing: uiError)
                }

                self.saveTokens(tokenResponse: tokenResponse!)
                continuation.resume()
            }
    }
}

The message includes a verifier used for PKCE handling, and AppAuth libraries take care of supplying this correctly.

Secure Token Storage

After login we store OAuth tokens in a secure manner and need to ensure that no other app can access them. This is straightforward using the Swift KeyChain Wrapper helper library:

private func saveTokenData() {

    let encoder = JSONEncoder()
    let jsonText = try? encoder.encode(self.tokenData)
    if jsonText != nil {
        KeychainWrapper.standard.set(jsonText!, forKey: self.storageKey)
    }
}

Application Restarts without Login

When the app starts, it loads OpenID Connect metadata and also any tokens that have been saved to Android storage. This prevents the user needing to re-authenticate on every application restart:

override suspend fun initialize() {
    this.getMetadata()
    this.tokenStorage.loadTokens()
}

AppAuth Library – Refreshing Access Tokens

AppAuth classes are also used to send a Refresh Token Grant message, via the OIDTokenRequest class. The AppAuth error codes allow us to reliably detect the ‘Invalid Grant‘ response when the refresh token finally expires:

private func performRefreshTokenGrant() async throws {

    let tokenData = self.tokenStorage.getTokens()

    try await self.getMetadata()

    let request = OIDTokenRequest(
        configuration: self.metadata!,
        grantType: OIDGrantTypeRefreshToken,
        authorizationCode: nil,
        redirectURL: nil,
        clientID: self.configuration.clientId,
        clientSecret: nil,
        scope: nil,
        refreshToken: tokenData!.refreshToken!,
        codeVerifier: nil,
        additionalParameters: nil)

    return try await withCheckedThrowingContinuation { continuation in

        OIDAuthorizationService.perform(request) { tokenResponse, error in

            if error != nil {

                if self.matchesAppAuthError(
                    error: error!,
                    domain: OIDOAuthTokenErrorDomain,
                    code: OIDErrorCodeOAuth.invalidGrant.rawValue) {

                    self.tokenStorage.removeTokens()
                    continuation.resume()
                    return
                }

                let uiError = ErrorFactory.fromTokenError(
                    error: error!,
                    errorCode: ErrorCodes.refreshTokenGrantFailed)
                continuation.resume(throwing: uiError)
                return
            }

            if tokenResponse == nil || tokenResponse!.accessToken == nil {
                let message = "No tokens were received in the Refresh Token Grant message"
                continuation.resume(throwing: ErrorFactory.fromMessage(message: message))
                return
            }

            self.saveTokens(tokenResponse: tokenResponse!)
            continuation.resume()
        }
    }
}

Token Renewal and Concurrency

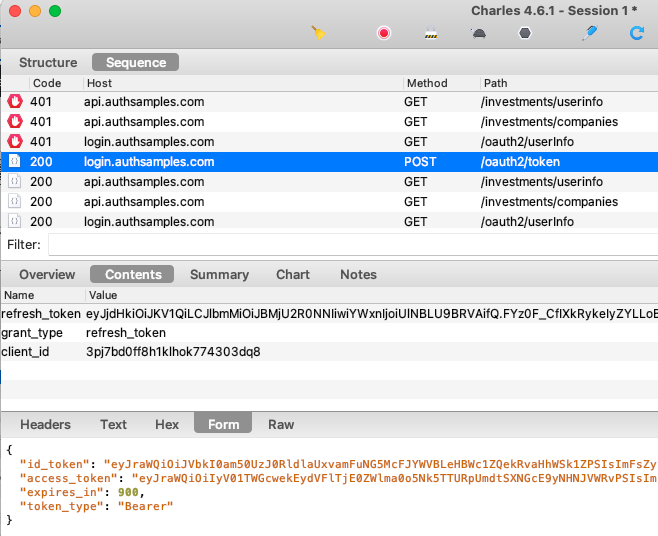
When multiple fragments call APIs and receive 401 responses, the token renewal call should be synchronised so that it only occurs once. If we view HTTP traffic we can see the correct behaviour:

  • Initially two fragments call the API and receive a 401 response
  • A single token renewal message is sent to the authorization server
  • Both fragments successfully call the API again with the new token
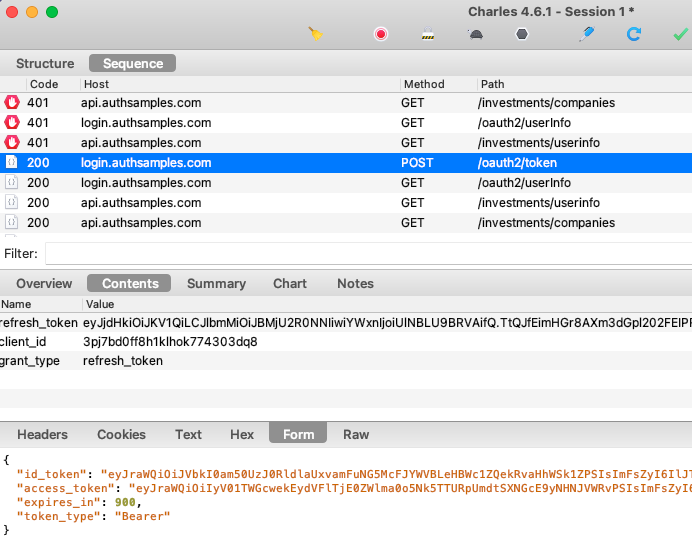
To ensure this, our code uses a ConcurrentActionHandler class, so that only a single UI fragment does a token refresh at a time:

func synchronizedRefreshAccessToken() async throws -> String {

    let refreshToken = self.tokenStorage.getTokens()?.refreshToken

    if refreshToken != nil {
        try await self.concurrencyHandler.execute(action: self.performRefreshTokenGrant)
    }

    let accessToken = self.tokenStorage.getTokens()?.accessToken
    if accessToken != nil {

        return accessToken!

    } else {

        throw ErrorFactory.fromLoginRequired()
    }
}

As well as being more efficient, this ensures that our code is ready to use refresh token rotation reliably, as opposed to receiving multiple refresh tokens and possibly saving one that has been invalidated.

Logout

We use AppAuth iOS support for End Session processing, and our logout code involves these two actions:

  • Removing the Refresh Token from iOS Secure Storage
  • Removing the Authorization Server’s Session Cookie

The second step requires creating an End Session Request. We then redirect on an ASWebAuthenticationSession window, since the session cookie can only be removed via the system browser:

func startLogoutRedirect(viewController: UIViewController) throws {

    let tokenData = self.tokenStorage.getTokens()
    if tokenData == nil || tokenData!.idToken == nil {
        return
    }

    do {

        let idToken = tokenData!.idToken!
        self.tokenStorage.removeTokens()

        let postLogoutUrl = self.getPostLogoutRedirectUri()
        guard let postLogoutRedirectUri = URL(string: postLogoutUrl) else {
            let message = "Error creating URL for : \(postLogoutUrl)"
            throw ErrorFactory.fromMessage(message: message)
        }

        let logoutManager = self.createLogoutManager()

        let metadataWithEndSessionEndpoint = try logoutManager.updateMetadata(
            metadata: self.metadata!)

        let request = logoutManager.createEndSessionRequest(
            metadata: metadataWithEndSessionEndpoint,
            idToken: idToken,
            postLogoutRedirectUri: postLogoutRedirectUri)

        let agent = OIDExternalUserAgentIOS(presenting: viewController)
        self.currentOAuthSession = OIDAuthorizationService.present(
            request,
            externalUserAgent: agent!,
            callback: self.logoutResponseHandler.callback)

    } catch {

        self.currentOAuthSession = nil
        throw ErrorFactory.fromLogoutRequestError(error: error)
    }
}

Logout request messages include a Post Logout Return Location that points to our Web Hosted Post Logout Page:
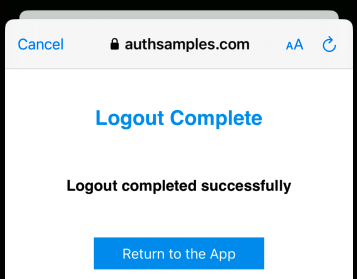
When continue is clicked, the web page again invokes the app’s Claimed HTTPS Scheme, which completes the operation in the same manner as for login redirects.

AppAuth Library – Error Codes

The Error Domain and Code from the AppAuth Errors Enumeration can be useful if you need to better understand any AppAuth error codes reported by the app:

/*! @brief The error codes for the @c ::OIDOAuthTokenErrorDomain error domain
    @see https://tools.ietf.org/html/rfc6749#section-5.2
 */
typedef NS_ENUM(NSInteger, OIDErrorCodeOAuthToken) {
  /*! @remarks invalid_request
      @see https://tools.ietf.org/html/rfc6749#section-5.2
   */
  OIDErrorCodeOAuthTokenInvalidRequest = OIDErrorCodeOAuthInvalidRequest,

  /*! @remarks invalid_client
      @see https://tools.ietf.org/html/rfc6749#section-5.2
   */
  OIDErrorCodeOAuthTokenInvalidClient = OIDErrorCodeOAuthInvalidClient,

  /*! @remarks invalid_grant
      @see https://tools.ietf.org/html/rfc6749#section-5.2
   */
  OIDErrorCodeOAuthTokenInvalidGrant = OIDErrorCodeOAuthInvalidGrant
};

The app’s error handling is diligent about capturing these runtime details, to help with OAuth problem resolution:
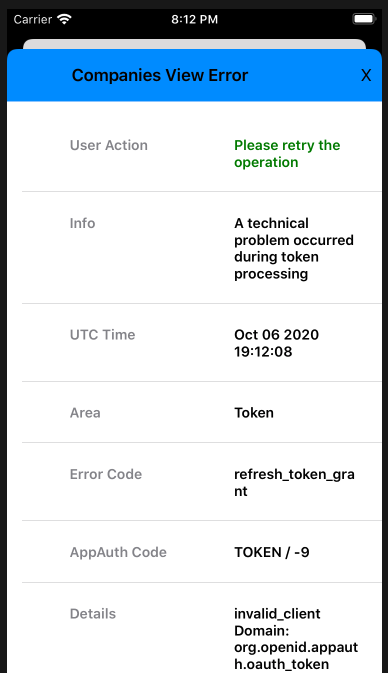
By coding in Swift, our iOS sample requires fewest technical layers to integrate AppAuth libraries, and we have first class access to error details.

Navigation

To manage navigation between views we use a simple ViewRouter class. The MainView class then renders the currently active main view whenever the router’s published properties are updated.

class ViewRouter: ObservableObject {

    @Published var currentViewType: Any.Type = CompaniesView.Type.self
    @Published var params: [Any] = [Any]()

    private let eventBus: EventBus
    var isTopMost: Bool

    init(eventBus: EventBus) {
        self.eventBus = eventBus
        self.isTopMost = true
    }

    func changeMainView(newViewType: Any.Type, newViewParams: [Any]) {

        self.currentViewType = newViewType
        self.params = newViewParams
    }
}

Deep Linking

Our iOS app also uses deep linking, as a second form of navigation. When a deep link notification matches the deep linking subpath, the View Router parses the incoming URL and updates the main view’s location:

func handleDeepLink(url: URL) {

    if self.isTopMost {

        let oldViewType = self.currentViewType
        let result = DeepLinkHelper.handleDeepLink(url: url)
        self.changeMainView(newViewType: result.0, newViewParams: result.1)

        let isSameView = oldViewType == self.currentViewType
        if isSameView {
            self.eventBus.sendReloadMainViewEvent(causeError: false)
        }
    }
}

It is possible to deep link to an unauthorised or invalid API resource, resulting in the API returning a 404 error. Our transactions view model deals with this reliably, by processing API error codes:

private func isForbiddenError() -> Bool {

    if self.error != nil {

        if self.error!.statusCode == 404 && self.error!.errorCode == ErrorCodes.companyNotFound {

            return true

        } else if self.error!.statusCode == 400 && self.error!.errorCode == ErrorCodes.invalidCompanyId {

            return true
        }
    }

    return false
}

Finally, note that deep link messages are ignored when an OAuth redirect is in progress, and the ASWebAuthenticationSession window is top most.

Debugging Swift Code

Since we are using Swift code, we can debug code by setting a breakpoint, and use step through commands from the Debug Menu. This also enables us to view the state of AppAuth classes:
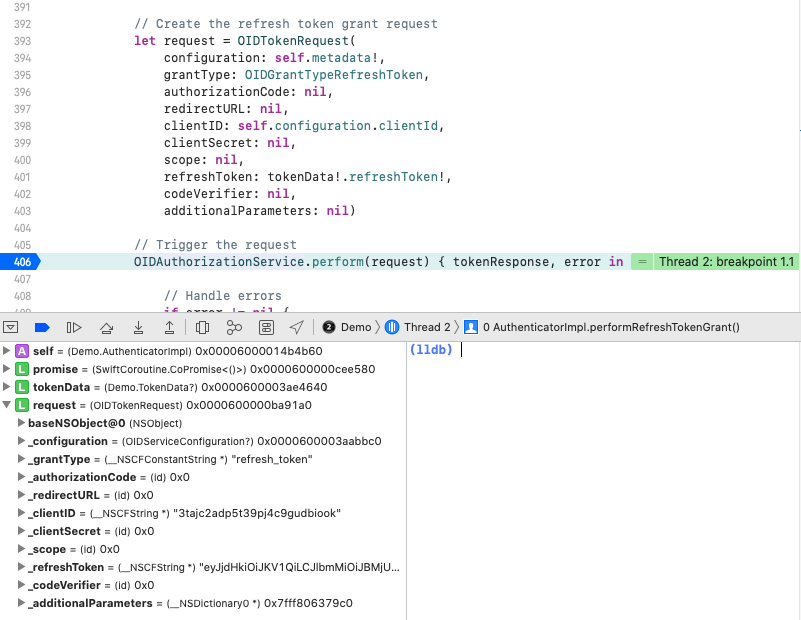
Swift Code Quality Checks

At build time we use the SwiftLint static analyzer tool, to check some of the  finer details of the Swift code, to help keep the coding style maintainable:

AppAuth Libraries

This blog demonstrates mobile integration using the recommendations from RFC8252. Doing so does not mandate use of the AppAuth libraries though. If you run into any library blocking issues, the code flow  could be implemented fairly easily in the AuthenticatorImpl class.

Where Are We?

We have implemented an OpenID Connect secured iOS App with no blocking issues. By using native tech a software company would now be in a strong technical position:

  • The app supports many possible types of user login
  • The app has a modern coding model that is easy to extend
  • The app can use the latest iOS native features
  • The app has good reliability and error handling control

Next Steps
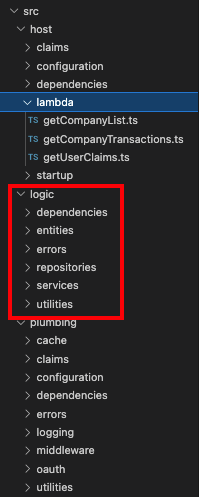
iOS Code Sample – Infrastructure

Background

Previously we described How to Run the iOS Code Sample, and next we will focus further on the infrastructure used by our OAuth solution.

AWS CloudFront Domains

Our iOS sample uses 2 online domains, which we configured previously as part of our Cloud Domain Setup:

Domain Usage
mobile.authsamples.com The domain name for mobile deep linking, which points to a Cloud location that hosts deep linking assets
authsamples.com We use the root domain for ad-hoc hosting of simple web pages, including interstitial Post Login / Logout web pages

Interstitial Web Page Hosting

Our web pages are first uploaded to an AWS S3 bucket:

They are then included in one of this blog’s CloudFront Distributions, so that the pages are served over an HTTPS URL:

Pages are then available at these URLs:

Deep Linking Assets File

To support deep linking needed for Claimed HTTPS Scheme Logins to work, the project includes a security/.well-known/apple-app-site-association document that associates our app’s Unique ID with its Hosting Domain:

{
    "applinks": {
        "apps": [],
        "details": [
            {
                "appID": "U3VTCHYEM7.com.authsamples.basicmobileapp",
                "paths": [ "/basicmobileapp/*" ]
            }
        ]
    }
}

The deep linking domains allowed by the app are configured as Associated Domains, which are a type of iOS Entitlement:

I uploaded the assets file to run at the below HTTPS URL, in a similar manner to the interstitial pages. We use a second S3 bucket and Cloudfront distribution for the root domain:

The mobile.authsamples.com S3 bucket has a .well-known folder containing the assets files for both Android and iOS:

The Apple file needs to be configured to return a content type of application/json, which is done under the S3 file’s properties:

Deep Linking Online Verification

We can verify the configuration via the following test site:

The details for our demo app can be provided to the site as follows:

We will then get the following validated results:

Deep Linking Registration Process

During installation of our app we can run the iOS Console Tool and filter on our domain name, though the information is pretty limited:

Deep Linking Registration Failures

Deep linking registration can fail, and one way to reproduce this is to configure the mobile device to use an HTTP Proxy:

Registration will fail because the iOS system does not trust the HTTP proxy’s man in the middle certificate. The result is that the app installs successfully but the Claimed HTTPS Scheme is not registered.

In the Console Tool you can filter on ‘app-site‘ to see basic failure details, and you may be able to get further details from the  sysdiagnose tool, as described in various online articles.

HTTP Debugging and Claimed HTTPS Schemes

During development, I proceed as follows when I want to view OAuth or API messages for the iOS app. The mobile OS re-registers Universal Links every time the app is redeployed from Xcode:

  • Deploy the app from Xcode without using an HTTP proxy
  • Deep linking registration will then succeed
  • Next start the HTTP proxy on the host MacBook
  • Messages from the app will then be captured successfully

iOS Code Signing

When Xcode is used to build and install our app on a real device, the app must be signed with an Apple Certificate linked to the Team ID. Therefore readers of this blog can only run the app on an emulator:

For a real app you would go through a complete Apple deployment process to the app store, after which deep linking registration would work on any iOS device.

Where Are We?

We have explained some infrastructure plumbing needed for our iOS code sample. Using claimed HTTPS schemes for mobile logins required some interaction between the mobile device and cloud endpoints.

Next Steps

How to Run the iOS Code Sample

Background

Previously we provided an Overview of our iOS App’s Behaviour and next we will describe how to run and test the code sample. For details on getting started with AppAuth libraries, and tracing OAuth requests, see these earlier pages:

Prerequisite 1: Install Xcode

Use an up to date version of Xcode on your macOS system, so that you have access to the latest Swift and Swift UI features.

Prerequisite 2: Install SwiftLint

This is used to make code quality checks and runs as a build step, so it is needed to compile our code sample. Download and run the PKG file for the latest version from the SwiftLint Releases Page.

Step 1: Download the Code

The project is available here, and can be downloaded / cloned to your local PC with the following command:

  • git clone https://github.com/gary-archer/oauth.mobilesample.ios

Step 2: Open the Project in Xcode

In Xcode the project layout looks as follows, and our Swift code is under the Source folder. I used techniques from this link to control the folder layout.

You should be able to run the app on an emulator without any special Signing & Capabilities requirements, as shown here:

Step 3: Understand Dependencies

We are using the following external dependencies:

Library Usage
AppAuth Does the OAuth based authentication work for the app
Swift Keychain Wrapper Simplifies secure storage of OAuth tokens on devices

These references were added via the Swift Package Manager and are built as libraries:

I then linked with the built libraries from the following page:

Step 4: Run the App on a Simulator

You can now run our demo app via the Run icon in the Xcode toolbar. You may then get an initial prompt to Secure your Device, after which you will be able to login with the following test credential:

  • User: guestuser@mycompany.com
  • Password: GuestPassword1

Next save the password when prompted, then navigate between fragments by clicking an item in the Companies view or using the Home button:

Step 5: Understand Configuration Settings

When our app runs it uses the API and OAuth settings from an embedded JSON configuration file:

{
  "app": {
    "apiBaseUrl":             "https://api.authsamples.com/investments"
  },
  "oauth": {
    "authority":              "https://cognito-idp.eu-west-2.amazonaws.com/eu-west-2_CuhLeqiE9",
    "userInfoEndpoint":       "https://login.authsamples.com/oauth2/userInfo",
    "clientId":               "2vshs4gidsbpnjmsprhh607ege",
    "webBaseUrl":             "https://authsamples.com",
    "loginRedirectPath":      "/apps/basicmobileapp/postlogin.html",
    "postLogoutRedirectPath": "/apps/basicmobileapp/postlogout.html",
    "deepLinkBaseUrl":        "https://mobile.authsamples.com",
    "loginActivatePath":      "/basicmobileapp/oauth/callback",
    "postLogoutActivatePath": "/basicmobileapp/oauth/logoutcallback",
    "scope":                  "openid profile email https://api.authsamples.com/investments",
    "customLogoutEndpoint":   "https://login.authsamples.com/logout"
  }
}

Step 6: Configure HTTPS Debugging

We will look at some OAuth messages in the following sections. To view these messages yourself you will need a working HTTPS Debugging Setup, or you can just view the below screenshots if you prefer.

Step 7: Understand Login Redirects

By using AppAuth libraries the standard Authorization Code Flow (PKCE) message is sent.

Our AWS Cognito Authorization Server accepts the request and issues an authorization code because the Client ID, Redirect URI and Scopes of the request match those configured in a Cognito OAuth Client:

Step 8: Understand Redirect Response Handling

The result of successful authorization is the following message, and note that this is sent to a web domain rather than directly to our iOS app:

Two interstitial web pages are used with our iOS sample, hosted at the following URLs:

If we do a View Source for one of the above URLs from a desktop browser, we can see that they just forward query parameters from the login response using a deep linking URL:

For this to work we need to register the https://mobile.authsamples.com base URL as an Associated Domain in the basicmobileapp.entitlements file:

Note that if the interstitial page is left for a couple of minutes before the user clicks Return to the App, the authorization code could time out, leading to a user error. The user can always retry and recover though.

Step 9: Understand Login Completion

Once the authorization code is received by the app, a background Authorization Code Grant message is sent to Cognito’s token endpoint, which return OAuth tokens in the response:

The token data is then saved to the iOS keychain, which ensures that the data is kept private to this particular mobile app.

Step 10: Test Reactivating the App During Login

It is worth performing certain tests while the ASWebAuthenticationSession window is active, to ensure that the app does not throw exceptions or recreate views unnecessarily:

The first of these is to switch away from the app and then reactivate it from its shortcut. Verify that this does not cause any application problems:

Step 11: Test Changing Orientation During Login

Similarly I would recommend changing the screen orientation half way through login and then completing the sign in.

Step 12: Test Restarting the App after Login

Restarting the app after a login will just load OAuth tokens from secure storage, and a new login will not be required. We will look at the coding details behind secure iOS Token Storage shortly.

Step 13: Test Deep Linking

While the app is running we can test deep linking on a simulator via a command such as the following. If required our app performs a login or token renewal before moving to the deep link destination:

xcrun simctl openurl booted https://mobile.authsamples.com/basicmobileapp/deeplink/company/2

Step 14: Test Access Token Expiry

We can use the Expire Access Token and Reload Data buttons to cause an invalid token to be sent to the API, resulting in a 401 response:

After every API call the UI checks for 401 responses, and handles them by getting a new access token. The API request is then retried once with the new token, so that the user session is silently extended. Note that a mobile app is a public client and the refresh token is not protected with a client credential:

Step 15: Test Refresh Token Expiry

We can use Expire Refresh Token followed by Reload Data to simulate the end of a user session, which might occur if a user left the app running overnight:

On the next request for data the attempt to renew the access token will fail, and the result of the refresh token grant message will be an Invalid Grant response:

This will trigger a login redirect, and the user may be prompted to sign in again, but will experience no errors.

Step 16: Test Logout

AppAuth libraries for iOS have built in support for End Session processing. AWS Cognito logouts require a vendor specific format though. Cognito requires the client_id and logout_url parameters, and the others are added by AppAuth libraries. The session cookie is successfully removed though, and we have a working logout solution.

When logout completes we are returned to the below post logout view within our app. In a real world app you could then test logging in as another user with different settings or permissions.

Step 17: Test Failure Scenarios

Our mobile app runs multiple fragments which could fail concurrently, so we implement the same Error HyperLink Behaviour as for our earlier recent React SPA. The following examples cause errors that the UI must handle:

Scenario Instructions
UI Error Load data normally, then disable the network and click reload, to cause a connectivity exception
API Error Long press the Reload button, which then sends a custom HTTP header to the API to rehearse an API 500 exception

Our error display looks as follows after concurrent view failures. The user can click a hyperlink to see details, or press the Home button to retry.

The summary view uses an iOS Modal Dialog / Sheet to display a view with error details, which would help to enable fast problem resolution:

Where Are We?

We have shown how to run this blog’s iOS code sample,  and test its technical behaviour. Next we will drill into the infrastructure needed to enable the use of OAuth claimed HTTPS schemes.

Next Steps

iOS Code Sample – Overview

Background

Previously we covered Android Coding Key Points for our initial mobile app. Next we will provide the same OAuth secured app for iOS, using Xcode and SwiftUI, with AppAuth libraries and a modern coding style.

Features

The following table summarises the main features of the code sample, some of which are tricky to implement:

Feature Description
AppAuth Integration We will implement the essential OpenID Connect behaviour by integrating the standard libraries
Claimed HTTPS Schemes The login result is returned to the app over HTTPS URLs, which is the most secure option according to security guidance
Secure Token Storage Tokens are stored securely on the device after login, so that users don’t need to authenticate on every app restart
Deep Linking The app also supports HTTPS Universal Links, so that users can bookmark locations within the app

Components

The sample connects to components hosted in AWS, so that readers only need to run the Swift app from Xcode to get a complete solution. By default our mobile app uses AWS Cognito as an authorization server.

Code Download

The code for the mobile app can be downloaded from here, and we will cover full details of how to run it in the next post:

Simple Mobile User Interface

The Mobile UI will provide the same Completed Code Sample Behaviour as for earlier Web UIs, with a simple list view as the home page:

There will also be a details view, which exists primarily  to demonstrate navigation and deep linking:

Single Page iOS Application

Our mobile UI will have identical functionality to the final React SPA, where the main section of the view is swapped out as the user navigates. This is technically simpler and more efficient than replacing entire screens, and makes the app feel faster for end users.

Modern UI Technology

Our iOS App will be coded entirely in Swift and SwiftUI, for the simplest syntax in areas such as navigation, data binding and async handling.

Security Recommendations

There are risks with mobile apps that a malicious third party could install an app that uses our app’s Client ID and Redirect URI, so we will follow high security recommendations, to use Claimed HTTP Schemes:

This prevents a fake app from receiving a login result, since the attacker would not be able to make deep links work for their app.

Logins via the System Browser

AppAuth user logins will be via an ASWebAuthenticationSession window, which first presents the below system window to inform the user which app and login domain are being signed into:

The user is then presented with the main login window, which is external to the app and acts as a Secure Sandbox, so that the app itself never has access to the user’s password:

Use of the system browser provides some useful login usability options:

  • Single sign on can work across multiple web / mobile apps
  • Passwords can be remembered and re-used for multiple apps

Logins via iOS Web Views are Problematic

The following problems exist if you perform login redirects on a normal mobile web view. This is because the result is a Browser Session Private to the App:

Problem Area Description
Password Autofill This feature will generally work less reliably in a web view, resulting in a poor login experience
Single Sign On Cookies will not be shared with other apps and are likely to be dropped more aggressively within your own app
Could be Blocked Google is an example of an identity provider that blocks logins on a mobile web view

Our Sample’s Login Usability Features

Using an ASWebAuthenticationSession window will provide the best chance of password autofill working, so that the user does not need to continually remember their password:

After login we will store the OAuth Refresh Token on the device, using secure operating system storage private to the app. This ensures that, on subsequent application restarts, the first thing the user sees is the app:

Secured Device Prerequisite

We need to ensure that the above usability features cannot be abused if the mobile device is stolen, so we require the device to have a Secured Lock Screen, and the user will see the below screen if this is not the case:

The user must then set a passcode or fingerprint in order to resume using the app. These security features are not available on iOS simulators.

Password Autofill Details

To use Password Autofill it must first be enabled in system settings on the iOS device. You may also need to be signed into iCloud for this to work:

On the initial login the user will need to type in their credentials. By default the ASWebAuthenticationSession window will immediately disappear after login and the user will be unable to use the system’s Save Password feature.

We will resolve this problem by presenting a Post Login Page after authentication but before the browser window is closed. Some authorization servers have built-in support for rendering this type of basic ‘user acknowledgement‘ screen.

Reliable Login Cancellation

Logins can be cancelled by closing the system browser instead of successfully completing a login. We will handle this reliably and allow the user to retry:

Reliable Session Management

The demo app also has buttons to enable Simulation of Expiry Events, in order to verify that these do not cause any end user problems:

Navigation with Expired Tokens

The session buttons help to ensure that navigation is reliable within the app as we swap out the main view. This may include logging the user in or renewing an access token before presenting the view.

Logout

We will use the End Session Support in AppAuth iOS to implement logout. One annoyance is that the ASWebAuthenticationSession indicates ‘Sign In‘ during the logout redirect, rather then ‘Sign Out‘:

The usual way to resolve it is to avoid the logout redirect and instead simply drop tokens. Then use the ‘prompt=login‘ OpenID Connect request parameter on the next login, as described in the Logout Page. Unfortunately though, AWS Cognito does not yet support the prompt parameter.

Deep Linking

The app also supports navigation via deep linking, where a user can receive HTTPS Universal Links in an email, to activate the mobile app at specific locations:

Reliable Input Checking

A deep link could point to an unauthorized or invalid resource, as demonstrated by the last two examples below:

// A deep link to the home page
https://mobile.authsamples.com/basicmobileapp/deeplink

// A deep link to the transactions for company 2
https://mobile.authsamples.com/basicmobileapp/deeplink/company/2

// A deep link to an unauthorized resource
https://mobile.authsamples.com/basicmobileapp/deeplink/company/3

// A deep link to an invalid resource
https://mobile.authsamples.com/basicmobileapp/deeplink/company/abc

In both cases our API will deny access gracefully by returning known error codes to the mobile app, which will then navigate back to the home page, so that the end user is not impacted.

Problems Receiving Redirect Responses

A common issue when first using AppAuth libraries is that the system browser may not return the deep link containing the authorization response to the app, and fall back to processing it as a web request in the browser, typically with a 404 not found error.

This is due to a browser security requirement that there must be a user gesture before a deep link can be processed. Invoking a deep link immediately after a redirect can be unreliable.

Therefore, when websites run on mobile devices, they often present the user with options like these when invoking the app. So when receiving the login response you may also need to present a continue button:

  • Open the app
  • Continue with web

Types of OAuth Redirect

There are three scenarios where we will redirect the user on the ASWebAuthenticationSession window. Note that the second scenario can be reproduced in our code sample by clicking Expire Refresh Token, then clicking Reload.

Redirect Type Description
Login The user is interactively prompted to login
Single Sign On The user already has a valid session cookie and signs in automatically without a login screen
Logout The user’s session cookie is removed, with no prompt

In each case, there needs to be a screen before invoking the deep link. You may find using the OpenID Connect prompt=login parameter on every login redirect is reliable. In this blog I instead use a custom interstitial page, partly because AWS Cognito does not support the prompt parameter.

This Blog’s Interstitial Web Pages

This blog uses the following custom AWS Hosted Web Pages that are returned to after  Login / Logout redirects. In a real world scenario these could be customised further.

Test Cases

ASWebAuthenticationSession based logins have usability benefits, but they also add complexity. Our code sample needs to ensure that, when the login window is top most, the following actions do not cause exceptions:

Test Case Description
Change Orientation The user switches between portrait and landscape
Reactivate App The user switches to another app and then re-runs our app from the home screen via the app’s shortcut
Deep Link The user selects a deep link message from an email

Where Are We?

We have described the desired functionality, and have described how to overcome some tricky areas. Since the app implements OpenID Connect in a standard way, it could be updated to support many other forms of user authentication, with zero code changes.

Next Steps

Android Code Sample – Coding Key Points

Background

Previously we described our Android Infrastructure Setup and we will now look at some key areas of our sample’s code. See also the Client Side API Journey to understand the background and the requirements being met.

Goal: Portable Coding Model

One of this blog’s coding goals is to use the same UI classes across multiple platforms. Our Android App uses the same logical separation of responsibilities into classes as the earlier React SPA:

Goal: Unobtrusive OAuth Integration

The fragment classes show below call our OAuth Secured API, and need to deal with triggering login redirects and renewing tokens. This can also involve concurrency, which we will explore shortly.

Companies will want to complete this tricky plumbing code once, then focus on business value, by growing the UI and API code.

Project Creation

The project was initially created via the below Empty Activity template, after which I began developing layout files and Kotlin classes:

I then added these options to the application’s build.gradle.kts file, which enables views to be created using the newer Jetpack Compose syntax, which lead to simpler code than older XML layout views:

buildFeatures {
    compose = true
}
composeOptions {
    kotlinCompilerExtensionVersion = "1.5.3"
}

Main Activity Entry Point

Our single activity is specified in the manifest file as the default / launcher activity, and fulfils a similar role to our SPA’s application shell:

<activity
        android:name=".app.MainActivity"
        android:exported="true"
        android:launchMode="singleTop"
        android:configChanges="orientation|screenSize">

    <intent-filter>
        <action android:name="android.intent.action.MAIN"/>
        <category android:name="android.intent.category.LAUNCHER"/>
    </intent-filter>
</activity>

Our code begins in the onCreate override, which initialises the main view model and creates views:

override fun onCreate(savedInstanceState: Bundle?) {

    super.onCreate(savedInstanceState)
    (this.application as Application).setMainActivity(this)
    actionBar?.hide()

    val model: MainActivityViewModel by viewModels()
    this.model = model

    this.createViews()
    this.model.initialize(this::onLoaded)
}

private fun onLoaded() {
    this.binding.model!!.eventBus.register(this)
    this.navigateStart()
}

Views can be recreated at any time, whereas the main view model is only created once. When it is constructed it reads settings from the JSON configuration file embedded in the app, then creates global objects used for OAuth and API operations:

init {

    this.configuration = ConfigurationLoader().load(this.app.applicationContext)

    this.fetchCache = FetchCache()
    this.eventBus = EventBus.getDefault()

    this.authenticator = AuthenticatorImpl(this.configuration.oauth, this.app.applicationContext)
    this.fetchClient = FetchClient(this.configuration, this.fetchCache, this.authenticator)
    this.viewModelCoordinator = ViewModelCoordinator(this.eventBus, this.fetchCache, this.authenticator)

    this.isLoaded = false
    this.isTopMost = true
    this.isDeviceSecured = DeviceSecurity.isDeviceSecured(this.app.applicationContext)
}

View Layout and Composition

The main activity’s layout creates a number of child views, including a navigation host, whose content is swapped out as the user navigates, in a similar way to the main view of an SPA:

private fun createViews() {

    val that = this@MainActivity
    setContent {
        ApplicationTheme {
            Column {

                TitleView(that.model.getUserInfoViewModel())

                HeaderButtonsView(
                    that.model.eventBus,
                    that::onHome,
                    that::onReloadData,
                    that::onExpireAccessToken,
                    that::onExpireRefreshToken,
                    that::onStartLogout
                )

                if (model.error.value != null) {

                    ErrorSummaryView(
                        ErrorViewModel(
                            model.error.value!!,
                            stringResource(R.string.main_error_hyperlink),
                            stringResource(R.string.main_error_dialogtitle)
                        ),
                        Modifier
                            .fillMaxWidth()
                            .wrapContentSize()
                    )
                }

                SessionView(that.model.eventBus, that.model.fetchClient.sessionId)

                val navHostController = rememberNavController()
                that.navigationHelper =
                    NavigationHelper(navHostController) { model.isDeviceSecured }
                that.navigationHelper.deepLinkBaseUrl =
                    that.model.configuration.oauth.deepLinkBaseUrl

                NavHost(navHostController, MainView.Blank) {

                    composable(MainView.Blank) {
                    }

                    composable(MainView.DeviceNotSecured) {
                        DeviceNotSecuredView(that.model.eventBus, that::openLockScreenSettings)
                    }

                    composable(MainView.Companies) {
                        CompaniesView(that.model.getCompaniesViewModel(), navigationHelper)
                    }

                    composable(
                        "${MainView.Transactions}/{id}",
                        listOf(navArgument("id") { type = NavType.StringType })
                    ) {

                        val id = it.arguments?.getString("id") ?: ""
                        TransactionsView(
                            id,
                            that.model.getTransactionsViewModel(),
                            navigationHelper
                        )
                    }

                    composable(MainView.LoginRequired) {
                        LoginRequiredView(that.model.eventBus)
                    }
                }
            }
        }
    }
}

Data Binding and View Models

Data binding is used, which aims for the simplest and most readable binding code. Each non-trivial view has a view model that manages state, including that returned from APIs. When the value of mutable state changes, the view is automatically updated.

class CompaniesViewModel(
    private val fetchClient: FetchClient,
    val eventBus: EventBus,
    private val viewModelCoordinator: ViewModelCoordinator
) : ViewModel() {

    var companiesList: MutableState<List<Company>> = mutableStateOf(ArrayList())
    var error: MutableState<UIError?> = mutableStateOf(null)

    ...
}

View Models and API Calls

The most interesting view models are those that get data from our OAuth Secured API. As is standard in UIs, this involves switching to an I/O worker thread, then switching back to the UI thread once complete:

fun callApi(options: ViewLoadOptions?, onComplete: () -> Unit) {

    val fetchOptions = FetchOptions(
        FetchCacheKeys.COMPANIES,
        options?.forceReload ?: false,
        options?.causeError ?: false
    )

    this.viewModelCoordinator.onMainViewModelLoading()
    this.updateError(null)

    val that = this@CompaniesViewModel
    CoroutineScope(Dispatchers.IO).launch {

        try {

            val companies = fetchClient.getCompanyList(fetchOptions)

            withContext(Dispatchers.Main) {

                if (companies != null) {
                    that.updateData(companies.toList())
                    that.viewModelCoordinator.onMainViewModelLoaded(fetchOptions.cacheKey)
                }
            }

        } catch (uiError: UIError) {

            withContext(Dispatchers.Main) {
                that.updateData(ArrayList())
                that.updateError(uiError)
                that.viewModelCoordinator.onMainViewModelLoaded(fetchOptions.cacheKey)
            }

        } finally {

            withContext(Dispatchers.Main) {
                onComplete()
            }
        }
    }
}

Use of Kotlin Coroutines  results in a readable async await coding model where we write simple suspending functions to do the work. The code also caches API responses to prevent redundant calls when views are recreated, such as during back navigation.

API Call Details

The FetchClient class acts as a service agent and uses the okhttp library. Each API call uses a shared method to deal with supplying OAuth access tokens and managing retries.

We implement the same OAuth client side behaviour that we have used in all of other UI code samples, by getting a new token and retrying the request once if the API returns a 401 status code. The basic API code, with caching omitted, looks like this:

private suspend fun <T> getDataFromApi(url: String, responseType: Class<T>, options: FetchOptions): T? {

    var accessToken = this.authenticator.getAccessToken()
    if (accessToken.isNullOrBlank()) {
        throw ErrorFactory().fromLoginRequired()
    }

    try {

        return this.callApiWithToken("GET", url, null, accessToken, responseType, options)

    } catch (e: Throwable) {

        val error = ErrorFactory().fromException(e)
        if (error.statusCode != 401) {
            throw error
        }

        accessToken = this.authenticator.synchronizedRefreshAccessToken()
        return this.callApiWithToken("GET", url, null, accessToken, responseType, options)
    }
}

Authenticator Interface

The ApiClient uses an Authenticator reference and calls getAccessToken in order to retrieve a message credential for API calls:

interface Authenticator {

    suspend fun initialize()

    suspend fun getAccessToken(): String?

    suspend fun synchronizedRefreshAccessToken(): String

    fun startLogin(launchAction: (i: Intent) -> Unit)

    suspend fun finishLogin(intent: Intent)

    fun startLogout(launchAction: (i: Intent) -> Unit)

    fun finishLogout()

    fun clearLoginState()

    fun expireAccessToken()

    fun expireRefreshToken()
}

Triggering Login Redirects

Our App has 2 fragments that load concurrently, both of which call the API, to get the main view’s data and also to get user info:

A ViewModelCoordinator class is used to wait for all views to load. In the event of any view receiving a permanent 401 response from the API, a single OAuth redirect is triggered by the main activity:

private fun handleErrorsAfterLoad() {

    if (this.loadedCount == this.loadingCount) {

        val errors = this.getLoadErrors()

        val loginRequired = errors.find { e -> e.errorCode == ErrorCodes.loginRequired }
        if (loginRequired != null) {
            this.eventBus.post(LoginRequiredEvent())
            return
        }

        val oauthConfigurationError = errors.find { e ->
            (e.statusCode == 401 && e.errorCode == ErrorCodes.invalidToken) ||
            (e.statusCode == 403 && e.errorCode == ErrorCodes.insufficientScope)
        }

        if (oauthConfigurationError != null) {
            this.authenticator.clearLoginState()
        }
    }
}

The ViewModelCoordinator class also deals with invalid token errors, such as incorrect scope, claims or audience configurations. For these errors, the app clears its login state to enable retries where the OAuth configuration has been fixed. The app then receives new tokens and the user can recover.

AppAuth Library – Login Requests

The authenticator implementation uses AppAuth Android classes to implement standards based OpenID Connect behaviour:

override fun startLogin(launchAction: (i: Intent) -> Unit) {

    try {

        val authService = AuthorizationService(this.applicationContext, this.getBrowserConfiguration())
        this.loginAuthService = authService

        val builder = AuthorizationRequest.Builder(
            this.metadata!!,
            this.configuration.clientId,
            ResponseTypeValues.CODE,
            Uri.parse(this.getLoginRedirectUri())
        )
            .setScope(this.configuration.scope)
        val request = builder.build()

        val authIntent = authService.getAuthorizationRequestIntent(request)
        launchAction(authIntent)

    } catch (ex: Throwable) {
        throw ErrorFactory().fromLoginOperationError(ex, ErrorCodes.loginRequestFailed)
    }
}

At runtime the properties of AppAuth objects are set based on our OAuth configuration settings:

{
  "app": {
    "apiBaseUrl":             "https://api.authsamples.com/investments"
  },
  "oauth": {
    "authority":              "https://cognito-idp.eu-west-2.amazonaws.com/eu-west-2_CuhLeqiE9",
    "userInfoEndpoint":       "https://login.authsamples.com/oauth2/userInfo",
    "clientId":               "2vshs4gidsbpnjmsprhh607ege",
    "webBaseUrl":             "https://authsamples.com",
    "loginRedirectPath":      "/apps/basicmobileapp/postlogin.html",
    "postLogoutRedirectPath": "/apps/basicmobileapp/postlogout.html",
    "scope":                  "openid profile email https://api.authsamples.com/investments",
    "deepLinkBaseUrl":        "https://mobile.authsamples.com",
    "customLogoutEndpoint":   "https://login.authsamples.com/logout"
  }
}

AppAuth libraries produce outgoing Authorization Code Flow (PKCE) request messages and then handle incoming response messages:

The libraries also select the type of login window, and the default option is to use a Chrome Custom Tab:

AppAuth Library – Login Responses

Our manifest file tells AppAuth’s login activity to use a Claimed HTTPS Scheme to receive login responses at the path provided:

<activity
    android:name="net.openid.appauth.RedirectUriReceiverActivity"
    android:exported="true">

    <intent-filter android:autoVerify="true">
        <action android:name="android.intent.action.VIEW" />
        <category android:name="android.intent.category.DEFAULT"/>
        <category android:name="android.intent.category.BROWSABLE"/>
        <data
            android:scheme="https"
            android:host="mobile.authsamples.com"
            android:path="/basicmobileapp/oauth/callback" />
    </intent-filter>
</activity>

Upon return from login we present the below Web Hosted Post Login Page in the Chrome Custom Tab window. This screen receives the authorization code in a response query parameter.

Javascript code in the web page invokes the login receiver activity when the continue button is pressed. This forwards any received query parameters, including the authorization code, to the app:

<script>
    window.addEventListener('DOMContentLoaded', function() {
        var redirectUri = 'https://mobile.authsamples.com/basicmobileapp/oauth/callback';

        if (window.location.search) {
            redirectUri += window.location.search;
        }
        if (window.location.hash) {
            redirectUri += window.location.hash;
        }

        document.getElementById('continueButton').onclick = () => {
            window.location.href = redirectUri;
        };
    });
</script>

AppAuth Library – Cancelled Logins

It is possible for users to cancel logins if they are having trouble logging in, via the top left button:

AppAuth libraries are well designed and provide error codes that we can use to determine cancellation and other conditions:

override suspend fun finishLogin(intent: Intent) {

    val authorizationResponse = AuthorizationResponse.fromIntent(intent)
    val ex = AuthorizationException.fromIntent(intent)

    this.loginAuthService?.dispose()
    this.loginAuthService = null

    when {
        ex != null -> {

            if (ex.type == AuthorizationException.TYPE_GENERAL_ERROR &&
                ex.code == AuthorizationException.GeneralErrors.USER_CANCELED_AUTH_FLOW.code
            ) {

                throw ErrorFactory().fromRedirectCancelled()
            }

            throw ErrorFactory().fromLoginOperationError(ex, ErrorCodes.loginResponseFailed)
        }
        authorizationResponse != null -> {

            this.exchangeAuthorizationCode(authorizationResponse)
        }
    }
}

For cancelled logins we return the user to the Login Required view so that they can retry the operation:

AppAuth Library – Authorization Code Grant

After successfully receiving the login response, the Authorization Code Flow continues by swapping the received code for tokens:

private suspend fun exchangeAuthorizationCode(authResponse: AuthorizationResponse) {

    return suspendCoroutine { continuation ->

        val callback =
            AuthorizationService.TokenResponseCallback { tokenResponse, ex ->

                when {
                    ex != null -> {
                        val error = ErrorFactory().fromTokenError(ex, ErrorCodes.authorizationCodeGrantFailed)
                        continuation.resumeWithException(error)
                    }

                    tokenResponse == null -> {
                        val empty = RuntimeException("Authorization code grant returned an empty response")
                        continuation.resumeWithException(empty)
                    }

                    else -> {
                        this.saveTokens(tokenResponse)
                        continuation.resume(Unit)
                    }
                }
            }

        val tokenRequest = authResponse.createTokenExchangeRequest()

        val authService = AuthorizationService(this.applicationContext)
        authService.performTokenRequest(tokenRequest, NoClientAuthentication.INSTANCE, callback)
    }
}

The message sent includes a verifier used for PKCE handling, and AppAuth libraries take care of supplying this correctly.

Secure Token Storage

After login, the app stores OAuth tokens using a TokenStorage  class, which saves them to shared preferences. The Android system ensures that no other app can access the demo app’s tokens, so it is not necessary to encrypt the stored values.

Application Restarts without Login

When the app starts, it loads OpenID Connect metadata and also any tokens that have been saved to Android storage. This prevents the user needing to re-authenticate on every application restart:

override suspend fun initialize() {
    this.getMetadata()
    this.tokenStorage.loadTokens()
}

AppAuth Library – Refreshing Access Tokens

AppAuth classes are also used to send a Refresh Token Grant message, via the TokenRequest class. The AppAuth error codes allow us to reliably detect the ‘Invalid Grant‘ response when the refresh token finally expires:

private suspend fun performRefreshTokenGrant() {

    val refreshToken = this.tokenStorage.loadTokens()?.refreshToken
    if (refreshToken.isNullOrBlank()) {
        return
    }

    this.getMetadata()

    return suspendCoroutine { continuation ->

        val callback =
            AuthorizationService.TokenResponseCallback { tokenResponse, ex ->

                when {
                    ex != null -> {

                        if (ex.type == AuthorizationException.TYPE_OAUTH_TOKEN_ERROR &&
                            ex.code == AuthorizationException.TokenRequestErrors.INVALID_GRANT.code
                        ) {
                            this.tokenStorage.removeTokens()
                            continuation.resume(Unit)
                            this.concurrencyHandler.resume()

                        } else {

                            val error = ErrorFactory().fromTokenError(ex, ErrorCodes.tokenRenewalError)
                            continuation.resumeWithException(error)
                            this.concurrencyHandler.resumeWithException(error)
                        }
                    }

                    tokenResponse == null -> {
                        val error = RuntimeException("Refresh token grant returned an empty response")
                        continuation.resumeWithException(error)
                        this.concurrencyHandler.resumeWithException(error)
                    }

                    else -> {
                        this.saveTokens(tokenResponse)
                        continuation.resume(Unit)
                        this.concurrencyHandler.resume()
                    }
                }
            }

        val tokenRequest = TokenRequest.Builder(
            this.metadata!!,
            this.configuration.clientId
        )
            .setGrantType(GrantTypeValues.REFRESH_TOKEN)
            .setRefreshToken(refreshToken)
            .build()

        val authService = AuthorizationService(this.applicationContext)
        authService.performTokenRequest(tokenRequest, callback)
    }
}

Token Renewal and Concurrency

When multiple fragments call APIs and receive 401 responses, the token renewal call should be synchronised so that it only occurs once. If we view HTTP traffic we can see the correct behaviour:

  • Initially two fragments call the API and receive a 401 response
  • A single token renewal message is sent to the authorization server
  • Both fragments successfully call the API again with the new token

To ensure this, our code uses a ConcurrentActionHandler class, so that only a single UI fragment does a token refresh at a time:

override suspend fun synchronizedRefreshAccessToken(): String {

    val refreshToken = this.tokenStorage.loadTokens()?.refreshToken
    if (!refreshToken.isNullOrBlank()) {

        this.concurrencyHandler.execute(this::performRefreshTokenGrant)

        val accessToken = this.tokenStorage.loadTokens()?.accessToken
        if (!accessToken.isNullOrBlank()) {
            return accessToken
        }
    }

    throw ErrorFactory().fromLoginRequired()
}

As well as being more efficient, this ensures that our code uses refresh token rotation reliably, as opposed to receiving multiple refresh tokens and possibly saving one that has been invalidated.

Logout

The app’s logout logic involves these two actions:

  • Removing the refresh token from Android secure storage
  • Removing the authorization server’s session cookie

The second step requires a redirect on a Chrome Custom Tab, since the authorization server session cookie can only be removed via the system browser. To make this work with AWS Cognito’s custom logout endpoint, the following code was used:

override fun startLogout(launchAction: (i: Intent) -> Unit) {

    val tokens = this.tokenStorage.loadTokens()
    val idToken = tokens?.idToken
    this.tokenStorage.removeTokens()

    try {
        if (idToken == null) {

            val message = "Logout is not possible because tokens have already been removed"
            throw IllegalStateException(message)
        }

        val logoutUrlBuilder = this.createLogoutUrlBuilder()
        val logoutUrl = logoutUrlBuilder.getEndSessionRequestUrl(
            this.metadata!!,
            this.getPostLogoutRedirectUri(),
            idToken
        )

        launchAction(this.getLogoutIntent(logoutUrl))

    } catch (ex: Throwable) {
        throw ErrorFactory().fromLogoutOperationError(ex)
    }
}

Logout request messages include a Post Logout Return Location that points to our Web Hosted Post Logout Page:

When continue is clicked, the web page again invokes the app’s Claimed HTTPS Scheme, which matches the below logout receiver activity, so that control is returned to the app and logout can complete:

<activity
android:name=".plumbing.oauth.logout.LogoutRedirectUriReceiverActivity"
    android:exported="true">

    <intent-filter android:autoVerify="true">
        <action android:name="android.intent.action.VIEW" />
        <category android:name="android.intent.category.DEFAULT"/>
        <category android:name="android.intent.category.BROWSABLE"/>
        <data
            android:scheme="https"
            android:host="mobile.authsamples.com"
            android:path="/basicmobileapp/oauth/logoutcallback" />
    </intent-filter>
</activity>

AppAuth Library – Error Codes

The Error Category and Code from the AppAuth Errors Enumeration can be useful if you need to better understand any AppAuth error codes reported by the app:

/**
 * Error codes related to failed token requests.
 *
 * @see "The OAuth 2.0 Authorization Framework" (RFC 6749), Section 5.2
 * <https://tools.ietf.org/html/rfc6749#section-5.2>"
 */
public static final class TokenRequestErrors {
    // codes in this group should be between 2000-2999

    /**
     * An `invalid_request` OAuth2 error response.
     */
    public static final AuthorizationException INVALID_REQUEST =
    tokenEx(2000, "invalid_request");

    /**
     * An `invalid_client` OAuth2 error response.
     */
    public static final AuthorizationException INVALID_CLIENT =
    tokenEx(2001, "invalid_client");

    /**
     * An `invalid_grant` OAuth2 error response.
     */
    public static final AuthorizationException INVALID_GRANT =
    tokenEx(2002, "invalid_grant");
}

The app’s error handling is diligent about capturing these runtime details, to help with OAuth problem resolution:

By coding in Kotlin, our Android sample requires fewest technical layers to integrate AppAuth libraries, and we have first-class access to error details.

Deep Linking

Our Android app can also use deep linking. An additional forwarding activity is used, to control whether deep links are allowed to execute. The app ignores deep links when a Chrome Custom Tab window is top most:

private fun handleIntent(receivedIntent: Intent) {

    if (!this.app().isMainActivityTopMost()) {
        finish()
        return
    }

    receivedIntent.setClass(this, MainActivity::class.java)
    receivedIntent.addFlags(Intent.FLAG_ACTIVITY_CLEAR_TOP or Intent.FLAG_ACTIVITY_SINGLE_TOP)
    startActivity(receivedIntent)
}

It is possible to deep link to an unauthorized or invalid API resource, resulting in the API returning an error. Our transactions view model deals with this reliably, by processing API error codes:

private fun isForbiddenError(error: UIError): Boolean {

    if (error.statusCode == 404 && error.errorCode.equals(ErrorCodes.companyNotFound)) {

        return true
    } else if (error.statusCode == 400 && error.errorCode.equals(ErrorCodes.invalidCompanyId)) {

        return true
    }

    return false
}

Debugging Kotlin Code

The app can be debugged via the below toolbar icon, to step through code using commands from the Run Menu. This also enables us to view the state of AppAuth classes, when we need to troubleshoot OAuth code:

Code Quality Checks

We use the detekt static analyzer tool, to check some of the finer details of our Kotlin code. A detekt.gradle file was added to the project, after which the following command can be run:

./gradlew detekt

This produces warnings that help to keep the code base maintainable:

AppAuth Libraries

This blog demonstrates mobile integration using the recommendations from RFC8252. Doing so does not mandate use of the AppAuth libraries though. If you run into any library blocking issues, the code flow  could be implemented fairly easily in the AuthenticatorImpl class.

Where Are We?

We have implemented an OpenID Connect secured Android App with no blocking issues. By using native tech a software company would now be in a strong technical position:

  • The app supports many possible types of user login
  • The app has a modern coding model that is easy to extend
  • The app can use the latest Android native features
  • The app has good reliability and error handling control

Next Steps
Android Code Sample – Infrastructure

Background

Previously we described How to Run the Android Code Sample, and next we will focus further on the infrastructure used by our OAuth solution.

AWS CloudFront Domains

Our Android sample uses 2 online domains, which we configured previously as part of our Cloud Domain Setup:

Domain Usage
mobile.authsamples.com The domain name for mobile deep linking, which points to a cloud location that hosts deep linking assets
authsamples.com We use the root domain for ad-hoc hosting of simple web pages, including interstitial Post Login / Logout web pages

Interstitial Web Page Hosting

Our web pages are first uploaded to an AWS S3 bucket:

They are then included in one of this blog’s CloudFront Distributions, so that the pages are served over an HTTPS URL:

Pages are then available at these URLs:

Deep Linking Assets File

In order for claimed HTTPS scheme logins to work you must configure Android app link verification. This includes hosting a deep linking assets file, which is contained in the project at security/assetlinks.json. This associates our app’s signing key and package name with its hosting domain:

[
  {
    "relation": ["delegate_permission/common.handle_all_urls"],
    "target": {
      "namespace": "android_app",
      "package_name": "com.authsamples.basicmobileapp",
      "sha256_cert_fingerprints":
      ["62:7D:06:B1:01:C6:2F:04:9A:D4:5D:17:DF:FF:AB:65:13:8E:E0:CC:F6:60:2A:F6:3A:DA:1D:19:0A:F9:DF:15"]
    }
  }
]

The deep linking domains allowed by the app are configured with an https scheme in the manifest file:

<activity
    android:name=".plumbing.oauth.logout.LogoutRedirectUriReceiverActivity"
    android:exported="true">

    <intent-filter android:autoVerify="true">
        <action android:name="android.intent.action.VIEW" />
        <category android:name="android.intent.category.DEFAULT"/>
        <category android:name="android.intent.category.BROWSABLE"/>
        <data
            android:scheme="https"
            android:host="mobile.authsamples.com"
            android:path="/basicmobileapp/oauth/logoutcallback" />
    </intent-filter>
</activity>

I uploaded the assets file to run at the below HTTPS URL, in a similar manner to the interstitial pages. We use a second S3 bucket and Cloudfront distribution for the root domain:

The mobile.authsamples.com S3 bucket has a .well-known folder containing the assets files for both Android and iOS:

Deep Linking Online Verification

We can verify the assets file via a test site that Google provides, and check that results do not contain any errors:

Deep Linking Registration Process

When our app is installed, deep linking registration is done via system components, as described via this article on Android App Links.

To understand how this works, uninstall the app, then re-run it while viewing the logcat window. Filter on the word Verification and ensure that the No Filters option is selected:

Once we have run the app we can execute the following command to query its deep linking verification status:

adb shell pm get-app-links com.authsamples.basicmobileapp

This should return a domain verification state of ‘verified‘:

com.authsamples.basicmobileapp:
    ID: 241b4727-f96d-40ad-8459-8238c0fb8747
    Signatures: [62:7D:06:B1:01:C6:2F:04:9A:D4:5D:17:DF:FF:AB:65:13:8E:E0:CC:F6:60:2A:F6:3A:DA:1D:19:0A:F9:DF:15]
    Domain verification state:
      mobile.authsamples.com: verified

Deep Linking Registration Failures

Deep linking registration can fail, and one way to reproduce this is to configure the mobile device to connect to the internet via an HTTP Proxy:

The system’s Intent Filter Verifier will not trust the HTTP proxy’s man in the middle certificate, and the result is that the app installs successfully but the Claimed HTTPS Scheme is not correctly configured:

We can then re-run the command to query the status of our app and the result will now use a domain verification state of ‘none‘:

com.authsamples.basicmobileapp:
    ID: 241b4727-f96d-40ad-8459-8238c0fb8747
    Signatures: [62:7D:06:B1:01:C6:2F:04:9A:D4:5D:17:DF:FF:AB:65:13:8E:E0:CC:F6:60:2A:F6:3A:DA:1D:19:0A:F9:DF:15]
    Domain verification state:
      mobile.authsamples.com: none

We can then run a deep link to our app on an emulator, via a command such as this:

adb shell am start -a android.intent.action.VIEW -d https://mobile.authsamples.com/basicmobileapp/deeplink/company/2

This will result in the following undesired behaviour, where the system browser attempts to open the URL, rather than the mobile app:

HTTP Debugging and Claimed HTTPS Schemes

During development, I use an HTTP proxy as follows when I want to view OAuth or API messages for the Android app. The mobile OS only registers App Links when the app is first installed, and not when it is redeployed from Android Studio:

  • First install the app without using an HTTP proxy
  • Deep linking registration will then succeed
  • Start the HTTP Proxy on the host PC
  • Next configure the Android emulator to use the HTTP Proxy
  • Then redeploy the app from Android Studio
  • Messages from the app will then be captured successfully

Android App Code Signing

To finish off our discussion on Deep Linking, let’s look at how I generated the signature from the assets file. Install the Java KeyStore Explorer and open our KeyStore file, which has a password of ‘android‘:

For educational purposes I have included the keystore file with my source code, though of course you should not do this for a real app. I then used the Tools / Generate Key Pair option to create an RSA key with default options and a 10 year validity:

I then chose Add Extensions / Use Standard Template / Code Signing and included the Subject Key Identifier extension:

I then used some naming to fit with this blog, and copied the below SHA256 Fingerprint to the mobile assets file:

Finally, the app’s gradle file references our Android Keystore File, which is used to digitally sign our app when it is built.

signingConfigs {
    release {
        storeFile file("${rootDir}/security/app-keystore.jks")
        storePassword "android"
        keyAlias "com.authsamples.basicmobileapp"
        keyPassword "android"
    }
}

buildTypes {
    debug {
        signingConfig signingConfigs.release
        debuggable true
    }
    release {
        signingConfig signingConfigs.release
        minifyEnabled false
        proguardFiles getDefaultProguardFile('proguard-android-optimize.txt'), 'proguard-rules.pro'
    }
}

When the app is deployed to the device, the Intent Filter Verifier can verify that the key in the Cloud Assets JSON Document matches the key used to digitally sign the mobile app.

Where Are We?

We have explained some infrastructure plumbing needed for our Android code sample. Using claimed HTTPS schemes for mobile logins required some interaction between the mobile device and cloud endpoints.

Next Steps
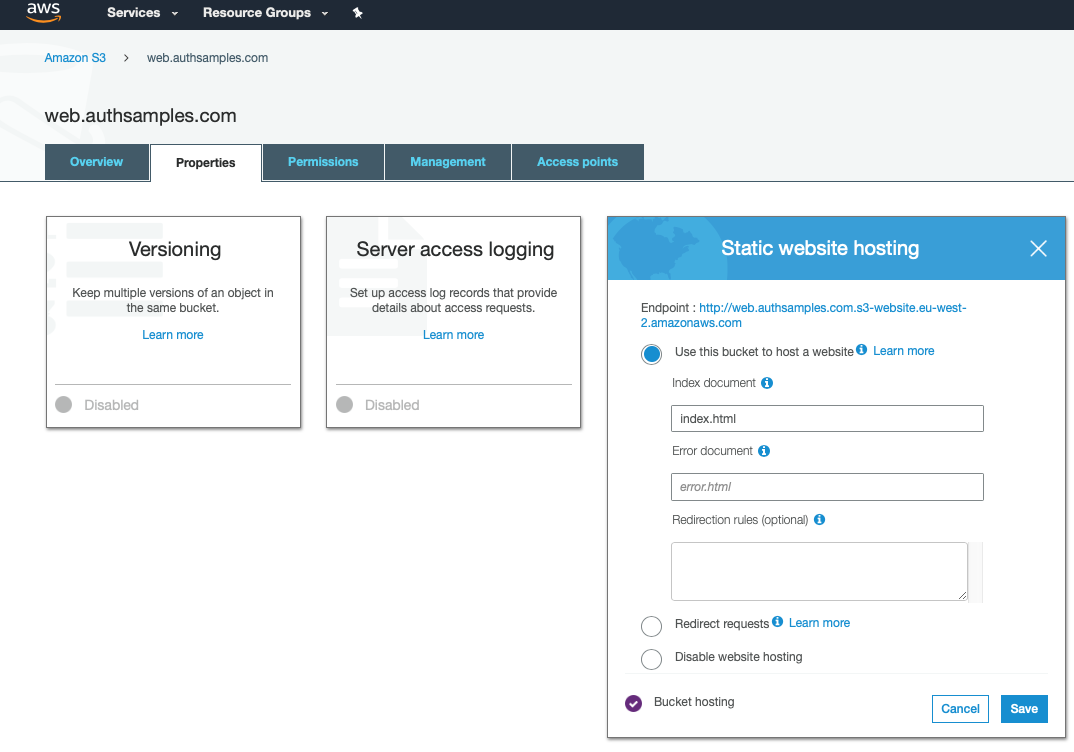
How to Run the Android Code Sample

Background

Previously we provided an Overview of our Android App’s Behaviour and next we will describe how to run and test the code sample. Readers who are new to Android development may also want to browse these earlier pages:

Prerequisite: Install Android Studio

We can run our sample on macOS, Windows or Linux, but first install an up to date version of Android Studio, so that you have access to the latest Kotlin and Jetpack features.

Step 1: Download the Code

The project is available here, and can be downloaded / cloned to your local PC with the following command:

  • git clone https://github.com/gary-archer/oauth.mobilesample.android

Step 2: Open the Project in Android Studio

Shortly we will describe the Coding Model, where we implement OAuth integration in an unobtrusive manner, so that Android views only need to make simple API calls and other classes deal with OAuth plumbing:

When the project is loaded there will be a Gradle Sync to download third party libraries. Ensure that this completes successfully, and also that Java 17 is configured under Preferences / Build,Execution,Deployment / Build Tools / Gradle / Gradle JDK:

Step 3: Run the App on an Emulator

You can now run our demo app via the Run Icon in the Android Studio toolbar. You may then get an initial prompt to Secure Your Device, after which you will be able to login with the following test credential:

  • User: guestuser@mycompany.com
  • Password: GuestPassword1

Next save the password when prompted, then navigate between fragments by clicking an item in the Companies view or using the Home button:

Step 4: View Library Dependencies

View the app’s build.gradle.kts file to understand the our Single Activity App’s third party dependencies, which include the AppAuth Library. The app requires Android 8 (SDK 26) and above, since this simplifies some areas of the Android implementation.

object VERSION {
    const val kotlin_extensions = "1.12.0"
    const val compose = "1.8.0"
    const val compose_bom = "2023.09.02"
    const val compose_ui = "1.5.3"
    const val material3 = "1.1.2"
    const val navigation = "2.7.4"
    const val appauth = "0.11.1"
    const val browser = "1.6.0"
    const val okhttp = "4.11.0"
    const val gson = "2.10.1"
    const val okio = "3.4.0"
    const val eventbus = "3.3.1"
    const val detekt = "1.23.1"
}

dependencies {

    implementation("androidx.core:core-ktx:${VERSION.kotlin_extensions}")

    implementation("androidx.activity:activity-compose:${VERSION.compose}")
    implementation(platform("androidx.compose:compose-bom:${VERSION.compose_bom}"))

    implementation("androidx.navigation:navigation-ui-ktx:${VERSION.navigation}")
    implementation("androidx.navigation:navigation-compose:${VERSION.navigation}")

    implementation("androidx.compose.ui:ui:${VERSION.compose_ui}")
    implementation("androidx.compose.ui:ui-graphics:${VERSION.compose_ui}")
    implementation("androidx.compose.material3:material3:${VERSION.material3}")

    implementation ("net.openid:appauth:${VERSION.appauth}")

    implementation ("androidx.browser:browser:${VERSION.browser}")

    implementation ("com.squareup.okhttp3:okhttp:${VERSION.okhttp}")
    implementation ("com.google.code.gson:gson:${VERSION.gson}")

    implementation ("com.squareup.okio:okio:${VERSION.okio}")

    implementation ("org.greenrobot:eventbus:${VERSION.eventbus}") 
}

Step 5: View the Single Activity Configuration

View the Android Manifest File to see the declaration of our Single Activity, which runs in Single Top mode, meaning it is by default created only once, in a similar  manner to the main window in an SPA.

<activity
        android:name=".app.MainActivity"
        android:exported="true"
        android:launchMode="singleTop"
        android:configChanges="orientation|screenSize">

    <intent-filter>
        <action android:name="android.intent.action.MAIN"/>
        <category android:name="android.intent.category.LAUNCHER"/>
    </intent-filter>
</activity>

Step 6: Understand Configuration Settings

When our app runs it uses the API and OAuth settings from an embedded JSON configuration file at res/raw/mobile_config.json:

{
  "app": {
    "apiBaseUrl":             "https://api.authsamples.com/investments"
  },
  "oauth": {
    "authority":              "https://cognito-idp.eu-west-2.amazonaws.com/eu-west-2_CuhLeqiE9",
    "userInfoEndpoint":       "https://login.authsamples.com/oauth2/userInfo",
    "clientId":               "2vshs4gidsbpnjmsprhh607ege",
    "webBaseUrl":             "https://authsamples.com",
    "loginRedirectPath":      "/apps/basicmobileapp/postlogin.html",
    "postLogoutRedirectPath": "/apps/basicmobileapp/postlogout.html",
    "scope":                  "openid profile email https://api.authsamples.com/investments",
    "deepLinkBaseUrl":        "https://mobile.authsamples.com",
    "customLogoutEndpoint":   "https://login.authsamples.com/logout"
  }
}

Step 7: Configure HTTPS Debugging

We will look at some OAuth messages in the following sections. To view these messages on your own PC you will need a working HTTPS Debugging Setup, or you can just view the below screenshots if you prefer.

Step 8: Understand Login Redirects

By using AppAuth libraries the standard Authorization Code Flow (PKCE) message is sent:

Our AWS Cognito Authorization Server accepts the request and issues an authorization code because the Client ID, Redirect URI and Scopes of the request match those configured in a Cognito OAuth Client:

Step 9: Understand Redirect Response Handling

The result of successful authorization is the following message, and note that this is sent to an internet hosted web page rather than directly to our Android app:

Two interstitial web pages are used with our Android sample, hosted at the following URLs. As discussed in the previous post, these web pages exist to return Claimed HTTPS scheme login responses correctly to our app.

If we do a View Source for one of the above URLs from a desktop browser, we can see that they just forward query parameters from the login response using a deep linking URL:

The Deep Linking HTTPS Scheme for login responses is associated to the app via the below Android manifest entry, which overrides the default AppAuth behaviour of using a Private URI Scheme:

<activity
    android:name="net.openid.appauth.RedirectUriReceiverActivity"
    android:exported="true">

    <intent-filter android:autoVerify="true">
        <action android:name="android.intent.action.VIEW" />
        <category android:name="android.intent.category.DEFAULT"/>
        <category android:name="android.intent.category.BROWSABLE"/>
        <data
            android:scheme="https"
            android:host="mobile.authsamples.com"
            android:path="/basicmobileapp/oauth/callback" />
    </intent-filter>
</activity>

Note that if the interstitial page is left for a couple of minutes before the user clicks Return to the App, the authorization code could time out, leading to a user error. The user can always retry and recover though.

Step 10: Understand Login Completion

Once the authorization code is received by the app, a background Authorization Code Grant message is sent to Cognito’s token endpoint, which return OAuth tokens in the response:

The token data is then stored in Android Shared Preferences, and the operating system ensures that other apps cannot access the tokens.

Step 11: Test Reactivating the App During Login

It is worth performing certain tests while the Chrome Custom Tab window is active, to ensure that the app does not throw exceptions or recreate views unnecessarily:

The first of these is to switch away from the app and then reactivate it from its shortcut:

Technically, when the app is invoked via a shortcut, the launcher action is used, which is a command similar to the following, and it can potentially cause the Single Activity to be Recreated:

adb shell am start -n com.authsamples.basicmobileapp/com.authsamples.basicmobileapp.app.MainActivity -a android.intent.action.MAIN -c android.intent.category.LAUNCHER

Step 12: Test Changing Orientation During Login

Similarly I would recommend changing the screen orientation half way through login and then completing the sign in.

The app’s MainActivity is configured with launchMode=’singleTop’ and  configChanges=’orientation|screenSize’. It is therefore redrawn but not recreated when the orientation changes.

Step 13: Test Restarting the App after Login

Restarting the app after a login will just load OAuth tokens from secure storage. A new login will not be required, in order to improve the app’s user experience.

Step 14: Test Deep Linking

While the app is running we can test deep linking on an emulator via a command such as the following. If required our app performs a login or token renewal before moving to the deep link destination:

adb shell am start -a android.intent.action.VIEW -d https://mobile.authsamples.com/basicmobileapp/deeplink/company/2

Our app uses a special activity to manage Deep Link Forwarding in a controlled manner:

<activity
    android:name=".app.DeepLinkForwardingActivity"
    android:exported="true"
    android:launchMode="singleTask"
    android:noHistory="true">

    <intent-filter android:autoVerify="true">
        <action android:name="android.intent.action.VIEW" />
        <category android:name="android.intent.category.DEFAULT" />
        <category android:name="android.intent.category.BROWSABLE" />
        <data
            android:scheme="https"
            android:host="mobile.authsamples.com"
            android:pathPrefix="/basicmobileapp/deeplink/" />
    </intent-filter>
</activity>

This enables us to ignore any deep linking requests when our activity is not top most, which most commonly means a Chrome Custom Tab is being shown.

Step 15: Test Access Token Expiry

We can use the Expire Access Token and Reload Data buttons to cause an invalid token to be sent to the API, resulting in a 401 response:

After every API call the UI checks for 401 responses, and handles them by getting a new access token. The API request is then retried once with the new token, so that the user session is silently extended. Note that a mobile app is a public client and the refresh token is not protected with a client credential:

Step 16: Test Refresh Token Expiry

We can use Expire Refresh Token followed by Reload Data to simulate the end of a user session, which might occur if a user left the app running overnight:

On the next request for data the attempt to renew the access token will fail, and the result of the refresh token grant message will be an Invalid Grant response:

This will trigger a login redirect, and the user may be prompted to sign in again, but will experience no errors.

Step 17: Test Logout

To implement logout, a Logout Url Receiver Activity was added, to map the HTTPS scheme logout callback path:

<activity
    android:name=".plumbing.oauth.logout.LogoutRedirectUriReceiverActivity"
    android:exported="true">

    <intent-filter android:autoVerify="true">
        <action android:name="android.intent.action.VIEW" />
        <category android:name="android.intent.category.DEFAULT"/>
        <category android:name="android.intent.category.BROWSABLE"/>
        <data
            android:scheme="https"
            android:host="mobile.authsamples.com"
            android:path="/basicmobileapp/oauth/logoutcallback" />
    </intent-filter>

AWS Cognito also uses a vendor specific logout solution and the logout request requires client_id and logout_url parameters:

When logout completes we are returned to the below post logout view within our app. In a real world app you could then test logging in as another user with different settings or permissions.

Step 18: Test Failure Scenarios

Our mobile app runs multiple fragments which could fail concurrently, so we implement the same Error HyperLink Behaviour as for our earlier React SPA. The following examples cause errors that the UI must handle:

Scenario Instructions
UI Error Load data normally, then switch to airplane mode and click reload, to cause a connectivity exception
API Error Long press the Reload button, which then sends a custom HTTP header to the API to rehearse an API 500 exception

Our error display looks as follows after concurrent view failures. The user can click a hyperlink to see details, or press the Home button to retry.

The summary view uses an Android Modal Dialog to display a view with error details, which would help to enable fast problem resolution:

Step 19: Test Back Navigation

In a Single Activity App, the user can use the highlighted button to return to previously loaded fragments. It is worth testing that this behaves correctly for your own apps:

Where Are We?

We have shown how to run this blog’s Android code sample,  and test its technical behaviour. Next we will drill into the infrastructure needed to enable the use of OAuth claimed HTTPS schemes.

Next Steps
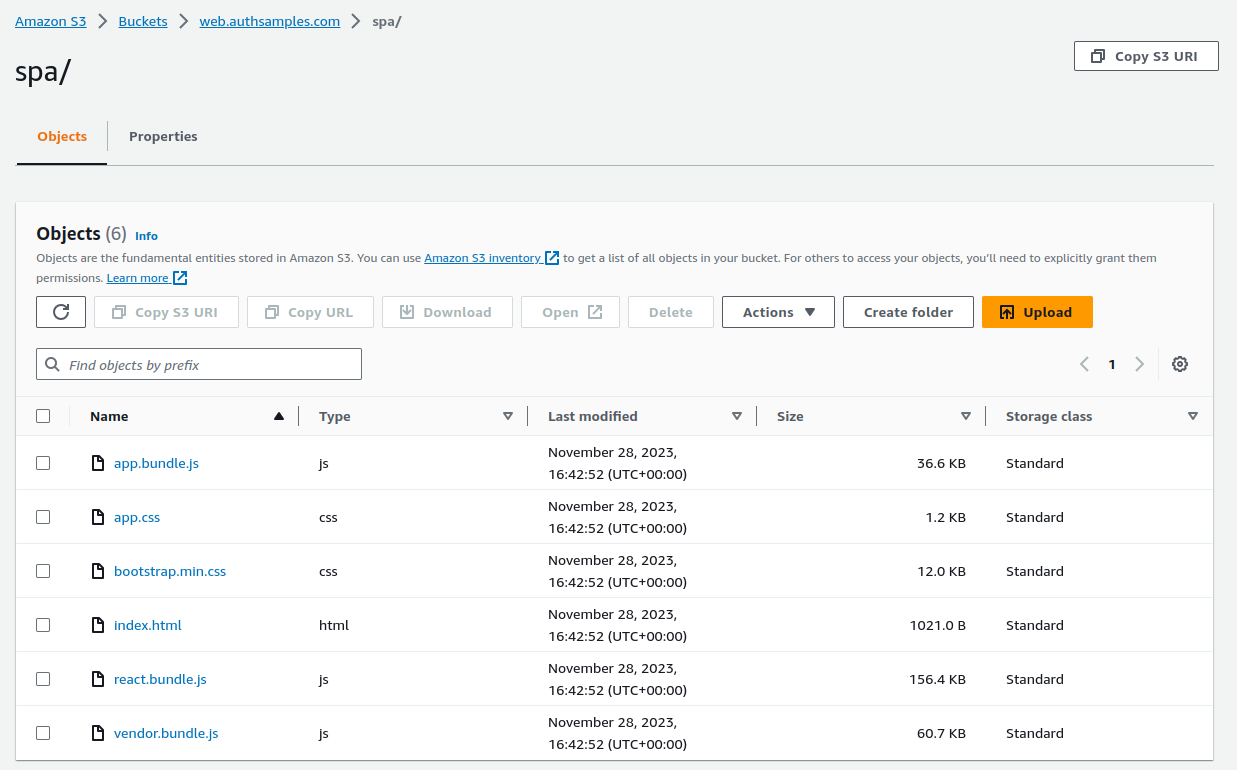
Android Code Sample – Overview

Background

Previously we covered our iOS HTTPS Debugging Setup and next we will describe the behaviour of our main Android code sample, which is a Single Activity App coded in Kotlin.

Features

The following table summarises the main features of the code sample, some of which is tricky to implement:

Feature Description
AppAuth Integration We will implement the essential OpenID Connect behaviour by integrating the standard libraries
Claimed HTTPS Schemes The login result is returned to the app over HTTPS URLs, which is the most secure option according to security guidance
Secure Token Storage Tokens are stored on the device after login, and not accessible by other apps, so that users don’t need to authenticate on every app restart
Deep Linking Our app also supports HTTPS App Links, so that users can bookmark locations within the app

Components

The sample connects to components hosted in AWS, so that readers only need to run the Kotlin code from Android Studio to get a complete solution. By default our mobile app uses AWS Cognito as an authorization server.

Code Download

The code for our mobile app can be downloaded from here, and we will cover full details of how to run it in the next post:

Simple Mobile User Interface

Our Mobile UI will provide the same API Client Journey as earlier Web UIs, with a simple list view as the home page:

There will also be a details view, which exists primarily to demonstrate navigation and deep linking:

Single Activity / View Application

Our mobile UI will have identical functionality to the final React SPA, where the main view is swapped out as the user navigates. This is technically simpler and more efficient than replacing entire activities, and makes the app feel faster for end users.

Modern UI Technology

The Android App will be coded in Kotlin and will use Jetpack Compose for its views. This mobile technology choice will simplify areas such as implementing views, data binding and navigation.

Security Recommendations

There are risks with mobile apps that a malicious third party could install an app that uses our app’s Client ID and Redirect URI, so we will follow high security recommendations, to use Claimed HTTP Schemes:

This prevents a fake app from receiving a login result, since the attacker would not be able to make deep links work for their app.

Logins via the System Browser

AppAuth user logins will be via a Chrome Custom Tab window, which overlays the app’s mobile views and acts as a Secure Sandbox, so that the app itself never has access to the user’s credentials.

AppAuth Android libraries deal with selecting the window for us at runtime. The result is that cookies and passwords can often be shared between web apps and mobile apps, to improve usability:

  • Single sign on can work across multiple web / mobile apps
  • Passwords can be remembered and used for multiple apps

Logins via Android Web Views are Problematic

The following problems exist if you perform login redirects on a normal mobile web view. This is because the result is a Browser Session Private to the App:

Problem Area Description
Password Autofill This feature will generally work less reliably in a web view, resulting in a poor login experience
Single Sign On Cookies will not be shared with other apps and are likely to be dropped more aggressively within your own app
Could be Blocked Google is an example of an identity provider that blocks logins on a mobile web view

Our Sample’s Login Usability Features

Using Chrome Custom Tabs will provide the best chance of password autofill working, so that the user does not need to continually remember their password:

After login we will store the OAuth Refresh Token on the device, using secure operating system storage private to our app. This ensures that, on subsequent application restarts, the first thing the user sees is the app:

Secured Device Prerequisite

We need to ensure that the above usability features cannot be abused if the mobile device is stolen, so we require the device to have a Secured Lock Screen, and the user will see the below screen if this is not the case:

The user must then set a minimum security level of Pattern, PIN or Password and the app will then resume normally:

Password Autofill Details

On the initial login the user will need to type in their email and password. By default the Chrome Custom Tab will immediately disappear after login and the user will be unable to use Chrome’s Save Password feature.

We will resolve this problem by presenting a Post Login Page after authentication but before the browser window is closed. Some authorization servers have built-in support for rendering this type of basic ‘user acknowledgement‘ screen.

Reliable Login Cancellation

Logins can be cancelled by closing the Chrome Custom Tab instead of successfully completing a login. We will handle this reliably and allow the user to retry:

Reliable Session Management

Our app has buttons to enable Simulation of Expiry Events, in order to verify that these do not cause any end user problems:

Navigation with Expired Tokens

Our session buttons help to ensure that built in Back Stack Navigation is reliable within  the app as we swap out the main view. This may include logging the user in or renewing an access token before presenting the view.

Logout

The sample also implements Open ID Connect RP-Initiated Logout , to remove the authorization server’s session cookie. As discussed in our Logout Page, in a real-world app a logout capability enables you to test data access for different users with different settings or permissions.

Deep Linking

The app also supports navigation via deep linking, where a user can receive HTTPS App Links in an email, to activate the mobile app at specific locations:

Reliable Input Checking

A deep link could point to an unauthorized or invalid resource, as demonstrated by the last two examples below:

// A deep link to the home page
https://mobile.authsamples.com/basicmobileapp/deeplink

// A deep link to the transactions for company 2
https://mobile.authsamples.com/basicmobileapp/deeplink/company/2

// A deep link to an unauthorized resource
https://mobile.authsamples.com/basicmobileapp/deeplink/company/3

// A deep link to an invalid resource
https://mobile.authsamples.com/basicmobileapp/deeplink/company/abc

In both cases our API will deny access gracefully by returning known error codes to the mobile app, which will then navigate back to the home page, so that the end user is not impacted.

Problems Receiving Redirect Responses

A common issue when first using AppAuth libraries is that the system browser may not return the deep link containing the authorization response to the app, and fall back to processing it as a web request in the browser, typically with a 404 not found error.

This is due to a browser security requirement that there must be a user gesture before a deep link can be processed. Invoking a deep link immediately after a redirect can be unreliable.

Therefore, when websites run on mobile devices, they often present the user with options like these when invoking the app. So when receiving the login response you may also need to present a continue button:

  • Open the app
  • Continue with web

Types of OAuth Redirect

There are three scenarios where we will redirect the user on the Chrome Custom Tab window. Note that the second scenario can be reproduced in our code sample by clicking Expire Refresh Token, then clicking Reload.

Redirect Type Description
Login The user is interactively prompted to login
Single Sign On The user already has a valid session cookie and signs in automatically without a login screen
Logout The user’s session cookie is removed, with no prompt

In each case, there needs to be a screen before invoking the deep link. You may find using the OpenID Connect prompt=login parameter on every login redirect is reliable. In this blog I instead use a custom interstitial page, partly because AWS Cognito does not support the prompt parameter.

This Blog’s Interstitial Web Pages

We will use the following custom AWS Hosted Web Pages that are returned to after  Login / Logout redirects. A real company could present its own branded page here.

Test Cases

Custom Tab Based Logins improve usability, but they also add complexity. Our code sample needs to ensure that, when the login window is top most, the following actions do not cause exceptions:

Test Case Description
Change Orientation The user switches between portrait and landscape
Reactivate App The user switches to another app and then re-runs our app from the home screen via the app’s launcher icon
Deep Link The user selects a deep link message from an email

Where Are We?

We have described the desired functionality, and have described how to overcome some tricky areas. Since the app implements OpenID Connect in a standard way, it could be updated to support many other forms of user authentication, with zero code changes.

Next Steps

iOS HTTPS Debugging Setup

Background

Previously we put in place an initial iOS Setup and ran the AppAuth iOS Code Sample. Next we will focus on viewing HTTPS mobile traffic from simulators and devices on a development computer.

Run the HTTP Proxy on the Host

First configure and run the HTTP proxy on the host computer, as described in our earlier write up on HTTPS Debugging:

We also need to instruct the proxy to decrypt SSL traffic, as covered in our page on SSL Trust Configuration:

Determine the Computer’s IP Address

I use the Charles menu item Help / Local IP Address to find my local computer’s IP address, since I usually run on a WiFi network where the IP address is auto assigned:

Configure iOS Simulator Proxy Settings

With iOS Simulators there are quite a few places where we cannot emulate a real device. One of these is network settings, where the simulator instead always uses the local computer’s network:

An HTTP proxy running on the local computer automatically comes into effect for the app on the simulator, which as long as the proxy is started before the simulator.

Configure iOS Device WiFi Proxy Settings

For a real iOS device we need to first click the specific network under Settings / Wi-Fi. Next select the  Configure Proxy option, then select Manual and enter details similar to the below screenshot:

iOS Device Cellular Proxy Settings

If you ever need to proxy over a cellular network you need to first select Settings / Mobile Data / Mobile Data Options / Mobile Network. Then add an Access Point Name along with its proxy host and port details:

Understand Initial SSL Errors

If we now run the system browser or the AppAuth Sample on the iOS device, there will be an attempt to proxy the traffic over HTTPS, and this will result in SSL Trust errors:

This is because the HTTP Proxy is intercepting SSL requests at runtime and replacing the Root Certification Authority. To fix this we need to configure simulators and devices to trust the HTTP Proxy’s Root Certificate.

Deploy the HTTP Proxy Root Certificate

If you are using the MITM Proxy tool, you can just browse from a mobile browser on the device or simulator to http://mitm.it/. Then download the certificate to the device’s Downloads folder.

Otherwise, there will be an export option similar to that shown below, so use it to save the HTTP Proxy Root Certificate to the local computer.

Rename the file so that it has a .CRT extension. You can then email the certificate to the device. Alternatively you can run an HTTP server to download the file using a mobile browser. The following steps do this using one of this blog’s code samples:

  • git clone https://github.com/gary-archer/oauth.websample1
  • cd oauth.websample1/api
  • cp ~/Desktop/charlesroot.pem ../spa
  • npm install
  • npm start
  • Run the Safari browser on the simulator
  • Get the local computer’s IP address, such as 192.168.42.37
  • Browse to a URL such as http://192.168.42.37/spa/charlesroot.pem

However you deliver the certificate, save it to the Downloads folder. In the following example I received an email and selected Save to Files:

Configure iOS SSL Trust

Next open the Files app and navigate to the certificate. When you tap the file you will then see a prompt that a profile has downloaded:

Under Settings / General / Device Management there will now be a Profile option, and when opened we will see our root certificate:

Select the Install option and follow prompts:

Finally switch to Settings / General / About / Certificate Trust Settings and activate the certificate:

Understand Domain Name Service Lookup

During mobile development it can be useful to also run a local API, with a real world API URL such as https://api.mycompany.com/api. To support this I add a local DNS entry on my local computer:

On iOS the DNS settings from the host computer are automatically used by simulators so DNS resolution succeeds, whether or not the proxy tool is running.

OAuth and API HTTPS Traffic is Now Viewable

On all simulators and devices we can now view OAuth and API HTTPS messages, which can be a big help when we need to troubleshoot.

Where Are We?

We have now completed our iOS HTTP debugging setup, and will now move on to describe this blog’s fully functional OAuth mobile samples.

Next Steps
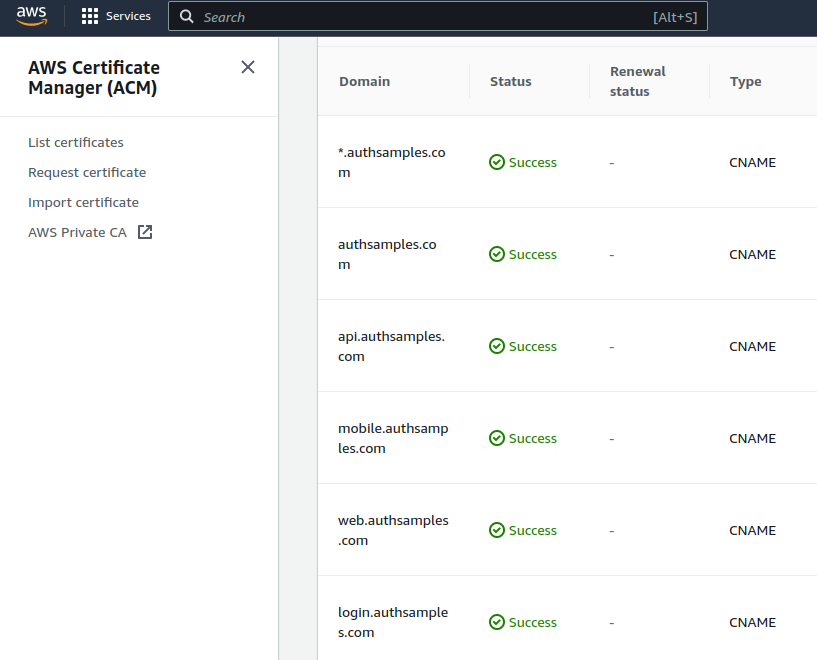
iOS Setup and AppAuth Sample

Background

Previously we completed our Android HTTP Debugging Setup. Next we will get a basic iOS OAuth Setup working, via the AppAuth iOS Code Sample.

Step 1: Sign up with Apple

I signed up for a Personal Apple Account so that I could get development tools and run mobile apps on real iOS devices:

Step 2: Install Xcode

I next downloaded and installed the latest Xcode development tool, with support for the most recent iOS operating systems and the latest Swift programming language.

Step 3: Get the AppAuth iOS Sample

Download the code sample via the following command:

  • git clone https://github.com/openid/AppAuth-iOS

From Xcode’s home screen, select File / Open and navigate to the AppAuth-iOS/Examples/Example-iOS_Swift-Carthage folder:

Step 4: Add the AppAuth Dependency

By default the code sample uses the Carthage dependency tool, which is problematic with more recent Xcode versions. Therefore I start with some cleanup, by removing the following items:

  • The Example_Extension folder
  • The AppAuth entries under Frameworks
  • The Carthage section under Build Phases

The project should then look like this:

I then add AppAuth using the Swift dependency manager, from the above screen, by typing in the URL to the AppAuth repo. When prompted I select the package product named AppAuth:

Step 5: Understand Mobile OAuth Client Settings

In this post we will point the AppAuth code sample to a client that I registered in this blog’s AWS Cognito authorization server:

The AppAuth settings are summarised below:

Field Value
Client Id 53osemtot8tp3n3qct5r2hijk3
Redirect URI net.openid.appauthdemo:/oauth2redirect
Scope openid email profile
Issuer URI https://cognito-idp.eu-west-2.amazonaws.com/eu-west-2_CuhLeqiE9

Step 6: Update OAuth Client Settings

Before running the app,  we need to make the edits from the Example README, so first change the AppAuthExampleViewController.swift source file and edit the below settings to match those in the above table:

let kIssuer: String = "https://cognito-idp.eu-west-2.amazonaws.com/eu-west-2_CuhLeqiE9";
let kClientID: String? = "53osemtot8tp3n3qct5r2hijk3";
let kRedirectURI: String = "net.openid.appauthdemo:/oauth2redirect";

We will also need to register the Redirect URI Scheme in the mobile app’s Info.plist file:

Note also the contents of the OAuth scopes array. For some providers you will need to add the offline_access scope in order to get a refresh token, though Cognito does not require this.

let request = OIDAuthorizationRequest(configuration: configuration,
                                      clientId: clientID,
                                      clientSecret: clientSecret,
                                      scopes: [OIDScopeOpenID, OIDScopeProfile],
                                      redirectURL: redirectURI,
                                      responseType: OIDResponseTypeCode,
                                      additionalParameters: nil)

Step 7: Run the Sample App on an Emulator

We can run the app using Xcode’s build and run option in the top left of the IDE. I always first select the latest emulator version:

This renders the following simple view. You can click Auto to run an entire OpenID Connect authorization redirect. Alternatively, do it in two stages, by using Manual, where step 1(A) is the front channel redirect, and step 1(B) is the back channel operation to swap the authorization code for tokens:

Next an ASWebAuthenticationSession window is shown, which first involves informing the user which app they are logging into:

You can then sign in to the app using this blog’s cloud test credential:

  • User: guestuser@mycompany.com
  • Password: GuestPassword1

The login is done using the system browser, which overlays the mobile view and prevents the sample app from having direct access to the password:

After login, control returns to the mobile app, which has an ID token, an access token and a refresh token. You can then test a couple of simple OAuth operations, including refreshing the access token:

Where Are We?

We have gained an initial understanding of how to run an OAuth Secured Mobile App from Xcode. Shortly we will dsescribe this blog’s iOS code sample, which demonstrates much more complete behaviour.

Next Steps
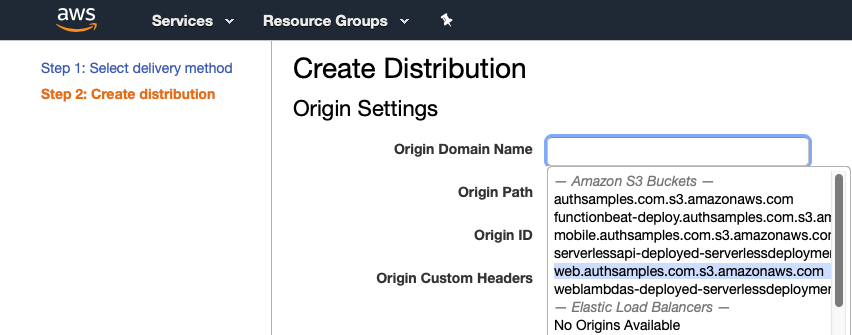
Android HTTPS Debugging Setup

Background

Previously we enabled an initial Android Setup and ran the AppAuth Android Code Sample. Next we will focus on viewing HTTPS mobile traffic from emulators and devices on a development computer.

Run the HTTP Proxy on the Host

First configure and run the HTTP proxy on the host computer, as described in our earlier write up on HTTPS Debugging:

We also need to instruct the proxy to decrypt SSL traffic, as covered in our page on SSL Trust Configuration:

Determine the Computer’s IP Address

This value will vary depending on whether you are using an emulator or a device connected via USB. With Android emulator networking, the host computer’s IP address is always the special value 10.0.2.2.

For a real device I use the Charles menu item Help / Local IP Address to find my Macbook’s IP address, since I usually run on a WiFi network where the IP address is auto assigned:

Configure Android WiFi Proxy Settings

When running on a WiFi network, select Settings / Network & Internet / Wi-Fi, then choose the specific network connection and click the pencil icon to edit it, then provide proxy details:

Force Use of WiFi Network

The Android emulator may alternate connectivity between WiFi and Cellular. This can cause confusion when getting an HTTP Proxy working, so I usually disable Mobile Data so that only WiFi is used:

Android Cellular Proxy Settings

If you do need to proxy over a cellular network you need to select Settings / Network & Internet / Mobile Network, then choose Advanced / Access Point Names and add a new entry:

The details for the new entry can then be added in the below screen. Be sure to click the menu in the top right and select the Save item to avoid losing edited details.

Understand Initial SSL Errors

If we now run the system browser or the AppAuth Sample on the Android device, there will be an attempt to proxy the traffic over SSL, and this will result in SSL Trust errors:

This is because the HTTP Proxy is intercepting SSL requests at runtime and replacing the Root Certification Authority. To fix this we need to configure emulators and devices to trust the HTTP Proxy’s Root Certificate.

Deploy the HTTP Proxy Root Certificate

If you are using the MITM Proxy tool, you can just browse from a mobile browser on the device or emulator to http://mitm.it/. Then download the certificate to the device’s Downloads folder.

Otherwise, there will be an export option similar to that shown below, so use it to save the HTTP Proxy Root Certificate to the local computer.

Rename the file so that it has a .CRT extension. If using an emulator, you can drag the root certificate into the Downloads folder:

Alternatively you can email the certificate to the device, or run an HTTP server to download the file using a mobile browser. The following steps do this using one of the blog’s code samples:

  • git clone https://github.com/gary-archer/oauth.websample1
  • cd oauth.websample1/api
  • cp ~/Desktop/charlesroot.pem ../spa
  • npm install
  • npm start
  • Run the Safari browser on the simulator
  • Get the local computer’s IP address, such as 192.168.42.37
  • Browse to a URL such as http://192.168.42.37/spa/charlesroot.pem

Configure Android SSL Trust

Next, navigate to Settings / Security / Encryption & Credentials / Install a Certificate / CA Certificate, then select the below Install Anyway option:

Next navigate to the downloads folder and select the certificate. You may be prompted to set a PIN to secure the device, You will then see the certificate under Settings / Security / Encryption & Credentials / User Credentials:

Configure SSL Trust for Mobile Apps

After these changes, the Chrome Browser will trust the Charles Root, but Mobile Apps will not and we will continue to get a trust error. This is due to Trusted Certificate Behaviour in Android 7.0+.

To overcome this we need to edit the Android manifest to reference an additional network_security_config.xml file, which will only be active in debug mode by default.This indicates that the app will trust all User Certificates installed on the device or emulator:

<?xml version="1.0" encoding="utf-8"?>
<network-security-config>
    <debug-overrides>
        <trust-anchors>
            <certificates src="user" />
        </trust-anchors>
    </debug-overrides>
</network-security-config>

Understand Domain Name Service Lookup

During mobile development it can be useful to also run a local API, with a real world API URL such as https://api.mycompany.com/api. To support this I add a local DNS entry on my local computer:

By default, devices and emulators will not be able to connect to this domain. If an HTTP proxy is used however, requests to api.mycompany.com occur on the host computer, so DNS resolution succeeds.

OAuth and API HTTPS Traffic is Now Viewable

On all simulators and devices we can now view OAuth and API HTTPS messages, which can be a big help when we need to troubleshoot.

Where Are We?

We have now completed our Android HTTP debugging setup and next we will enable the equivalent behaviour on iOS.

Next Steps
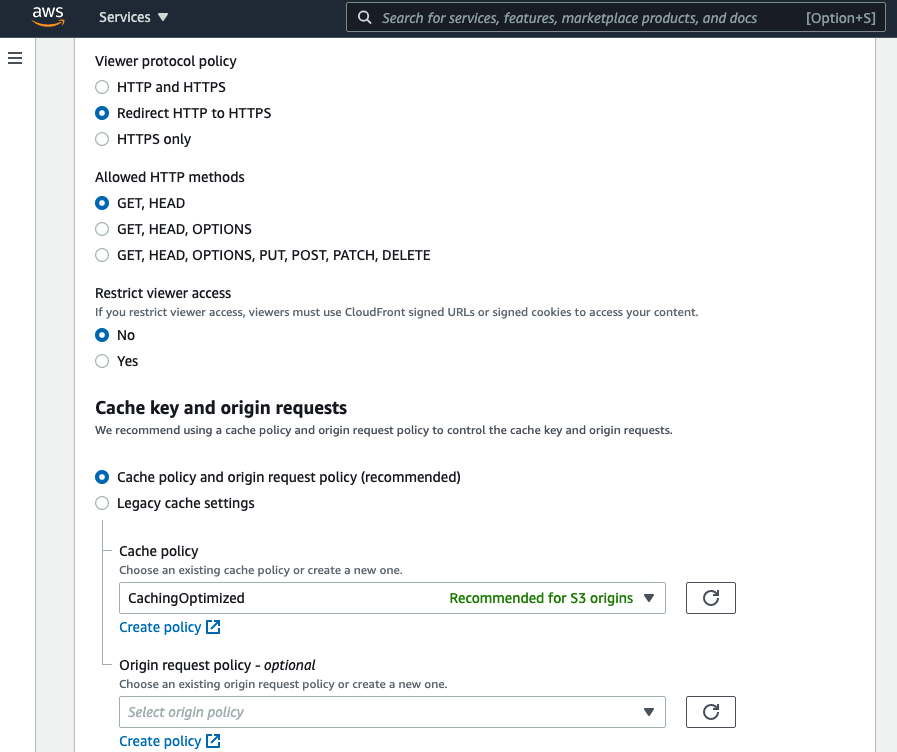
  • Next we will start our iOS Setup and run the AppAuth Code Sample
  • For a list of all blog posts see the Index Page
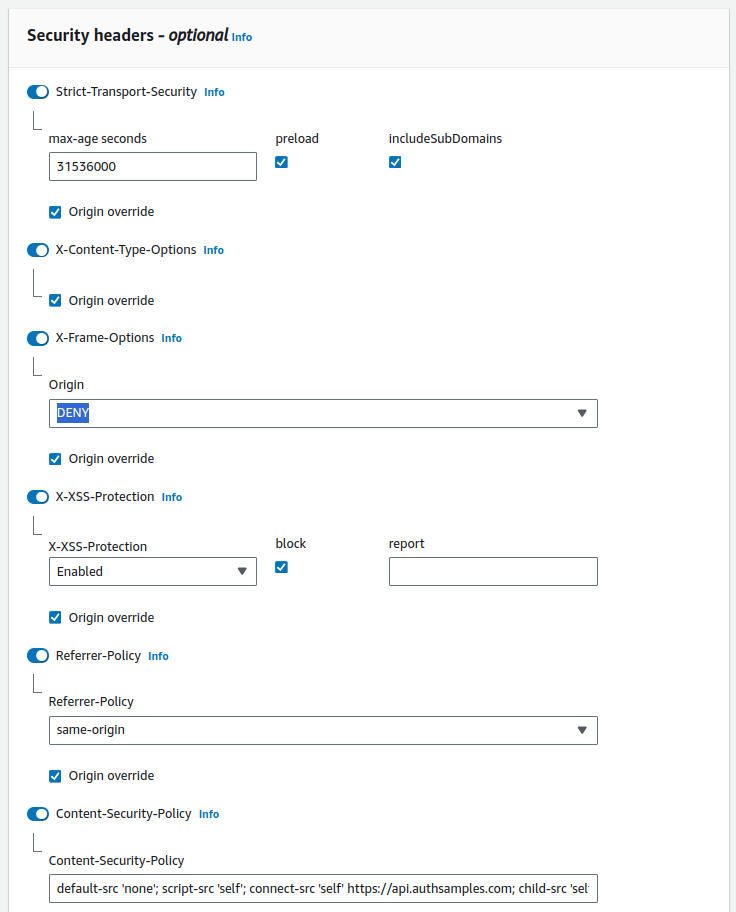
Android Setup and AppAuth Sample

Background

Previously we discussed coding key points for the final desktop code sample. Next we will get a basic Android OAuth Setup working, via the AppAuth Android Code Sample.

Step 1: Install Android Studio

First I downloaded and installed an up to date version of Android Studio, which installs the Android SDK to a location such as ~/Android/sdk. Also update the PATH environment variable to enable use of Android tools from the command line:

export PATH="$HOME/Android/Sdk/tools:$HOME/Android/Sdk/platform-tools"

Step 2: Get the AppAuth Android Sample

Download the code sample via the following command. From Android Studio’s home screen select Open and navigate to the downloaded folder:

  • git clone https://github.com/openid/AppAuth-Android

Ignore prompts to update the Gradle Plugin and wait a couple of minutes for dependencies to download. You will then see two projects, for the library and the app:

Step 3: Understand Mobile OAuth Client Settings

In this post we will point the AppAuth code sample to a client that I registered in this blog’s AWS Cognito authorization server:

The AppAuth settings are summarised below:

Field Value
Client Id 53osemtot8tp3n3qct5r2hijk3
Redirect URI net.openid.appauthdemo:/oauth2redirect
Scope openid email profile
Discovery URI https://cognito-idp.eu-west-2.amazonaws.com/eu-west-2_CuhLeqiE9/.well-known/openid-configuration

Step 4: Update OAuth Application Configuration

Navigate to app/res/raw/auth_config.json and update the settings, pasting in the Client ID and Discovery URI:

{
  "client_id": "53osemtot8tp3n3qct5r2hijk3",
  "redirect_uri": "net.openid.appauthdemo:/oauth2redirect",
  "end_session_redirect_uri": "net.openid.appauthdemo:/oauth2redirect",
  "authorization_scope": "openid email profile",
  "discovery_uri": "https://cognito-idp.eu-west-2.amazonaws.com/eu-west-2_CuhLeqiE9/.well-known/openid-configuration",
  "authorization_endpoint_uri": "",
  "token_endpoint_uri": "",
  "registration_endpoint_uri": "",
  "user_info_endpoint_uri": "",
  "https_required": true
}

Note that login redirects are configured to use a Private URI Scheme, and the value used is configured in the app’s build.gradle file::

Step 5. Run the Sample App on an Emulator

From Android Studio. navigate to Device Manager, then create an emulator if required. The emulator must have the Play Store icon enabled, so that Google Chrome is installed:

Run the app using the emulator, which will result in this display:

When prompted you can login with this blog’s cloud test credential:

  • User: guestuser@mycompany.com
  • Password: GuestPassword1

During login the system browser is invoked as a Chrome Custom Tab, which renders the AWS Cognito login screen:

After login you will be returned to the app, which displays information about tokens. You can also send the access token to Cognito’s User Info endpoint, to get name details for the test user account:

To get the refresh token on some authorization servers, an additional scope called offline_access may need to be specified in both the OAuth Client registration and the app’s JSON configuration.

Where Are We?

We have gained an initial understanding of how to run an OAuth Secured Mobile App from Android Studio. Shortly we will run this blog’s Android code sample, which demonstrates much more complete behaviour.

Next Steps