Background
Previously we drilled into use of Modern JavaScript Technology for front end focused development. Next we will show how developers can visualize OAuth request and response messages.
Goal: Developer Productivity
We will run an HTTP Proxy on a development computer, to enable productive troubleshooting. For OAuth secured apps these messages are often a side effect of our code, often issued by a security library that we use.
Using Browser Tools
For some HTTP requests, the browser network trace works well, to capture messages from this blog’s initial example SPA, or general websites:
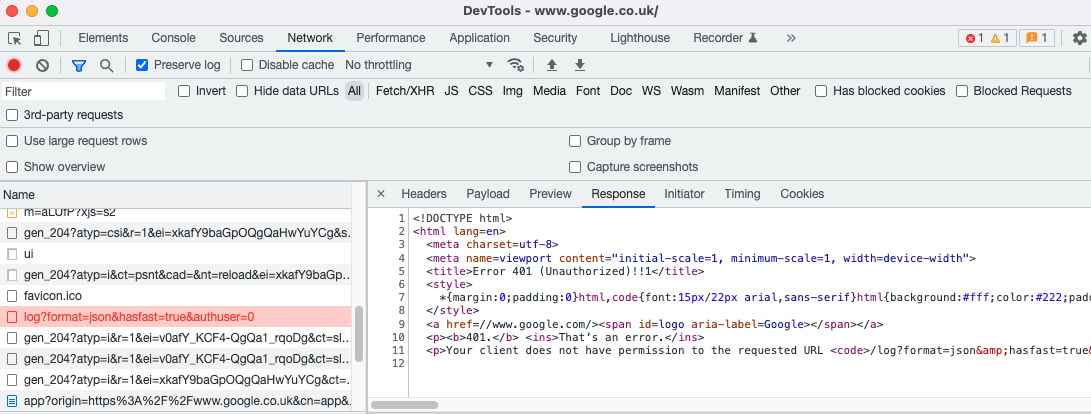
Browser tools are often a suboptimal choice for capturing OAuth traffic. They do not include requests from non-browser components and may also be limited to a single browser tab. During navigation and window changes, such as when a popup or iframe is dismissed, traffic is sometimes lost.
Open Source HTTP Proxy Tools
A more powerful option during development is to use an HTTP proxy tool. In this post we will show how to get started with the open source and cross platform MITM Proxy tool.
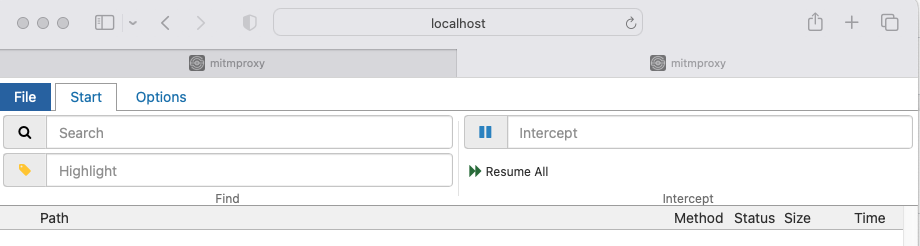
Follow the installation guide, to use the package manager for your operating system, on either Linux, Windows or macOS. You can then run the proxy, and specify a listen port and a web port.
sudo mitmweb -p 8888 --web-port 8889 --ssl-insecureI also use the –ssl-insecure option when upstream components use my own OpenSSL generated certificates. Once the proxy is running you can browse to the web interface at http://127.0.0.1:8889, which will render traffic from both browser and non-browser components:
Next, configure the operating system to use an HTTP proxy, with host=127.0.0.1 and port=8888. Screenshots on how to do on Windows, macOS and Linux are provided a little later in this post.
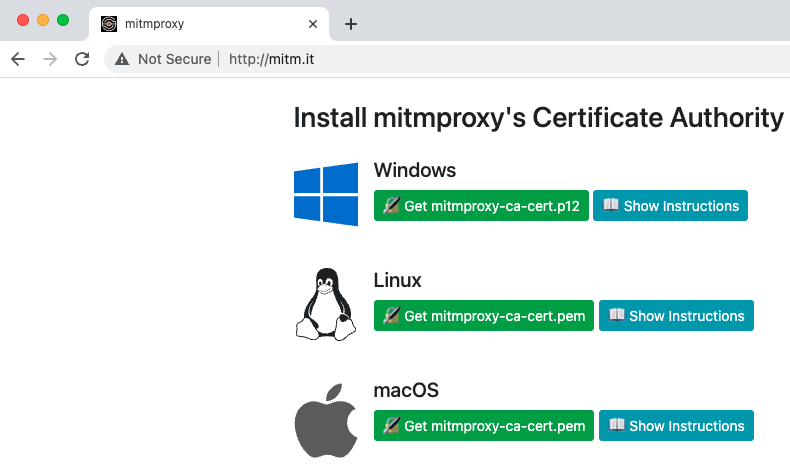
Then browse to http://mitm.it, and follow the instructions so that your browser trusts the HTTP proxy’s root certificate authority. This will enable the browser to capture HTTPS requests, including those sent from this blog’s SPAs to the authorization server:
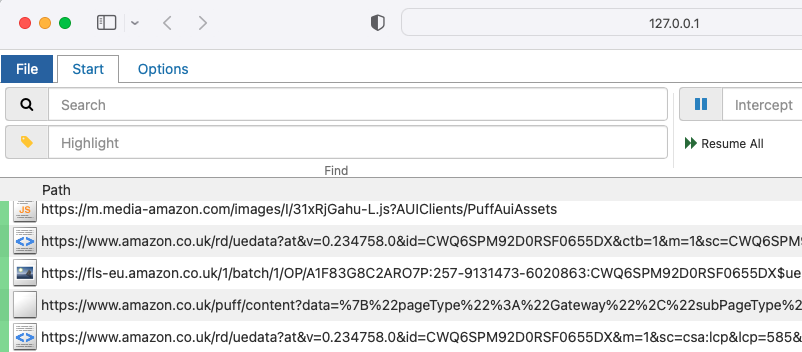
You will then be able to browse to internet sites and capture traffic, to prove that the proxy capturing is working. So far this is not very interesting, since you could also have achieved this with browser tools:
Debug the Initial SPA and API
Next run this blog’s initial SPA and API code sample. First edit the API configuration file and set ‘useProxy=true‘:
{
    "api": {
        "port": 80,
        "trustedOrigins": [
            "http://web.mycompany.com",
            "http://localhost"
        ],
        "useProxy": true,
        "proxyUrl": "http://127.0.0.1:8888"
    },
    "oauth": {
        "jwksEndpoint": "https://cognito-idp.eu-west-2.amazonaws.com/eu-west-2_qqJgVeuTn/.well-known/jwks.json",
        "algorithm": "RS256",
        "issuer": "https://cognito-idp.eu-west-2.amazonaws.com/eu-west-2_qqJgVeuTn",
        "audience": ""
    }
}
Next set this environment variable, which is a quick way to get the sample’s Node.js API to also trust the proxy root certificate. Configuring SSL trust properly is covered in the next post:
export NODE_TLS_REJECT_UNAUTHORIZED=0Run the start.sh script to capture traffic from both the SPA and API. The following request is from the API’s JWT library to the JWKS endpoint of the authorization server, to download the token signing public key:

HTTP Proxying Mechanics
The MITM docs provide a great explanation of how HTTP proxying works. The application’s HTTP client is instructed to route via the proxy, which can chain to an existing HTTP proxy when applicable, such as those often used by corporate networks.
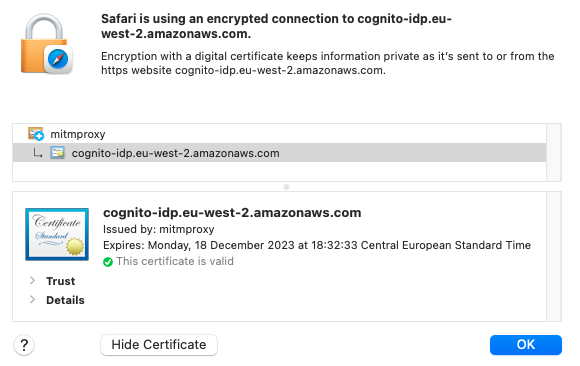
The proxy also performs clever manipulation of HTTPS traffic, which includes re-encrypting outgoing client traffic using the proxy root certificate and key. Consider the following JWKS URL, which uses an Amazon root certificate:
When the HTTP proxy is used, the root authority shown in browsers changes to that of the MITM tool:
Technical Challenges
The tricky part of using an HTTPS proxy is that use of the proxy is configured in different ways across tools and technologies. This page will explain the ways to configure an HTTP proxy for all of these clients:
- Chrome / Safari Browsers
- Microsoft Browser
- Firefox Browser
- Electron Desktop Apps
- Node.js APIs
- .NET APIs
- Java APIs
- Kotlin Android Apps
- Swift iOS Apps
- Command Line Tools
We will also explain differences across the following operating systems:
- Windows
- macOS
- Linux
- Android
- iOS
System Proxy Configuration
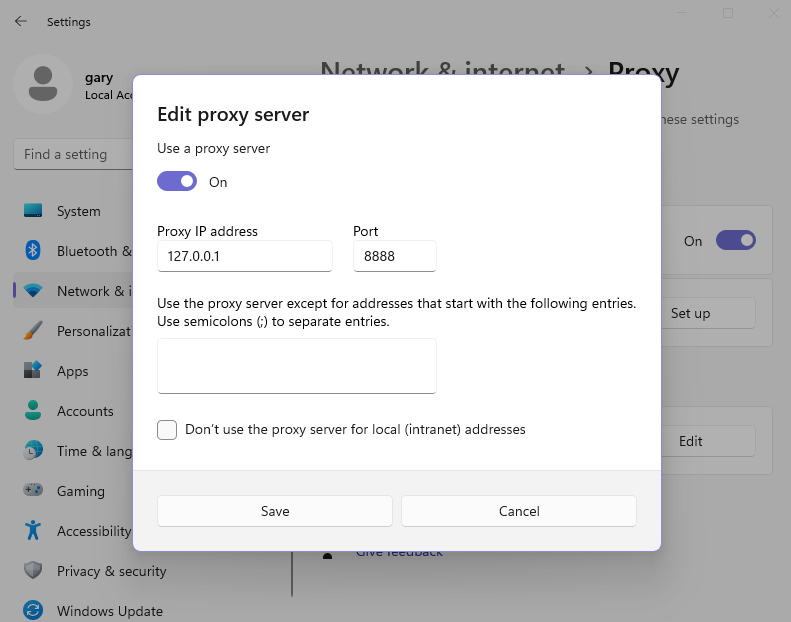
On Windows computers, the system proxy is configured under Settings / Network and Internet / Proxy/ Manual Proxy Setup:
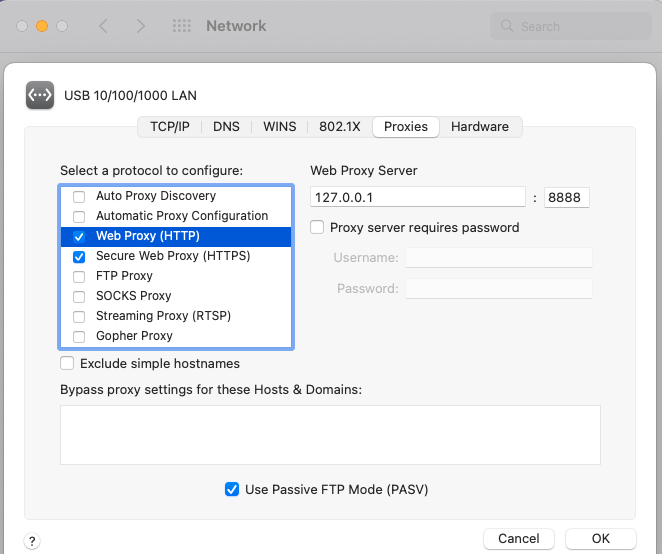
On macOS, the system proxy is available under System Preferences / Network / Advanced / Proxies:
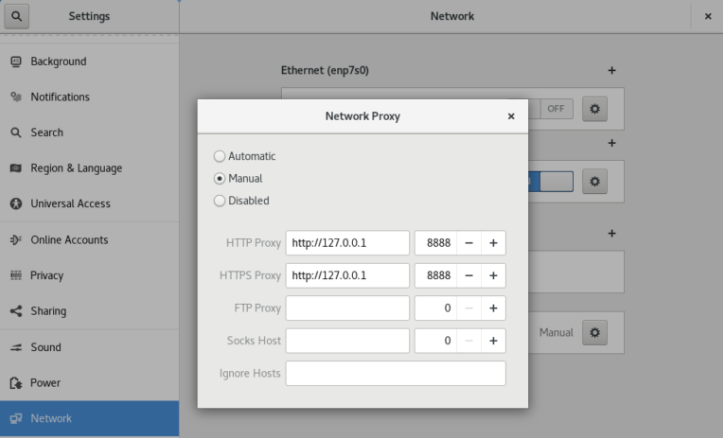
On Linux, run the network tool for the operating system and configure equivalent settings:
Browser Proxy Settings
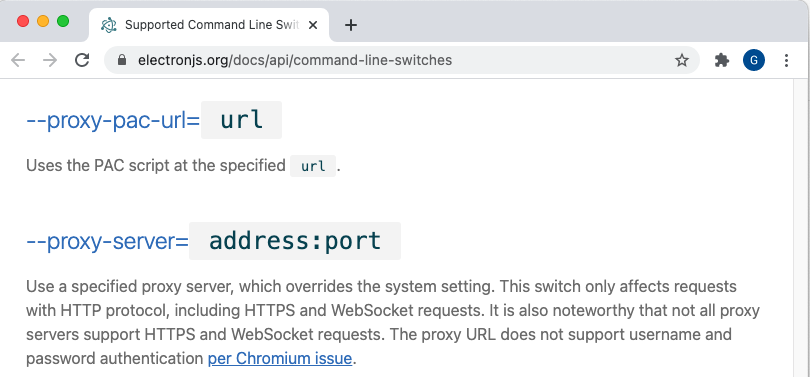
Browsers usually inherit the system proxy settings, though command line overrides may exist, such as Chrome’s –proxy-server option. Firefox does not inherit the system settings, and instead you must set proxy details explicitly, under Options / Network Settings:

Proxy Settings for Node.js APIs
Our Node.js APIs use a small proxy-agent library. HTTP libraries such as axios allow an httpAgent or httpsAgent property to be configured and you use the option that corresponds to the scheme of the target URL. When connecting to HTTPS URLs I assign the value of the agent property from the following utility class:
import HttpsProxyAgent from 'https-proxy-agent';

export class HttpProxy {

    private readonly _agent: any;

    public constructor(useProxy: boolean, proxyUrl: string) {

        if (useProxy) {
            this._agent = HttpsProxyAgent(proxyUrl);
        }
    }

    public get agent(): any {
        return this._agent;
    }
}
Proxy Settings for .NET APIs
In a later post we will provide a sample OAuth Secured .NET API. Outbound calls use a custom HttpClientHandler to support HTTP proxy integration:
public sealed class HttpProxy
{
    private readonly bool isEnabled;
    private readonly string url;

    public HttpProxy(bool enabled, string proxyUrl)
    {
        this.isEnabled = enabled;
        this.url = proxyUrl;
    }

    public HttpClientHandler GetHandler()
    {
        var handler = new HttpClientHandler();
        if (this.isEnabled)
        {
            handler.Proxy = new WebProxy(this.url);
        }

        return handler;
    }
}
The .NET code then wires up the custom handler to the HttpClient class that is used to send OAuth requests:
public async Task<IEnumerable<Claim>> GetUserInfoAsync(string accessToken)
{
    try
    {
        using (var client = new HttpClient(this.httpProxy.GetHandler()))
        {
            client.DefaultRequestHeaders.Accept.Add(new MediaTypeWithQualityHeaderValue("application/json"));
            var request = new HttpRequestMessage(HttpMethod.Get, this.configuration.ClaimsCache.UserInfoEndpoint);
            request.Headers.Authorization = new AuthenticationHeaderValue("Bearer", accessToken);
            var response = await client.SendAsync(request);

            if (!response.IsSuccessStatusCode)
            {
                var status = (int)response.StatusCode;
                var text = await response.Content.ReadAsStringAsync();
                throw ErrorUtils.FromUserInfoError(status, text, this.configuration.ClaimsCache.UserInfoEndpoint);
            }

            return ClaimsReader.UserInfoClaims(json);
        }
    }
    catch (Exception ex)
    {
        throw ErrorUtils.FromUserInfoError(ex, this.configuration.ClaimsCache.UserInfoEndpoint);
    }
}
Proxy Settings for Java APIs
Later we will provide a sample OAuth Secured Java Spring Boot API, and we will activate the proxy by setting standard system properties at startup, based on the API’s configuration settings. For HTTP URLs the properties use an http prefix, and for HTTPS URLs they use an https prefix:
private void configureHttpDebugging(final ApiConfiguration configuration) {

    if (configuration.isUseProxy()) {
        try {

            var url = new URL(configuration.getProxyUrl());
            System.setProperty("https.proxyHost", url.getHost());
            System.setProperty("https.proxyPort", String.valueOf(url.getPort()));

        } catch (MalformedURLException ex) {

            var message = String.format("Unable to parse proxy URL %s", configuration.getProxyUrl());
            throw new IllegalStateException(message, ex);
        }
    }
}
Proxy Settings for Electron Desktop Apps
Later in this blog we will use Electron to develop OAuth Secured Cross Platform Desktop Apps, where there are two code areas:
| Area | Proxy Behaviour |
|---|---|
| Main Process | The main process follows Node.js rules if it needs to make outgoing connections |
| Renderer Process | Uses the Chromium Browser, which by default inherits proxy settings from the system proxy |
It is also possible to override the system proxy settings via Electron Command Line Overrides:
Command Line Tools
I commonly use the curl and openssl tools to make HTTP/S requests, for Windows, macOS and Linux operating systems:
| Tool | Windows | macOS | Linux |
|---|---|---|---|
| Package Manager | Chocolatey | Homebrew | apt |
| Terminal / Shell | Git Bash | Pre-installed | Pre-installed |
| curl | Installed with Git Bash | Pre-installed | Pre-installed |
| OpenSSL | Installed with Git Bash | Pre-installed | Pre-installed |
These command line tools look for one or both of the below environment variables, depending on the scheme of the target URL:
| Environment Variable | Used for |
|---|---|
| http_proxy | Browsing to HTTP URLs |
| https_proxy | Browsing to HTTPS URLs |
Example commands are shown below:
export http_proxy=http://127.0.0.1:8888
export https_proxy=http://127.0.0.1:8888
curl -H "Authorization Bearer XXXX" http://api.mycompany.com/api/companies
openssl s_client -connect api.mycompany.com:443
Proxy Settings for iOS and Android
Use of HTTP proxy tools for mobile apps is a little more detailed, involving quirks of both simulators and devices, and is described in these later posts:
Advanced Features
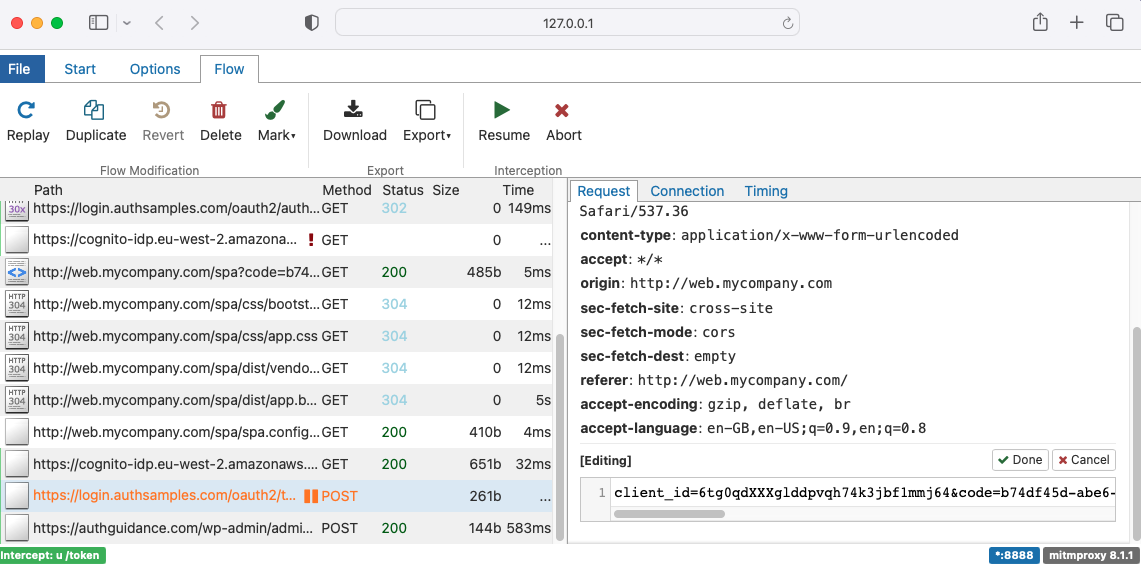
An HTTP proxy tool also enables us to modify OAuth requests and responses in flight, sometimes called ‘setting a breakpoint‘. This is done by typing a filter expression into the intercept window.
In the following screenshot I used the expression ‘~u /token‘, for a request from the SPA to the token endpoint. I then altered the client ID and submitted the request, to simulate an unexpected error condition:
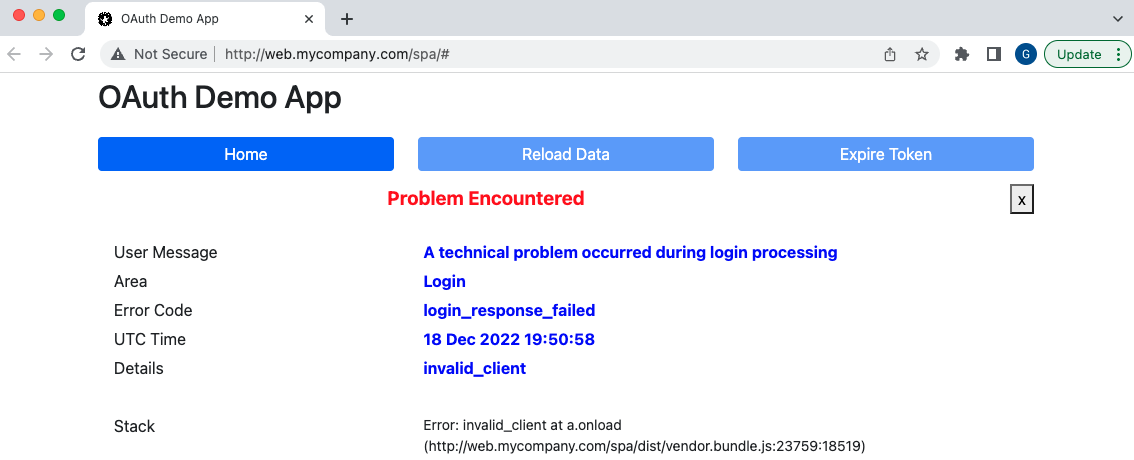
This type of technique can be used to verify that OAuth clients handle error responses, with the returned OAuth error and error_description fields, in a solid way. The sample SPA renders these details as shown here:
Other Proxy Tools
Many other HTTP proxy tools exist. Most screenshots in this blog use my personal paid version of Charles Proxy, and I have also often used the free Fiddler tool on Windows.
Where Are We?
We have used an HTTPS proxy tool to enable capturing of HTTP/S messages from clients, regardless of technology. This provides good troubleshooting options when there are failures during development, and promotes a good understanding of the OAuth standards based messages.
Next Steps
- Next we will drill further into Developer SSL Trust Configuration
- For a list of all blog posts see the Index Page